Difference between revisions of "4 Pycharm IDE programming"
(→Install the pycharm community version) |
|||
| (35 intermediate revisions by the same user not shown) | |||
| Line 1: | Line 1: | ||
| + | [[File:Webduino_gif.gif|thumb|Overview: [[BPI-Bit]]]] | ||
| + | [[File:Micropython3.png|thumb|[[1 Get the development suite]] ]] | ||
| + | [[File:Micropython2.png|thumb|[[2 Wired connection board]] ]] | ||
| + | [[File:Micropython2.png|thumb|[[3 Try burning the board]] ]] | ||
| + | [[File:Micropython2.png|thumb|[[4 Hello, World!]] ]] | ||
| + | [[File:Micropython2.png|thumb|[[5 Light up all kinds of LED]] ]] | ||
| + | |||
| + | |||
| + | [[File:Micropython4.png|thumb|[[1 Auto series one key burn]] ]] | ||
| + | [[File:Micropython2.png|thumb|[[2 ESPBlocks Beginner's only]] ]] | ||
| + | [[File:Micropython2.png|thumb|[[3 Mpfshell details]] ]] | ||
| + | [[File:Micropython2.png|thumb|[[4 Pycharm IDE programming]] ]] | ||
| + | |||
| + | |||
| + | [[File:Micropython5.png|thumb|[[1. Panel scrolling text]] ]] | ||
| + | [[File:Micropython2.png|thumb|[[2. Panel display images]] ]] | ||
| + | [[File:Micropython2.png|thumb|[[3 Bottom IO port control]] ]] | ||
| + | [[File:Micropython2.png|thumb|[[4 Panel key detection]] ]] | ||
| + | [[File:Micropython2.png|thumb|[[5 Gets the board temperature]] ]] | ||
| + | [[File:Micropython2.png|thumb|[[6 Play MIDI music]] ]] | ||
| + | [[File:Micropython2.png|thumb|[[7 Photosensitive gesture]] ]] | ||
| + | [[File:Micropython2.png|thumb|[[8. MPU-9250 9-axis sensor]] ]] | ||
| + | [[File:Micropython2.png|thumb|[[9. Make a compass]] ]] | ||
| + | [[File:Micropython2.png|thumb|[[10 Free to define gestures]] ]] | ||
| + | [[File:Micropython2.png|thumb|[[11 Random number generator]] ]] | ||
| + | [[File:Micropython2.png|thumb|[[12 S2m Scratch2]] ]] | ||
| + | [[File:Micropython2.png|thumb|[[13 Codelab Scratch3]] ]] | ||
| + | |||
| + | [[File:Micropython6.png|thumb|[[1 The basic algorithm]] ]] | ||
| + | [[File:Micropython2.png|thumb|[[2 WiFI wireless connection]] ]] | ||
| + | [[File:Micropython2.png|thumb|[[3 WiFI wireless programming]] ]] | ||
| + | [[File:Micropython2.png|thumb|[[MQTT communication applications]]]] | ||
| + | |||
| + | |||
=Install Python 3.7= | =Install Python 3.7= | ||
| Line 16: | Line 50: | ||
*When the installation is complete, open it. Press the default Settings to enter the following interface. | *When the installation is complete, open it. Press the default Settings to enter the following interface. | ||
::[[File:Python03.png]] | ::[[File:Python03.png]] | ||
| − | |||
=Create a new project= | =Create a new project= | ||
| Line 28: | Line 61: | ||
*Finally, you can see that the project has been established and completed. | *Finally, you can see that the project has been established and completed. | ||
::[[File:Python07.png]] | ::[[File:Python07.png]] | ||
| + | |||
| + | **Refer to the official documentation of [http://www.jetbrains.com/help/pycharm/meet-pycharm.html pycharm] for more methods | ||
| + | |||
| + | =Install the MicroPython plug-in= | ||
| + | |||
| + | *Note: it is now recommended to use the '''intellij-mpfshell-1.1.1.1.zip''' plug-in version instead of the older version | ||
| + | *releases in the [https://github.com/BPI-STEAM/BPI-BIT-MicroPython/releases release] directory [https://github.com/BPI-STEAM/BPI-BIT-MicroPython/releases/download/Tools/intellij-micropython-1.1.0.zip intellij micropython - 1.1.0. Zip] the plugin file, and information about the plug-in in[http://plugins.jetbrains.com/plugin/9777-micropython official introduction] and [https://github.com/vlasovskikh/intellij-micropython official GIT] | ||
| + | *Download good ` intellij micropython - 1.1.0 ` plug-in, where you know, into the JetBrains pycharm Community Edition of File - > Settings - > plugins - > Install plugins from disk | ||
| + | ::[[File:Python08.png]] | ||
| + | ::[[File:Py08.png]] | ||
| + | *Tip: I offer this plugin is a modified version at the bottom of the interface, and haven't access to the official store, so still and the original plugin name, therefore the IDE prompts plug-ins need to upgrade or other repair, will be replaced back to the original, in this case, it is good to ignore, then replace the plug-in names again issued can be directly connected to the Internet in the shop for download. | ||
| + | ::[[File:Py09.png]] | ||
| + | *Latest revision: the latest [https://github.com/BPI-STEAM/BPI-BIT-MicroPython/releases/download/intellij-mpfshell-1.1.1/intellij-mpfshell-1.1.1.zip intellij-mpfshell-1.1.1.1.zip] is now available, which differs from the specified version above in that it cleanness unnecessary information display, the connection is more stable, also applies to esp8266, and plans to launch the store in the future. | ||
| + | |||
| + | =Run a file= | ||
| + | *Once the plug-in is installed, start it in the project. | ||
| + | ::[[File:Py10.png]] | ||
| + | *You can search for MicroPython in Settings to get the above page. | ||
| + | ::[[File:Py11.png]] | ||
| + | *Now start it and click on the Settings in the figure, Enable MicroPython support. | ||
| + | ::[[File:Py12.png]] | ||
| + | *Select ESP8266 (ESP32) to configure the device type, and click Detect to Detect the path (or name) of the board you are connecting to, which is bound to fail because the key dependencies are not yet installed. | ||
| + | ::[[File:Py13.png]] | ||
| + | *When automatic serial port recognition fails, you need to fill in your own serial port name (including path) or other connection parameters, such as: ws:192.168.1.1,1234, which is the same as the open of mpfshell. | ||
| + | ::[[File:Py14.png]] | ||
| + | *Now that you have set the connection parameters for the board, you can right click on a new python file from untitled and be sure to create a file to trigger the installation dependency the first time you use it, before using the auto-identification serial port and other Tools (Tools in the menu item). | ||
| + | ::[[File:Py15.png]] | ||
| + | *In the right code edit box, say print(helloworld!) | ||
| + | ::[[File:Py16.png]] | ||
| + | *The first time you use it, you'll be prompted to Install the dependencies, so click Install requirements in the message to download the installation automatically in the background | ||
| + | ::[[File:Py17.png]] | ||
| + | *Just wait a moment | ||
| + | ::[[File:Py18.png]] | ||
| + | *You will be prompted when the installation is complete. | ||
| + | ::[[File:Py19.png]] | ||
| + | *Now we can Run the main.py file. Select Run 'Flash main.py' from the right-click menu anywhere in the edit box to automatically generate the Run file configuration and Run it on the board | ||
| + | ::[[File:Py20.png]] | ||
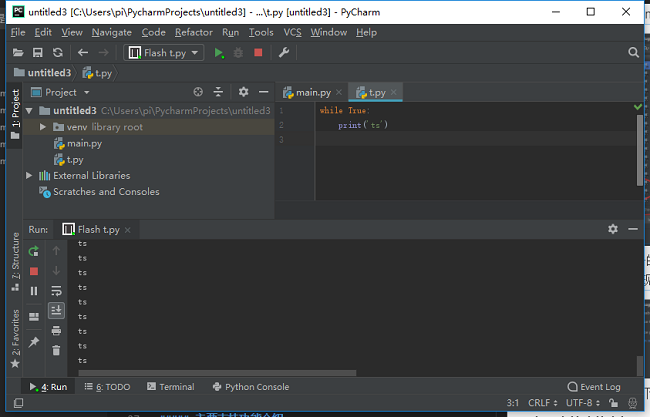
| + | *You can see the results below | ||
| + | ::[[File:Py21.png]] | ||
| + | |||
| + | =Use the Mpfshell directly= | ||
| + | |||
| + | REPL and Mpfshell shortcuts are available in tools-> MicroPython. | ||
| + | ::[[File:Py22.png]] | ||
| + | |||
| + | =Functional specification= | ||
| + | ==1. Understanding intellij-micropython plug-ins== | ||
| + | *This plug-in version is different from the official version. It is based on my mpfshell. That is to say, you only need to know what functions the original mpfshell has. | ||
| + | *Note from the past: the future will be independent or merged back into the official version, so please do not use the store version at this stage. | ||
| + | *Note: the intellij-mpfshell has been updated synchronously. This version will continue my update. | ||
| + | |||
| + | ==2. Manually configure the files you want to run== | ||
| + | *Tip: now that the underlying machine has been automatically reconnected, it automatically fixes and reexecutes if something goes wrong, so running the code will not fail in most cases. | ||
| + | The following information may be outdated and is for reference only. | ||
| + | *Previous tips: the current operation can only be retried if it fails, which may happen occasionally, especially in the main.py function. Since the main. | ||
| + | *Prepare a project and add a file as shown. | ||
| + | ::[[File:Py23.png]] | ||
| + | *First configure the current file, as shown in the figure | ||
| + | ::[[File:Py24.png]] | ||
| + | *Just set the Name and Path | ||
| + | ::[[File:Py25.png]] | ||
| + | *Select the configured device, and then click the green triangle to run. The red square indicates that it has stopped running. If it fails, just retry | ||
| + | ::[[File:Py26.png]] | ||
| + | *The results | ||
| + | ::[[File:Py27.png]] | ||
| + | *The common failures are shown below, just like the mpfshell, because the underlying layer is the same. | ||
| + | ::[[File:Py28.png]] | ||
Latest revision as of 02:37, 21 February 2019
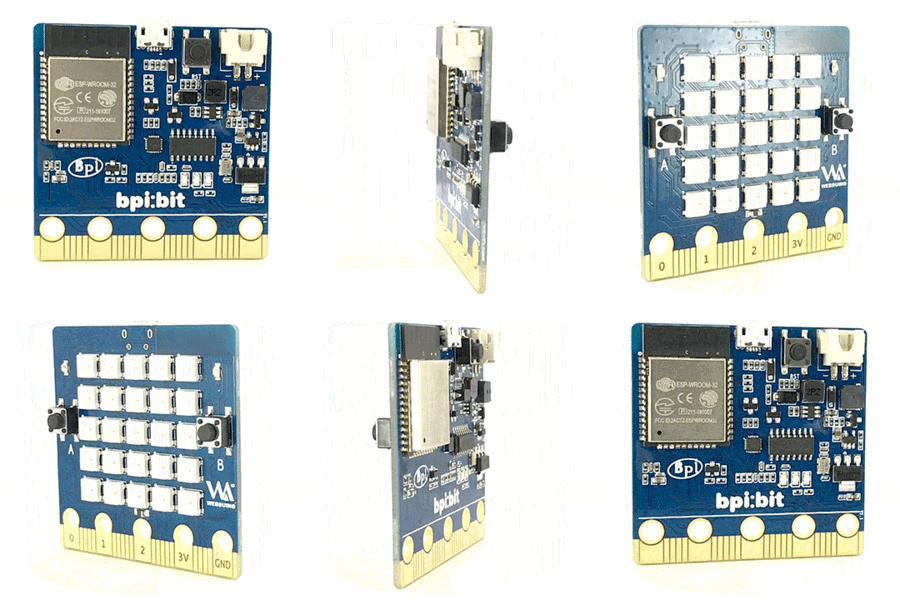
Overview: BPI-Bit
Contents
Install Python 3.7
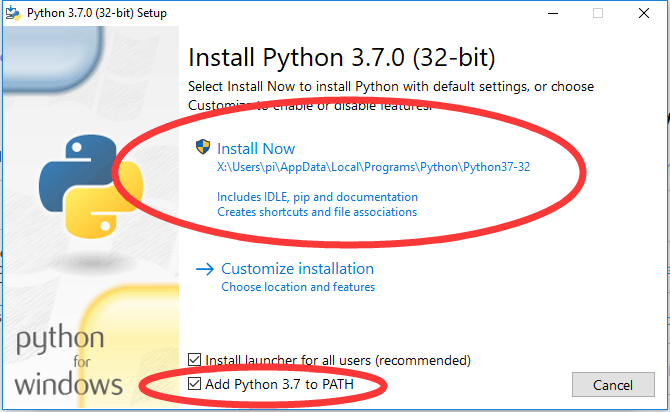
- get Python, the latest version is (3.7, 11/08/2018)
- use Windows click here to download
- setup interface is as follows!
- the system already has Python.
Install the pycharm community version
- Get pycharm
- Using the Windows system click here to download the 2018 - version 2.3 (community free of charge)
- Tip: 2018.3.3 change is too big, do not use, wait for me to compile repair. (2019/01/13)
- Important note 1: program installation and project under Windows must be under the system disk (path should be consistent)
- Important clew 2, Linux system if there is a serial connection, please kindly check whether the serial port for the average user permissions, if not sure, please check this instruction ` usermod - a - G dialout Username && sudo reboot `, Username is to point to your user name, not a Username.
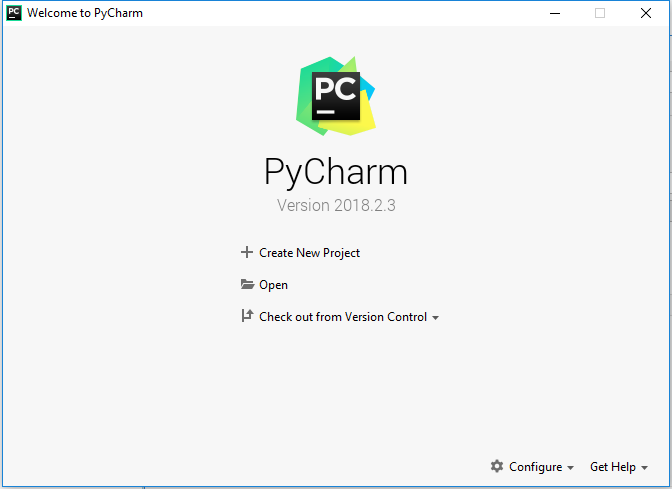
- When the installation is complete, open it. Press the default Settings to enter the following interface.
Create a new project
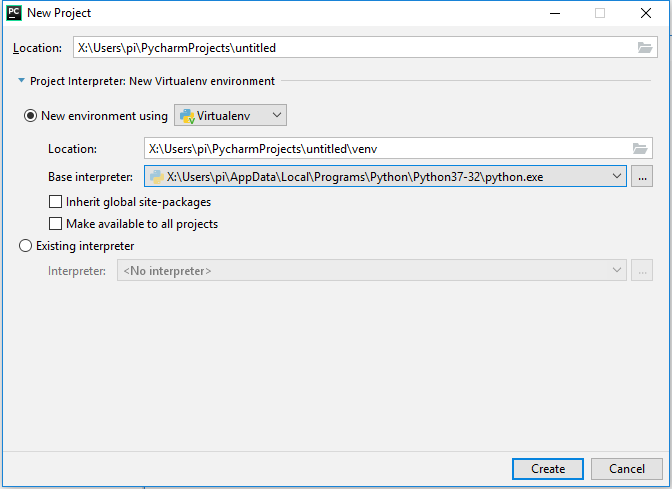
- Click Create New Project to bring up the following interface.
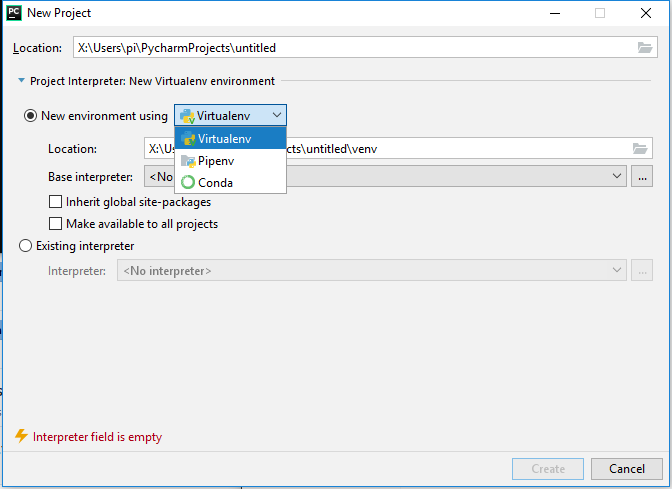
- If you do not have Python installed, here is the interface
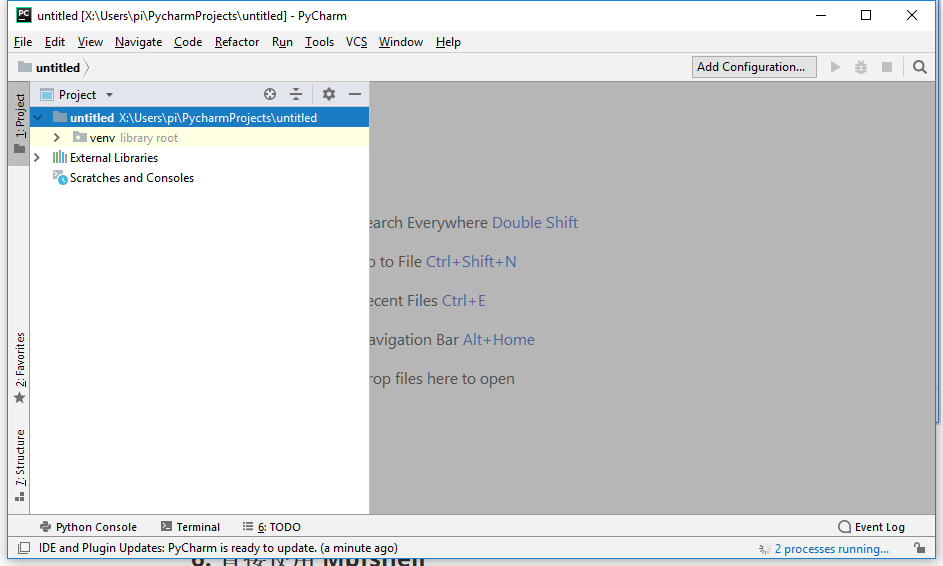
- Finally, you can see that the project has been established and completed.
- Refer to the official documentation of pycharm for more methods
Install the MicroPython plug-in
- Note: it is now recommended to use the intellij-mpfshell-1.1.1.1.zip plug-in version instead of the older version
- releases in the release directory intellij micropython - 1.1.0. Zip the plugin file, and information about the plug-in inofficial introduction and official GIT
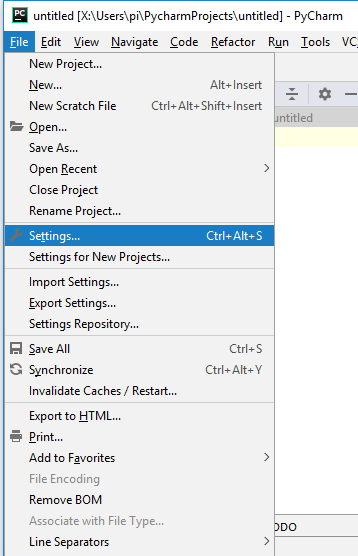
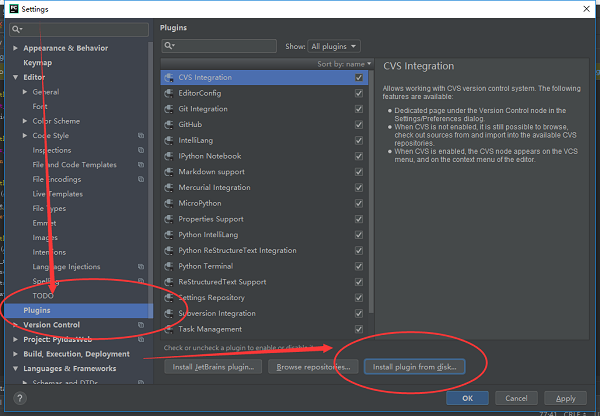
- Download good ` intellij micropython - 1.1.0 ` plug-in, where you know, into the JetBrains pycharm Community Edition of File - > Settings - > plugins - > Install plugins from disk
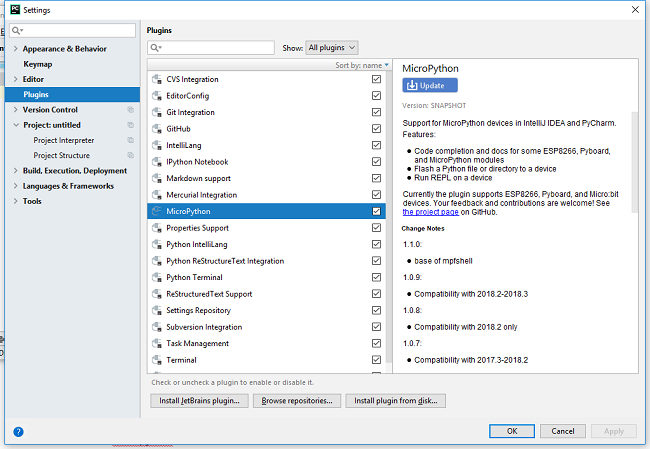
- Tip: I offer this plugin is a modified version at the bottom of the interface, and haven't access to the official store, so still and the original plugin name, therefore the IDE prompts plug-ins need to upgrade or other repair, will be replaced back to the original, in this case, it is good to ignore, then replace the plug-in names again issued can be directly connected to the Internet in the shop for download.
- Latest revision: the latest intellij-mpfshell-1.1.1.1.zip is now available, which differs from the specified version above in that it cleanness unnecessary information display, the connection is more stable, also applies to esp8266, and plans to launch the store in the future.
Run a file
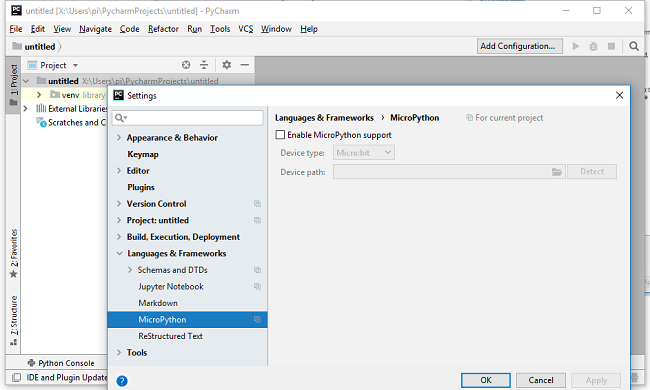
- Once the plug-in is installed, start it in the project.
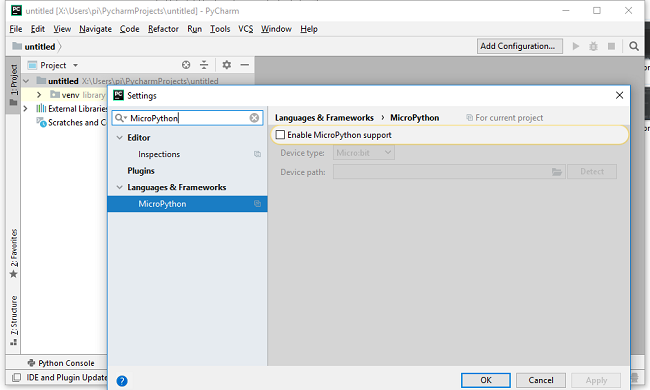
- You can search for MicroPython in Settings to get the above page.
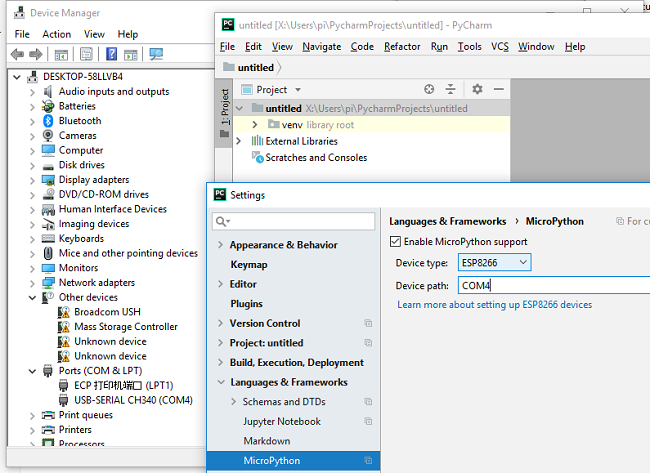
- Now start it and click on the Settings in the figure, Enable MicroPython support.
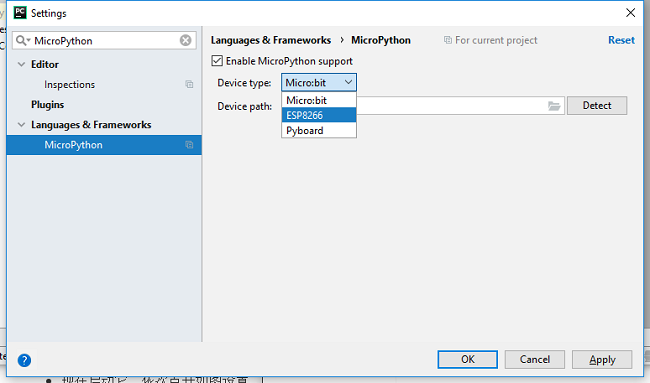
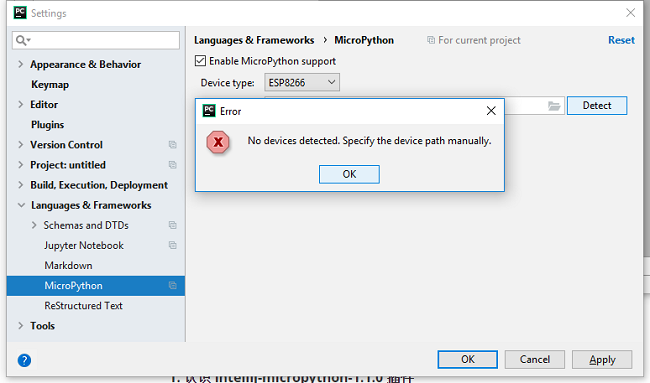
- Select ESP8266 (ESP32) to configure the device type, and click Detect to Detect the path (or name) of the board you are connecting to, which is bound to fail because the key dependencies are not yet installed.
- When automatic serial port recognition fails, you need to fill in your own serial port name (including path) or other connection parameters, such as: ws:192.168.1.1,1234, which is the same as the open of mpfshell.
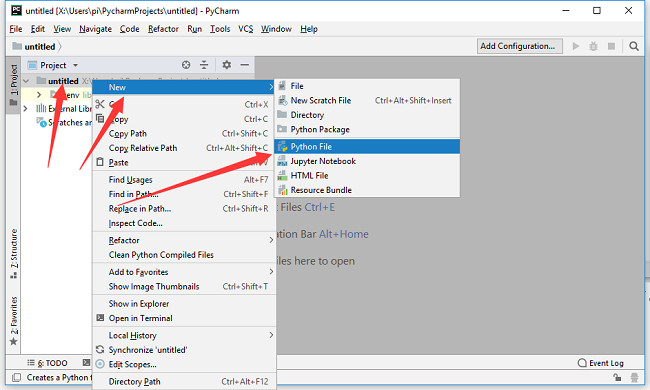
- Now that you have set the connection parameters for the board, you can right click on a new python file from untitled and be sure to create a file to trigger the installation dependency the first time you use it, before using the auto-identification serial port and other Tools (Tools in the menu item).
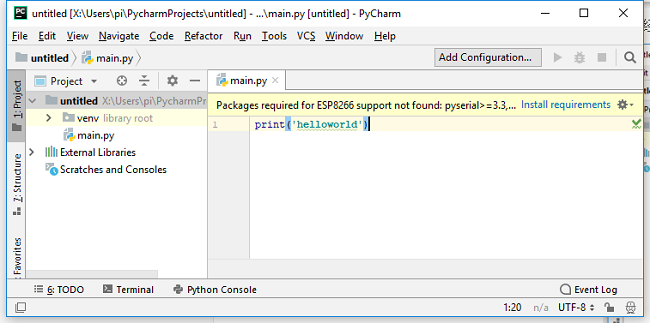
- In the right code edit box, say print(helloworld!)
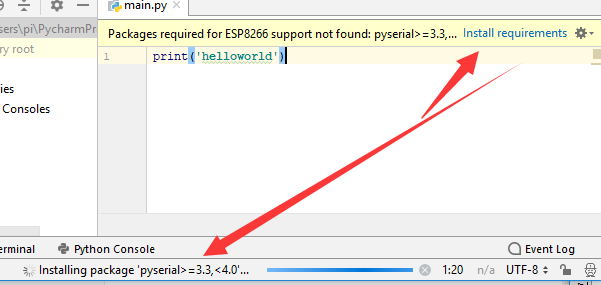
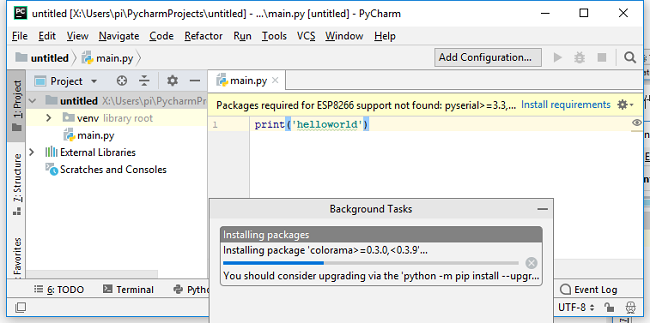
- The first time you use it, you'll be prompted to Install the dependencies, so click Install requirements in the message to download the installation automatically in the background
- Just wait a moment
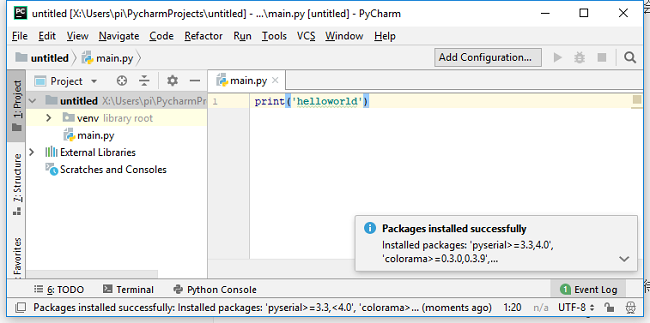
- You will be prompted when the installation is complete.
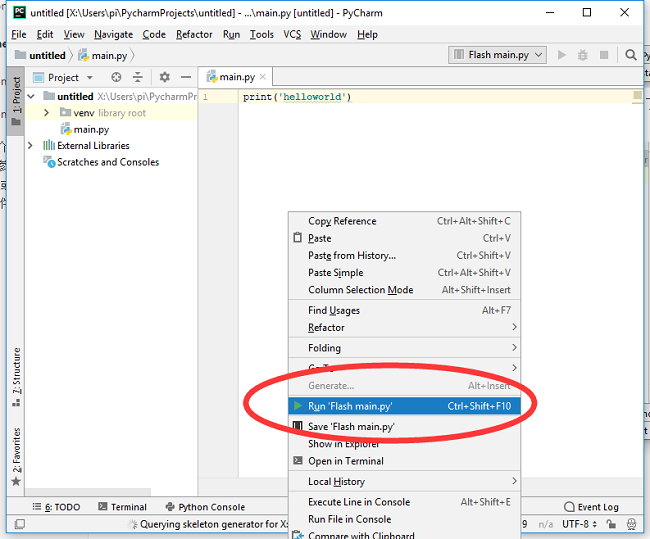
- Now we can Run the main.py file. Select Run 'Flash main.py' from the right-click menu anywhere in the edit box to automatically generate the Run file configuration and Run it on the board
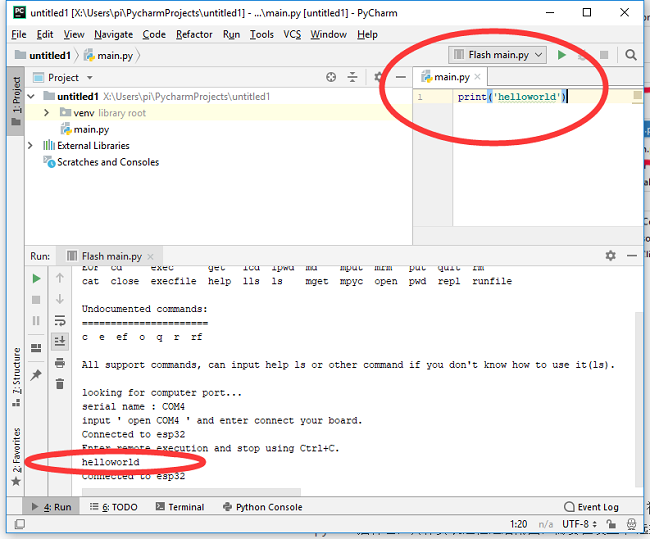
- You can see the results below
Use the Mpfshell directly
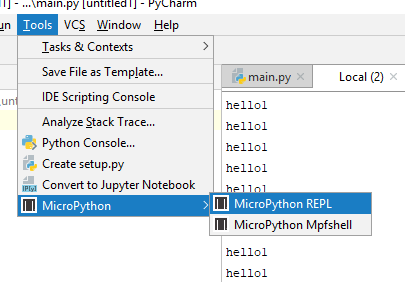
REPL and Mpfshell shortcuts are available in tools-> MicroPython.
Functional specification
1. Understanding intellij-micropython plug-ins
- This plug-in version is different from the official version. It is based on my mpfshell. That is to say, you only need to know what functions the original mpfshell has.
- Note from the past: the future will be independent or merged back into the official version, so please do not use the store version at this stage.
- Note: the intellij-mpfshell has been updated synchronously. This version will continue my update.
2. Manually configure the files you want to run
- Tip: now that the underlying machine has been automatically reconnected, it automatically fixes and reexecutes if something goes wrong, so running the code will not fail in most cases.
The following information may be outdated and is for reference only.
- Previous tips: the current operation can only be retried if it fails, which may happen occasionally, especially in the main.py function. Since the main.
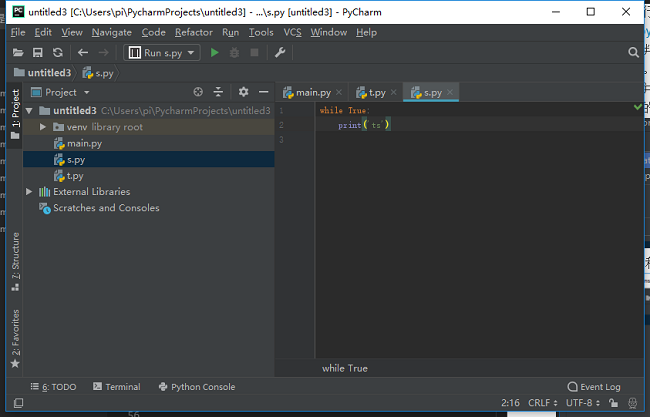
- Prepare a project and add a file as shown.
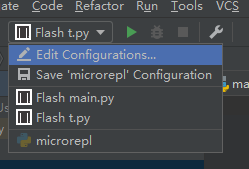
- First configure the current file, as shown in the figure
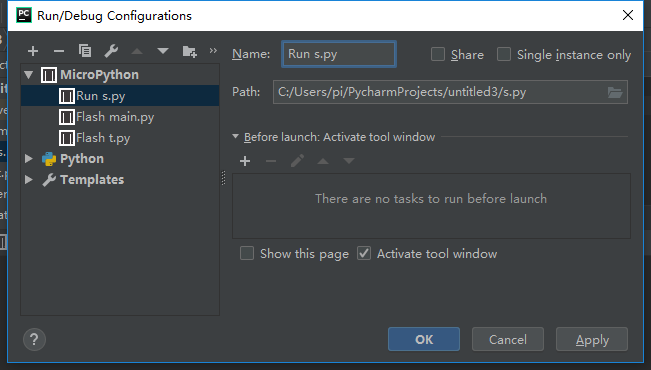
- Just set the Name and Path
- Select the configured device, and then click the green triangle to run. The red square indicates that it has stopped running. If it fails, just retry
- The results
- The common failures are shown below, just like the mpfshell, because the underlying layer is the same.
