Difference between revisions of "2 Wired connection board"
(Created page with "# Document  ## 有线连接板子 ### 1. 连接板子 - 将板子通过 MicroUSB 线连接到你的电脑里,以下以 Windows10 为例。 - ![连接板...") |
|||
| (17 intermediate revisions by the same user not shown) | |||
| Line 1: | Line 1: | ||
| − | + | [[File:Webduino_gif.gif|thumb|Overview: [[BPI-Bit]]]] | |
| + | [[File:Micropython3.png|thumb|[[1 Get the development suite]] ]] | ||
| + | [[File:Micropython2.png|thumb|[[2 Wired connection board]] ]] | ||
| + | [[File:Micropython2.png|thumb|[[3 Try burning the board]] ]] | ||
| + | [[File:Micropython2.png|thumb|[[4 Hello, World!]] ]] | ||
| + | [[File:Micropython2.png|thumb|[[5 Light up all kinds of LED]] ]] | ||
| − | |||
| − | + | [[File:Micropython4.png|thumb|[[1 Auto series one key burn]] ]] | |
| + | [[File:Micropython2.png|thumb|[[2 ESPBlocks Beginner's only]] ]] | ||
| + | [[File:Micropython2.png|thumb|[[3 Mpfshell details]] ]] | ||
| + | [[File:Micropython2.png|thumb|[[4 Pycharm IDE programming]] ]] | ||
| − | + | [[File:Micropython5.png|thumb|[[1. Panel scrolling text]] ]] | |
| + | [[File:Micropython2.png|thumb|[[2. Panel display images]] ]] | ||
| + | [[File:Micropython2.png|thumb|[[3 Bottom IO port control]] ]] | ||
| + | [[File:Micropython2.png|thumb|[[4 Panel key detection]] ]] | ||
| + | [[File:Micropython2.png|thumb|[[5 Gets the board temperature]] ]] | ||
| + | [[File:Micropython2.png|thumb|[[6 Play MIDI music]] ]] | ||
| + | [[File:Micropython2.png|thumb|[[7 Photosensitive gesture]] ]] | ||
| + | [[File:Micropython2.png|thumb|[[8. MPU-9250 9-axis sensor]] ]] | ||
| + | [[File:Micropython2.png|thumb|[[9. Make a compass]] ]] | ||
| + | [[File:Micropython2.png|thumb|[[10 Free to define gestures]] ]] | ||
| + | [[File:Micropython2.png|thumb|[[11 Random number generator]] ]] | ||
| + | [[File:Micropython2.png|thumb|[[12 S2m Scratch2]] ]] | ||
| + | [[File:Micropython2.png|thumb|[[13 Codelab Scratch3]] ]] | ||
| − | + | [[File:Micropython6.png|thumb|[[1 The basic algorithm]] ]] | |
| + | [[File:Micropython2.png|thumb|[[2 WiFI wireless connection]] ]] | ||
| + | [[File:Micropython2.png|thumb|[[3 WiFI wireless programming]] ]] | ||
| + | [[File:Micropython2.png|thumb|[[MQTT communication applications]]]] | ||
| − | + | '''Wired connection board''' | |
| − | + | 1. connect BPI;bit | |
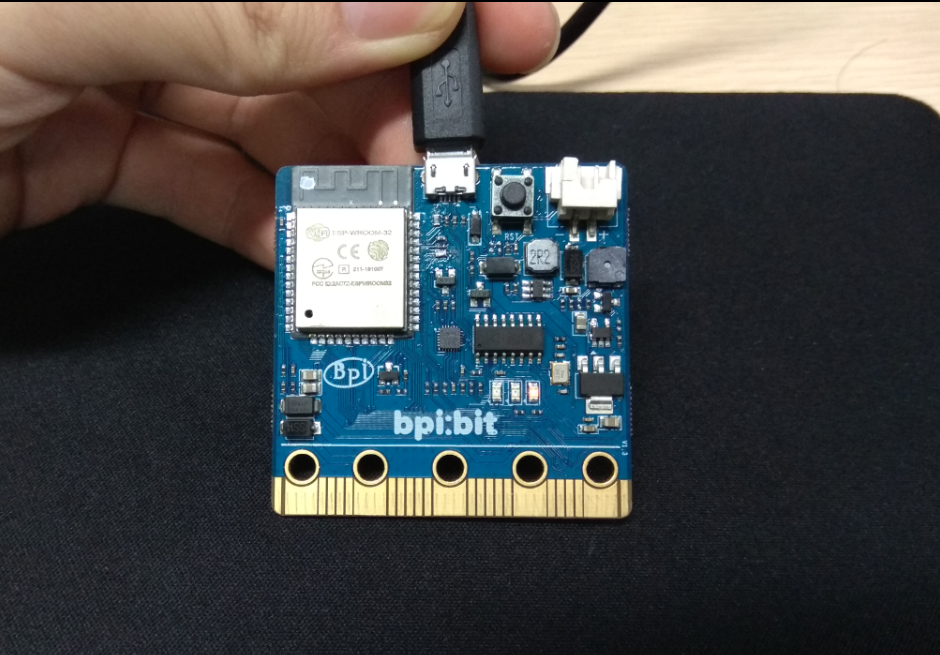
| − | + | Connect a board to your computer via a MicroUSB wire, with Windows10 system | |
| − | |||
| − | |||
| − | |||
| − | + | [[File:Bit_connect.png]] | |
| − | + | 2. Check the drive | |
| − | + | Enter <device manager> to confirm whether Serial is installed, enter as follows. | |
| + | *(right key)This computer -> attribute -> device manager | ||
| + | *Start menu -> (input) device manager | ||
| + | *Control panel -> (search) device manager | ||
| − | + | [[File:Error.png]] | |
| − | + | you can see the device display ** usb2.0-serial **, indicating that ** has not been installed driver **, if the driver has been installed before, you can skip to step 5. | |
| − | |||
| − | + | 3. install the driver | |
| − | + | ::check here [http://www.wch.cn/downloads/file/5.html Serial CH341 ] driver,And follow the instructions below to install the driver | |
| − | + | ::Open the downloaded '''CH341SER.ZIP''' ZIP package, enter the '''CH341SER''' folder, open '''setup. EXE''', you can see the following figure. | |
| − | + | [[File:Install.png]] | |
| − | + | ::check '''INSTALL''' to install driver,Wait a moment to complete the installation。 | |
| − | + | 4. Confirm the serial port | |
| − | + | *Check that the board is connected successfully | |
| − | + | [[File:Success.png]] | |
| + | |||
| + | You can see that the original '''usb2.0-serial''' has disappeared and is replaced by '''usb-serial CH340(COM3)''', which means that you have successfully installed the driver and got the name of the board Serial port ('''COM3'''). You can view the information coming out of the board of Serial port name (COM3) through various Serial port tools | ||
| + | |||
| + | 5. Other System | ||
| + | |||
| + | The board has been successfully connected,Go on to the next section [[3 Try burning the board]],If it's a Linux or Mac system you have to do your own search, but it's pretty much the same. | ||
Latest revision as of 02:36, 21 February 2019

Wired connection board
1. connect BPI;bit
Connect a board to your computer via a MicroUSB wire, with Windows10 system
2. Check the drive
Enter <device manager> to confirm whether Serial is installed, enter as follows.
- (right key)This computer -> attribute -> device manager
- Start menu -> (input) device manager
- Control panel -> (search) device manager
you can see the device display ** usb2.0-serial **, indicating that ** has not been installed driver **, if the driver has been installed before, you can skip to step 5.
3. install the driver
- check here Serial CH341 driver,And follow the instructions below to install the driver
- Open the downloaded CH341SER.ZIP ZIP package, enter the CH341SER folder, open setup. EXE, you can see the following figure.
- check INSTALL to install driver,Wait a moment to complete the installation。
4. Confirm the serial port
- Check that the board is connected successfully
You can see that the original usb2.0-serial has disappeared and is replaced by usb-serial CH340(COM3), which means that you have successfully installed the driver and got the name of the board Serial port (COM3). You can view the information coming out of the board of Serial port name (COM3) through various Serial port tools
5. Other System
The board has been successfully connected,Go on to the next section 3 Try burning the board,If it's a Linux or Mac system you have to do your own search, but it's pretty much the same.


