Difference between revisions of "2 WiFI wireless connection"
(→connect WiFI by mobile) |
|||
| (13 intermediate revisions by the same user not shown) | |||
| Line 1: | Line 1: | ||
| + | [[File:Webduino_gif.gif|thumb|Overview: [[BPI-Bit]]]] | ||
| + | [[File:Micropython3.png|thumb|[[1 Get the development suite]] ]] | ||
| + | [[File:Micropython2.png|thumb|[[2 Wired connection board]] ]] | ||
| + | [[File:Micropython2.png|thumb|[[3 Try burning the board]] ]] | ||
| + | [[File:Micropython2.png|thumb|[[4 Hello, World!]] ]] | ||
| + | [[File:Micropython2.png|thumb|[[5 Light up all kinds of LED]] ]] | ||
| + | |||
| + | |||
| + | [[File:Micropython4.png|thumb|[[1 Auto series one key burn]] ]] | ||
| + | [[File:Micropython2.png|thumb|[[2 ESPBlocks Beginner's only]] ]] | ||
| + | [[File:Micropython2.png|thumb|[[3 Mpfshell details]] ]] | ||
| + | [[File:Micropython2.png|thumb|[[4 Pycharm IDE programming]] ]] | ||
| + | |||
| + | |||
| + | [[File:Micropython5.png|thumb|[[1. Panel scrolling text]] ]] | ||
| + | [[File:Micropython2.png|thumb|[[2. Panel display images]] ]] | ||
| + | [[File:Micropython2.png|thumb|[[3 Bottom IO port control]] ]] | ||
| + | [[File:Micropython2.png|thumb|[[4 Panel key detection]] ]] | ||
| + | [[File:Micropython2.png|thumb|[[5 Gets the board temperature]] ]] | ||
| + | [[File:Micropython2.png|thumb|[[6 Play MIDI music]] ]] | ||
| + | [[File:Micropython2.png|thumb|[[7 Photosensitive gesture]] ]] | ||
| + | [[File:Micropython2.png|thumb|[[8. MPU-9250 9-axis sensor]] ]] | ||
| + | [[File:Micropython2.png|thumb|[[9. Make a compass]] ]] | ||
| + | [[File:Micropython2.png|thumb|[[10 Free to define gestures]] ]] | ||
| + | [[File:Micropython2.png|thumb|[[11 Random number generator]] ]] | ||
| + | [[File:Micropython2.png|thumb|[[12 S2m Scratch2]] ]] | ||
| + | [[File:Micropython2.png|thumb|[[13 Codelab Scratch3]] ]] | ||
| + | |||
| + | |||
| + | [[File:Micropython6.png|thumb|[[1 The basic algorithm]] ]] | ||
| + | [[File:Micropython2.png|thumb|[[2 WiFI wireless connection]] ]] | ||
| + | [[File:Micropython2.png|thumb|[[3 WiFI wireless programming]] ]] | ||
| + | [[File:Micropython2.png|thumb|[[MQTT communication applications]]]] | ||
'''WiFI wireless connection''' | '''WiFI wireless connection''' | ||
| Line 39: | Line 72: | ||
*Wait for a while. If the network mode fails, it will restart automatically within two minutes. When the distribution network is successful, the LED light will turn slightly bright, and then REPL will output the IP address of the board connected to WIFI, as shown in the figure below: 192.168.10.185. It is worth noting that 3de1 corresponds to the name of the board, which will be used later. | *Wait for a while. If the network mode fails, it will restart automatically within two minutes. When the distribution network is successful, the LED light will turn slightly bright, and then REPL will output the IP address of the board connected to WIFI, as shown in the figure below: 192.168.10.185. It is worth noting that 3de1 corresponds to the name of the board, which will be used later. | ||
::[[File:Smc_finish.png]] | ::[[File:Smc_finish.png]] | ||
| + | |||
| + | *And on the phone, also can see the IP address of the board, at this time the board has completed the network configuration. | ||
| + | ::[[File:Apk_finish.png]] | ||
| + | |||
| + | Tip: if the network fails, please follow the following procedures to troubleshoot the problem. | ||
| + | *Confirm entering the distribution network mode (SmartConfig) | ||
| + | *Verify that the password for the WIIFI hotspot is correct | ||
| + | *Verify that the information output by the REPL in the distribution network is similar to the figure | ||
| + | *Confirm that WIFI rf is 2.4ghz (important) | ||
==connect WiFI by hand== | ==connect WiFI by hand== | ||
| + | *When you fail to connect to the above network and find no solution, you can use the direct networking process, namely manually entering the WIFI name and password | ||
| + | *Now the newest firmware will automatically generate wifi_cfg,py after calling wifi.start() | ||
| + | *Prepare a wifi_cfg,py with the following contents: | ||
| + | |||
| + | WIFI_SSID = 'your wifi ap name' | ||
| + | WIFI_PSWD = 'your wifi passwork ' | ||
| + | HOST_NAME = 'you host name' # optional | ||
| + | |||
| + | *(you can now get the wifi_cfg.py fetch configuration first.) use put wifi_cfg.py in the same directory as the mpfshell to replace the current WIFI connection configuration. | ||
| + | *You can also manually start the distribution mode by typing 'wifi.smartcoinfig()' directly in the repl, rather than using the button trigger at startup | ||
=BPI:bit WiFI connect with REPL= | =BPI:bit WiFI connect with REPL= | ||
| + | |||
| + | *Note: before use, make sure that the application is allowed through the network firewall, and the computer and the board are connected to the same network (the same WIFI). | ||
| + | *Before you do that, enter repl mode and '''import webrepl_setup''' to start the network configuration process. | ||
| + | *According to the steps, they are (e, 1234, y). | ||
| + | ::Start network service configuration (start input e, stop input d) | ||
| + | ::Set the network connection password (no less than 4 digits, need to enter twice, it is up to you, I just want to save trouble) | ||
| + | ::Need to restart the board (reset input y, otherwise input n) | ||
| + | ::[[File:Webrepl.png]] | ||
| + | |||
| + | *I have known that the IP of the board is now 192.168.10.185. If you don't know, you can power it up again. Then use mpfshell and input ws:192.168.10.185 and 1234.Among them,1234 is the connection password I set before (the previous chapter), you may not enter it now, but it will prompt you to enter the password later.(note that the English input method comma) | ||
| + | ::[[File:Into_webrepl.png]] | ||
| + | |||
| + | *You can see that the connection is successful, and the board can be operated wirelessly. You can also restart the reset and try again. | ||
| + | |||
| + | *There are two kinds of hints for connection failure: | ||
| + | ::1,The '''WebREPL Remote IP Does not respond''' to the answer that one possibility can be that a network different from the board, and the other can be that a variety of software or hardware firewalls are blocking the response. | ||
| + | ::2,Connection '''WebREPL Password Error''', prompt WebREPL Password Error, re-enter the Password, perhaps you are connected to someone else's board. | ||
| + | |||
| + | *If the connection fails, press Ctrl + D to reset the connection, and then exit to replace the wireless connection. | ||
| + | ::[[File:Error_webrepl.png]] | ||
| + | |||
| + | Tip: as to how to use the wireless connection of the Pycharm Mpfshell plug-in, you only need to set up ws:192.168.10.185,1234 in the device path (comx). | ||
| + | ::[[File:Webrepl_pycharm.png]] | ||
| + | |||
| + | These operations are all performed in mpfshell. If you use Pycharm programming, you can also operate in mpfshell tools. I believe you should all be able to operate. | ||
Latest revision as of 02:40, 21 February 2019
Overview: BPI-Bit
WiFI wireless connection
Contents
BPI:bit connect WiFI AP
- After the firmware is powered on, it will try to connect to the Internet by default after the LED light in the panel has been rolled over. You may notice that if the tool or artificial Ctrl + C stops at this time, there will be no connection to the Internet. The following code is required
mport wifi # booy.py default enable
wifi.try_connect()
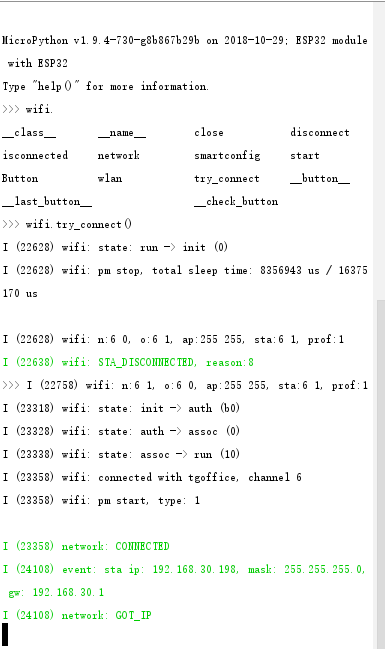
- As shown below, import wifi is invoked by default in boot.py, so you can also call wifi.try_connect() directly from REPL.
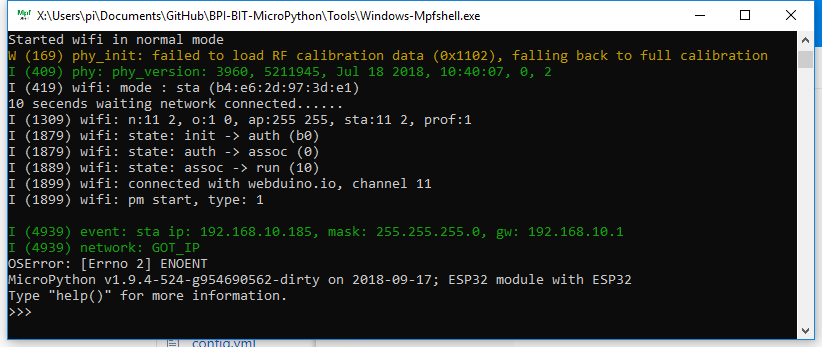
- In the default networking mode, if no network has ever been configured, the board will initially automatically connect to the WIFI hotspot with WIFI name:webduino.io password:webduino.
- If not near the hot spot, will output the no AP found, and my surroundings are prepared ahead of the hot spots, so to get an IP address 192.168.10.185 (pictured), otherwise it will be repeated output connection problems (this does not affect your input and output), if you don't want it to continue to connect to the Internet, you can manually enter wifi.close() to stop the wifi connection.
connect WiFI by mobile
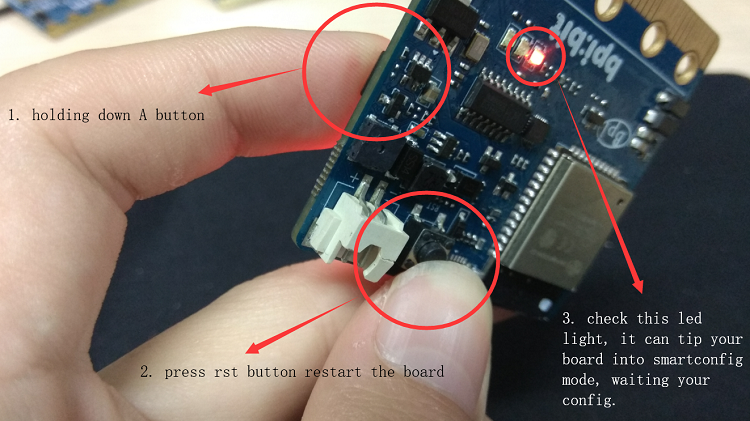
- Of course, your WIFI hotspot is definitely not this one, so now you can press and hold A key and press the reset key to start to enter the mode of distribution network, connect the board to other WIFI, help the board connect to the specified WIFI, enter the mode of distribution network of SmartConfig, LED (18) will light up, LED (18) is the LED light in the previous chapter.
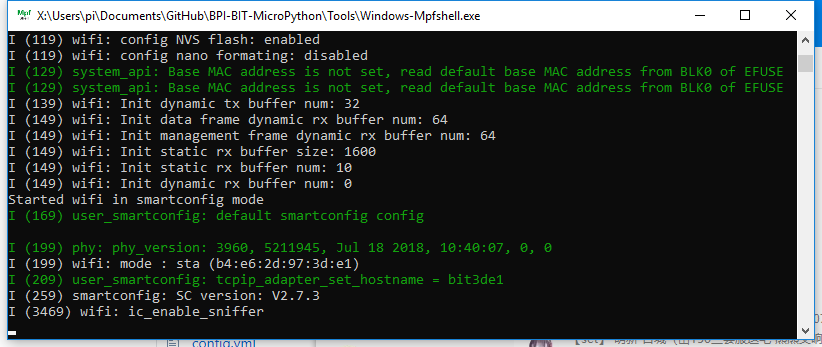
- LED lights will long bright when reset BPI:bit, If necessary, you can also view the corresponding output at this time of the serial port information, note that in this mode will not be able to use the Mpfshell open.This is because the board can no longer respond to the serial REPL operation, so you need to use the Mpfshell again when the network is complete
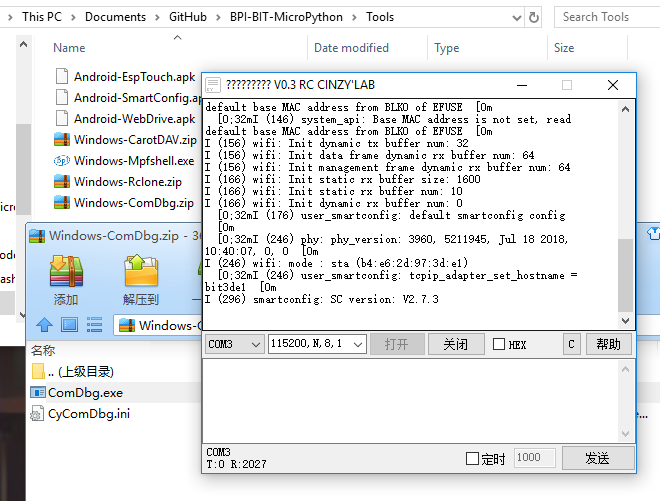
- If something goes wrong during the tool run, use another serial port tool to view the output, such as the windows-comdbg.zip provided under Release
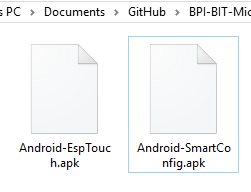
- Once you're in distribution mode, you'll need to use an android phone to install the distribution software provided by Release
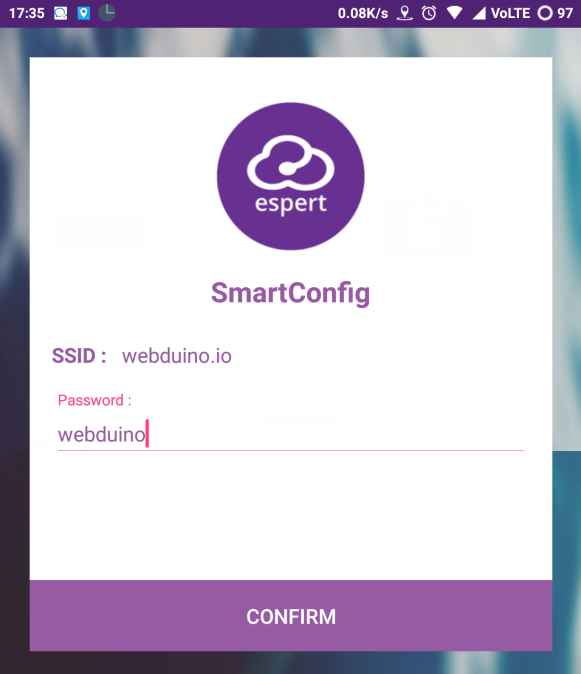
- Take android-smartconfig.apk as an example, connect the mobile phone to WIFI first, then connect the board to the same WIFI, and then input the password of the WIFI to the software, which will tell the board how to connect to the WIFI.
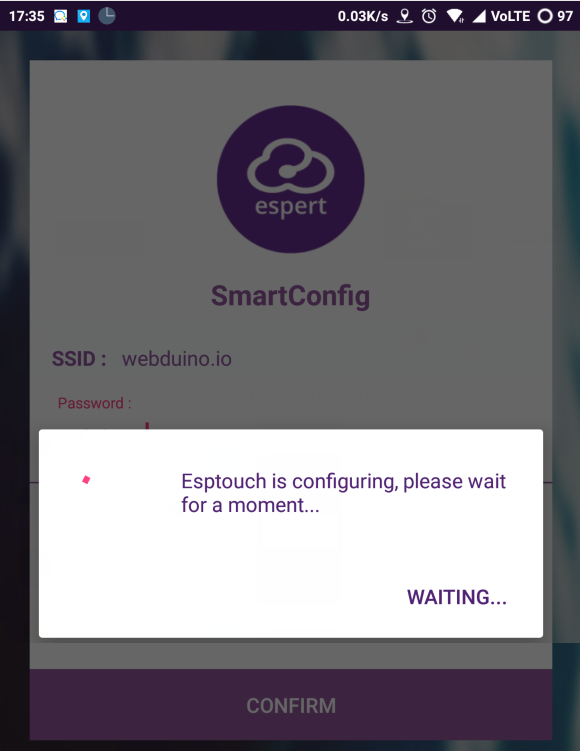
- Click the unique button to start the distribution network, you can see the corresponding information output of REPL, and the LED light of the board will also change accordingly
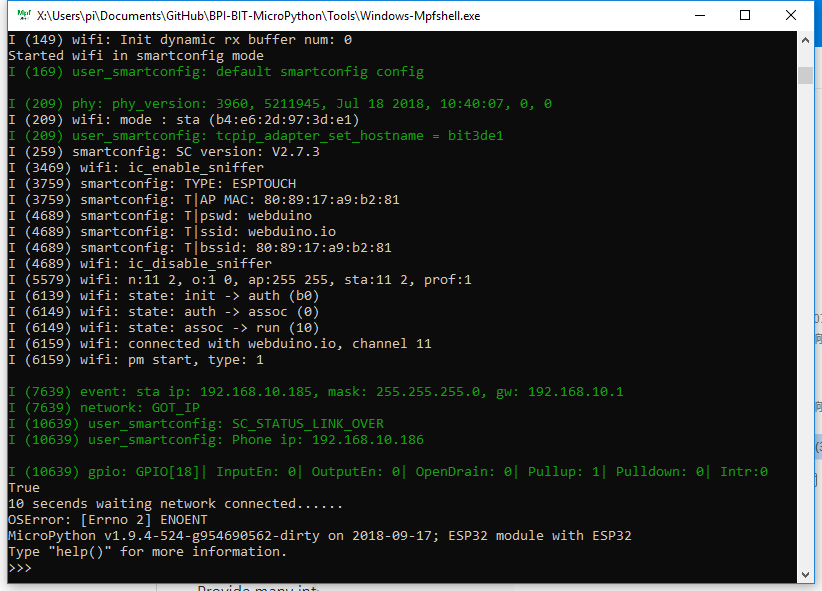
- Wait for a while. If the network mode fails, it will restart automatically within two minutes. When the distribution network is successful, the LED light will turn slightly bright, and then REPL will output the IP address of the board connected to WIFI, as shown in the figure below: 192.168.10.185. It is worth noting that 3de1 corresponds to the name of the board, which will be used later.
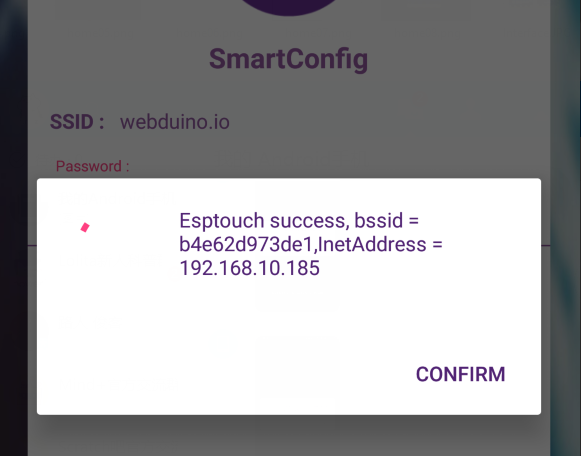
- And on the phone, also can see the IP address of the board, at this time the board has completed the network configuration.
Tip: if the network fails, please follow the following procedures to troubleshoot the problem.
- Confirm entering the distribution network mode (SmartConfig)
- Verify that the password for the WIIFI hotspot is correct
- Verify that the information output by the REPL in the distribution network is similar to the figure
- Confirm that WIFI rf is 2.4ghz (important)
connect WiFI by hand
- When you fail to connect to the above network and find no solution, you can use the direct networking process, namely manually entering the WIFI name and password
- Now the newest firmware will automatically generate wifi_cfg,py after calling wifi.start()
- Prepare a wifi_cfg,py with the following contents:
WIFI_SSID = 'your wifi ap name'
WIFI_PSWD = 'your wifi passwork '
HOST_NAME = 'you host name' # optional
- (you can now get the wifi_cfg.py fetch configuration first.) use put wifi_cfg.py in the same directory as the mpfshell to replace the current WIFI connection configuration.
- You can also manually start the distribution mode by typing 'wifi.smartcoinfig()' directly in the repl, rather than using the button trigger at startup
BPI:bit WiFI connect with REPL
- Note: before use, make sure that the application is allowed through the network firewall, and the computer and the board are connected to the same network (the same WIFI).
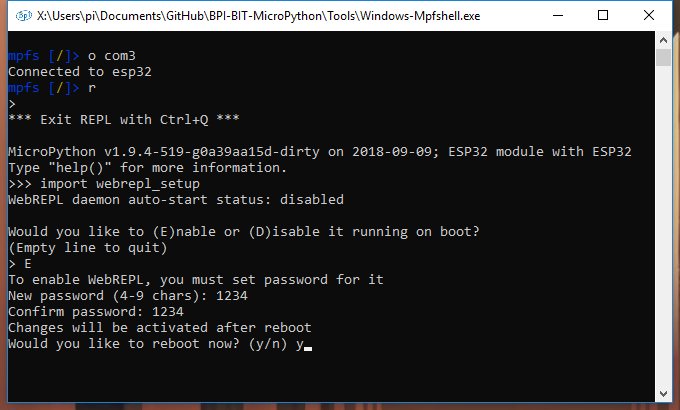
- Before you do that, enter repl mode and import webrepl_setup to start the network configuration process.
- According to the steps, they are (e, 1234, y).
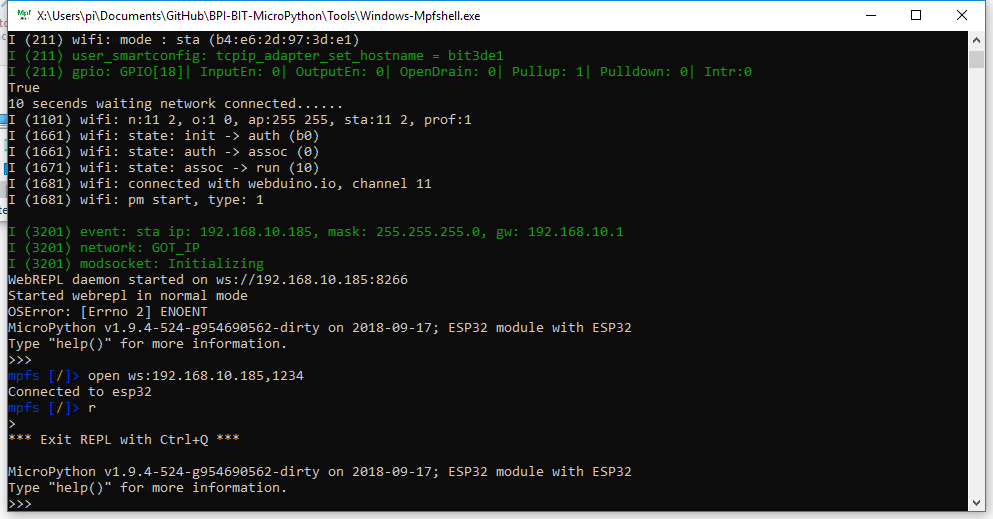
- I have known that the IP of the board is now 192.168.10.185. If you don't know, you can power it up again. Then use mpfshell and input ws:192.168.10.185 and 1234.Among them,1234 is the connection password I set before (the previous chapter), you may not enter it now, but it will prompt you to enter the password later.(note that the English input method comma)
- You can see that the connection is successful, and the board can be operated wirelessly. You can also restart the reset and try again.
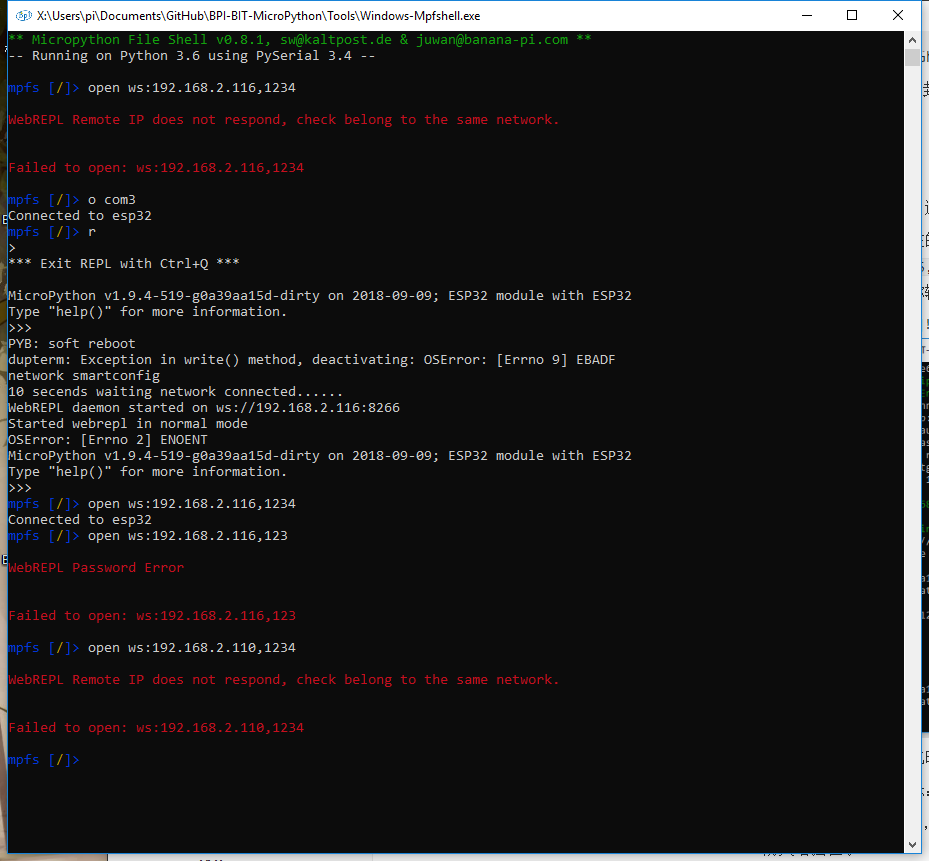
- There are two kinds of hints for connection failure:
- 1,The WebREPL Remote IP Does not respond to the answer that one possibility can be that a network different from the board, and the other can be that a variety of software or hardware firewalls are blocking the response.
- 2,Connection WebREPL Password Error, prompt WebREPL Password Error, re-enter the Password, perhaps you are connected to someone else's board.
- If the connection fails, press Ctrl + D to reset the connection, and then exit to replace the wireless connection.
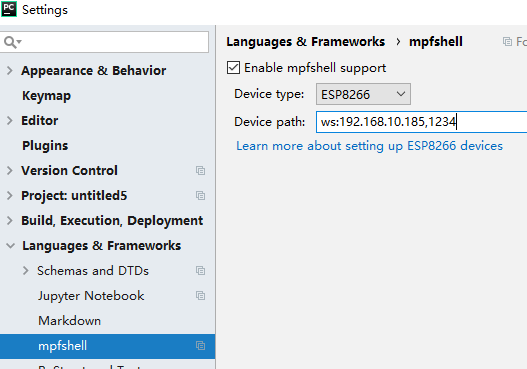
Tip: as to how to use the wireless connection of the Pycharm Mpfshell plug-in, you only need to set up ws:192.168.10.185,1234 in the device path (comx).
These operations are all performed in mpfshell. If you use Pycharm programming, you can also operate in mpfshell tools. I believe you should all be able to operate.
