Difference between revisions of "BPI:bit for Webduino"
(→How to power the Bit:bit board) |
(→How to power the Bit:bit board) |
||
| Line 59: | Line 59: | ||
*1,USB cable power supply, bit board design has a Micro USB interface, in daily life wire is relatively common, it is quite convenient to use. | *1,USB cable power supply, bit board design has a Micro USB interface, in daily life wire is relatively common, it is quite convenient to use. | ||
| + | ::[[File:Bit_power_1.jpg]] | ||
*2,Power is supplied through 2Pin battery socket, which can supply power to the board through lithium battery, battery pack, etc. The interface has anti-stay design, and there is no need to worry about the problem of inverting the power supply | *2,Power is supplied through 2Pin battery socket, which can supply power to the board through lithium battery, battery pack, etc. The interface has anti-stay design, and there is no need to worry about the problem of inverting the power supply | ||
| + | ::[[File:Bit_power_2.jpg]] | ||
*3,Through the goldfinger power supply, the lower end of the board goldfinger contains a power interface, while both input and output functions, compatibility is very high. | *3,Through the goldfinger power supply, the lower end of the board goldfinger contains a power interface, while both input and output functions, compatibility is very high. | ||
| + | ::[[File:Bit_power_3.jpg]] | ||
= Webduino firmware programming = | = Webduino firmware programming = | ||
Revision as of 18:41, 20 February 2019
Contents
About webduino
Webduino = WebComponents + Arduino
Webduino working model
- 1 use WebComponents integration Breakout.
- 2 use WebSocket(Firmata) to interacting with the server.
- 3 Server use TCP/IP(Firmata) to control webduino terminal.
Webduino project VS Arduino and micro:bit project
| Webduino project VS Arduino and micro:bit project | |||
| item compared | Webduino | Arduino | Micro:bit |
| development language | HTML/JavaScript | C/C++ | Python/JavaScript |
| development environment | WEB browser | Arduino IDE | JavaScript Blocks |
| Simulator | Webduino Simulator | Third-party support | Microsoft MakeCode |
| graphical programming | Wbduino blockly | Third-party Scratch | Blockly |
| Cloud Server | webduino cloud | N/A | N/A |
| attended mode | WiFi | USB | USB |
| Update the program | web online update | USB burn | USB disk |
Webduino source code on github
More webduino function now is open source , and code update to github.
How to power the Bit:bit board
Board a total of three power supply, you can choose one
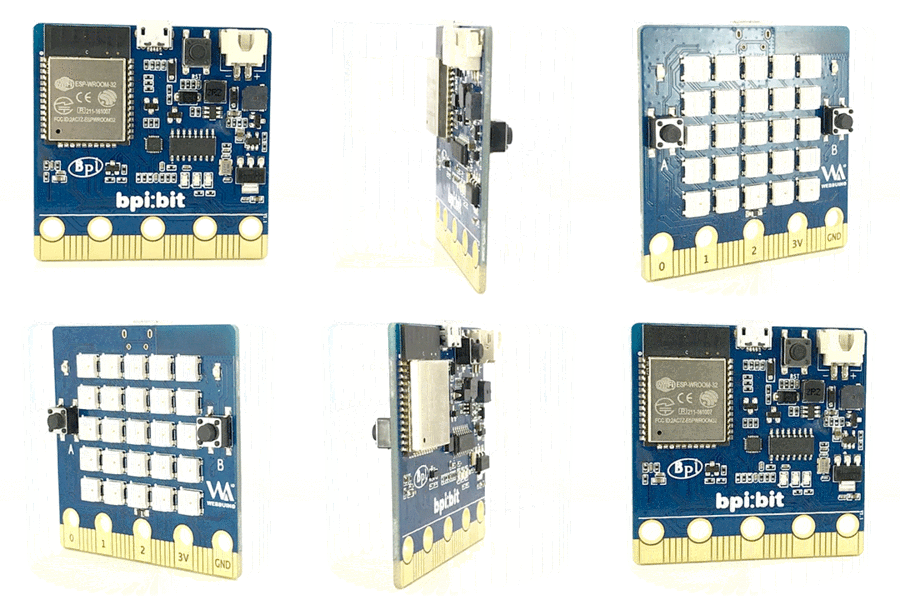
- 1,USB cable power supply, bit board design has a Micro USB interface, in daily life wire is relatively common, it is quite convenient to use.
- Error creating thumbnail: Unable to save thumbnail to destination
- 2,Power is supplied through 2Pin battery socket, which can supply power to the board through lithium battery, battery pack, etc. The interface has anti-stay design, and there is no need to worry about the problem of inverting the power supply
- Error creating thumbnail: Unable to save thumbnail to destination
- 3,Through the goldfinger power supply, the lower end of the board goldfinger contains a power interface, while both input and output functions, compatibility is very high.
- Error creating thumbnail: Unable to save thumbnail to destination
Webduino firmware programming
How to burn webduino firmware
How to : Webduino firmware programming
Webduino OTA Cloud upgrade
BPI:bit for webduino support OTA cloud upgrade , it is easy to use this function to update newest version.
power on bit ,Press the A button when flash white light, unpress A booton when when the green light is on, so start to update.
Initialization of Webduino Bit
Initialization of Webduino Bit:https://www.webduino.com.cn/site/en/docs/setting.html
Webduino Blockly and simulator
- Webduino Blockly and simulator
- Quick start BPI:bit with Webduino Blockly and simulator
Get to know Webduino Blockly Bit
Get to know Webduino Blockly Bit :https://www.webduino.com.cn/site/en/docs/blockly.html
Webduino Cloud
Webduino cloud platform provides your complete Internet of things services. You can update and operate various iot devices through platform management.
webduino refer to the tutorial
- BPI:bit Through the photosensitive resistors built into Webduino Bit on the left and right sides, it is easy to determine which side the gesture comes from
- Using Webduino Bit nine shaft sensor "attitude Angle" + full color dot matrix, simple implementation ~ ^_^ interesting effects
Online tutorials
- Webduino Bit Detail:https://www.webduino.com.cn/site/en/docs/detail.html
- Initialization of Webduino Bit:https://www.webduino.com.cn/site/en/docs/setting.html
- Get to know Webduino Blockly Bit :https://www.webduino.com.cn/site/en/docs/blockly.html
- 5x5 RGB LED matrix:https://www.webduino.com.cn/site/en/docs/rgbmatrix.html
- Buttons : https://www.webduino.com.cn/site/en/docs/button.html
- Light Detection :https://www.webduino.com.cn/site/en/docs/photocell.html
- Buzzer :https://www.webduino.com.cn/site/en/docs/buzzer.html
