Difference between revisions of "快速上手 M1"
JackZengWiki (talk | contribs) |
JackZengWiki (talk | contribs) (→Introduction) |
||
| Line 1: | Line 1: | ||
[[en:Getting_Started_with_M1]] | [[en:Getting_Started_with_M1]] | ||
| − | = | + | =介绍= |
==BPI-M1== | ==BPI-M1== | ||
[[File:BPI-m1_respbian.png|thumb|Overview: BPI-M1 respbian linux]] | [[File:BPI-m1_respbian.png|thumb|Overview: BPI-M1 respbian linux]] | ||
| Line 6: | Line 6: | ||
[[File:BPI-m1_ubutnu.jpg|thumb|Overview: BPI-M1 ubuntu linux]] | [[File:BPI-m1_ubutnu.jpg|thumb|Overview: BPI-M1 ubuntu linux]] | ||
| − | + | 香蕉派M1是我们的第一个产品,我们的目标是创建一个开源开发板社区。使用香蕉派,我们希望你去探索和体验DIY项目和便携式计算的世界。我们欢迎社区里所有的公司、DIY爱好者和热爱科技的人!我们可以一起改变,我们可以发现我们的激情,激励他人,并建立一个切实可行的项目。 | |
| − | * | + | *关于更多 : [[Banana Pi BPI-M1]] |
| − | === | + | ===关键特性=== |
| − | * | + | * 4核 1.0GHz CPU |
| − | * 1 GB DDR3 | + | * 1 GB DDR3 内存 |
| − | * Mali-400 MP2 | + | * Mali-400 MP2 和 Open GL ES 2.0/1.1 |
=Development For Android= | =Development For Android= | ||
Revision as of 23:25, 11 October 2018
Contents
介绍
BPI-M1
File:BPI-m1 respbian.png
Overview: BPI-M1 respbian linux
File:BPI-m1 debian.jpg
Overview: BPI-M1 debian linux
File:BPI-m1 ubutnu.jpg
Overview: BPI-M1 ubuntu linux
香蕉派M1是我们的第一个产品,我们的目标是创建一个开源开发板社区。使用香蕉派,我们希望你去探索和体验DIY项目和便携式计算的世界。我们欢迎社区里所有的公司、DIY爱好者和热爱科技的人!我们可以一起改变,我们可以发现我们的激情,激励他人,并建立一个切实可行的项目。
- 关于更多 : Banana Pi BPI-M1
关键特性
- 4核 1.0GHz CPU
- 1 GB DDR3 内存
- Mali-400 MP2 和 Open GL ES 2.0/1.1
Development For Android
Load your first image on M1
 1.You could download latest image from our forum.
 Ex:

 2.Put your TF card into a TF-USB adapter, and then plug adapter in your Windows PC usb interface.

 3.Prepare your image, and download image burning tools PhoenixCard.exe.

 4.Use "PhoenixCard.exe" to burn android image to TF card.
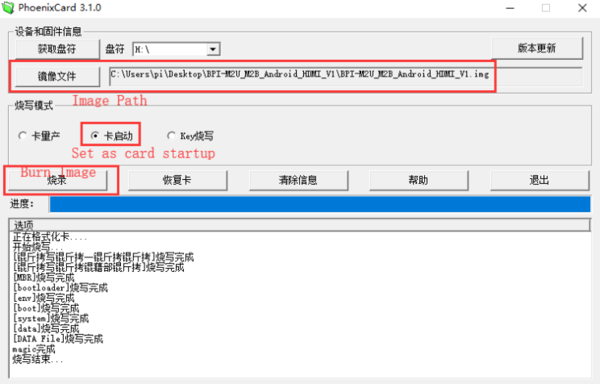

* Download PhoenixCard: https://pan.baidu.com/s/18Fo_JhYY02gmxtFw2Ps3rQ
How to buld M1 Bsp code
 * Prepare a PC which runs ubuntu
 * Install Docker-ce on your PC,https://docs.docker.com/install/linux/docker-ce/ubuntu/#install-docker-ce
 * After install Docker, execute "docker pull sinovoip/bpi-build-android:a20_01", to pull image
 * Then you pulled image, execute "docker run --privileged -d -p 2223:22 -v /media:/media sinovoip/bpi-build-android:a20_01"
 * "ssh -p 2223 [email protected] #default passwd is root"
 * Execute "git clone https://github.com/BPI-SINOVOIP/BPI-M1-bsp.git" on your ubuntu terminal
 * Execute "./build.sh" to build M1 bsp code
 * After built, open a new terminal, execute "docker cp xxxxx(your container id):xxxxx(your project path) xxxxx(your pc path)"

Development For Linux
Let's get start to develop on BPI-M1, see amazing things happen.
Basic Development
Prepare to develop
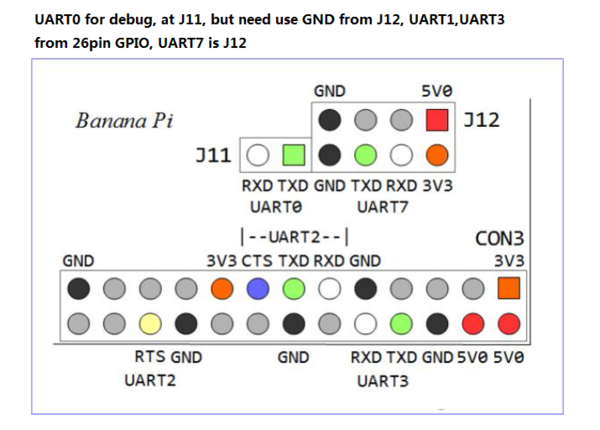
 * Prepare 8G/above TF card, USB-Serial interface, PC with Ubuntu System
 * Using your USB-Serial Connect debug console on M1


Load your first image on M1
 1.You could download latest image from our forum
 * Here is the example link:

 2.Install bpi-tools on your system
 * apt-get install pv
 * curl -sL https://github.com/BPI-SINOVOIP/bpi-tools/raw/master/bpi-tools | sudo -E bash

 3.After you download the image, insert your TF card into your Ubuntu
 * Execute "bpi-copy xxx.img /dev/sdx" to install image on your TF card.

 4.After step 3, then you can insert your TF card into M1, and press power button setup M1
Update your image
  * execute “bpi-tools”, to update your bpi tools;
  * execute “bpi-update -c bpi-m1.conf”, to download new driver to update your image
  * execute “file *.tgz”, to check download files’ type is compressed data
  * execute “bpi-bootsel”, you will see the bootloader path, “/usr/lib/u-boot/bananapi/u-boot-2018.01/u-boot-2018.01-bpi-m1-8k.img.gz”
  * execute “bpi-bootsel /usr/lib/u-boot/bananapi/u-boot-2018.01/u-boot-2018.01-bpi-m1-8k.img.gz”, to update your bootloader
  * reboot