Getting Started with M1
Introduction
BPI-M1

Overview Banana Pi BPI-M1


The Banana Pi M1 is our first product in our goal of creating an open source devlopment board community. With a Banana Pi, we want you to explore and experience the world of DIY projects and portable computing. We welcome all companies, DIYers, and tech loving people within our community! Together, we can make a difference, we can discover our passions, inspire others, and build a practical project
- Read more about : Banana Pi BPI-M1
Key Features
- Dual-core 1.0GHz CPU
- 1 GB DDR3 memeory
- Mali-400 MP2 with Open GL ES 2.0/1.1
Development For Armbian
Basic requirements
x86_64 or aarch64 machine with at least 2GB of memory and ~35GB of disk space for a virtual machine, container or bare metal installation Ubuntu Jammy 22.04.x amd64 or aarch64 for native building or any Docker capable amd64 / aarch64 Linux for containerised
 apt-get -y install git
 git clone https://github.com/armbian/build
 cd build
 ./compile.sh
Latest images
https://www.armbian.com/bananapi/
Development For Android
Load your first image on M1
 1.You could download latest image from our forum.
 Ex:

 2.Put your TF card into a TF-USB adapter, and then plug adapter in your Windows PC usb interface.

 3.Prepare your image, and download image burning tools PhoenixCard.exe.

 4.Use "PhoenixCard.exe" to burn android image to TF card.
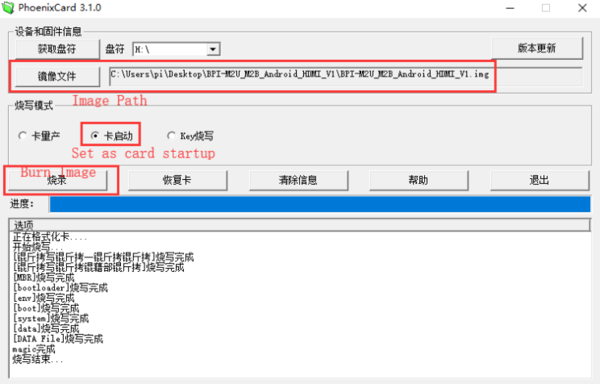

* Download PhoenixCard: https://pan.baidu.com/s/1-fjvPqtG_zewVzqnXf1AHw?pwd=eid9
How to buld M1 Bsp code
 * Prepare a PC which runs ubuntu
 * Install Docker-ce on your PC,https://docs.docker.com/install/linux/docker-ce/ubuntu/#install-docker-ce
 * After install Docker, execute "docker pull sinovoip/bpi-build-android:a20_01", to pull image
 * Then you pulled image, execute "docker run --privileged -d -p 2223:22 -v /media:/media sinovoip/bpi-build-android:a20_01"
 * "ssh -p 2223 [email protected] #default passwd is root"
 * Execute "git clone https://github.com/BPI-SINOVOIP/BPI-M1-bsp.git" on your ubuntu terminal
 * Execute "./build.sh" to build M1 bsp code
 * After built, open a new terminal, execute "docker cp xxxxx(your container id):xxxxx(your project path) xxxxx(your pc path)"

Development For Linux
Load the linux image on M1
1.Download the latest image from the forum.
2.Put the TF card into a card reader and plug it to your PC USB interface.
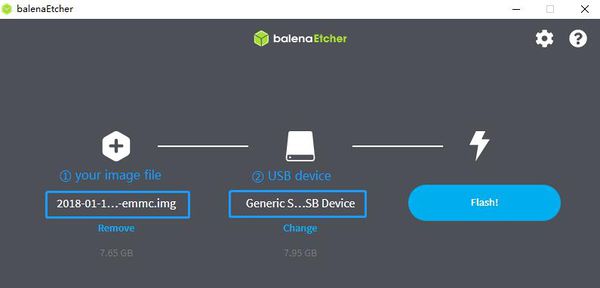
3.Download the flashing tools "BalenaEtcher" and start it.
4.Click "Flash from file" to select your image file.(.img or .zip)
5.Click "Select target" to choose your USB device.
6.Start to flash and wait for a moment.

Let's get start to develop on BPI-M1, see amazing things happen.
Basic Development
Prepare to develop
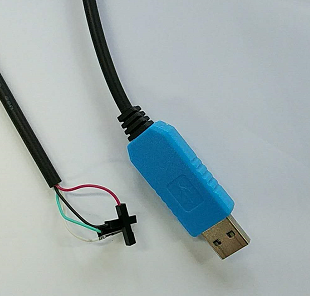
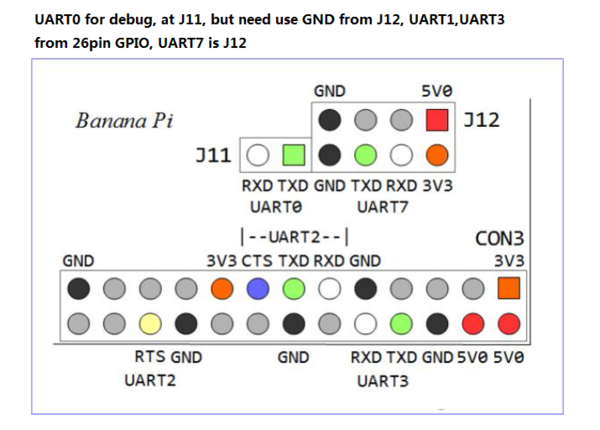
 * Prepare 8G/above TF card, USB-Serial interface, PC with Ubuntu System
 * Using your USB-Serial Connect debug console on M1


Load your first image on M1
 1.You could download latest image from our forum
 * Here is the example link:

 2.Install bpi-tools on your system. If you can't access this URL or any other problems, please go to bpi-tools repo and install this tools manually.
 * apt-get install pv
 * curl -sL https://github.com/BPI-SINOVOIP/bpi-tools/raw/master/bpi-tools | sudo -E bash

 3.After you download the image, insert your TF card into your Ubuntu
 * Execute "bpi-copy xxx.img /dev/sdx" to install image on your TF card.

 4.After step 3, then you can insert your TF card into M1, and press power button setup M1
Update your image
  * execute “bpi-tools”, to update your bpi tools;
  * execute “bpi-update -c bpi-m1.conf”, to download new driver to update your image
  * execute “file *.tgz”, to check download files’ type is compressed data
  * execute “bpi-bootsel”, you will see the bootloader path, “/usr/lib/u-boot/bananapi/u-boot-2018.01/u-boot-2018.01-bpi-m1-8k.img.gz”
  * execute “bpi-bootsel /usr/lib/u-boot/bananapi/u-boot-2018.01/u-boot-2018.01-bpi-m1-8k.img.gz”, to update your bootloader
  * reboot