Getting Started with R64
Contents
Introduction

Overview:Banana Pi BPI-R64

Banana Pi BPI-R64 Metal Jacket


BPI:4.0 Successful case 5G Converged communication gateway

Banana Pi BPI-R1 Allwinner A20

Banana Pi BPI-R2 with MTK MT7623N chip design

Banana Pi BPI-R2 Pro Rockchip RK3568 design

Banana Pi BPI-W2 with Realtek RTD1296 chip design

Banana Pi BPI-R3 with MediaTek MT7986(Filogic 830)

Banana Pi BPI-M2S Amlogic A311D chip
The Banana Pi R64 is a router based development board, which can run on a variety of open source operating systems including OpenWrt,Linux. It has 4 Gigabit LAN ports, 1 Gigabit WAN, and AC wifi AP function. use 64 bit chip design.
Read more: Banana Pi BPI-R64
Key Features
- MediaTek MT7622,1.35GHZ 64 bit dual-core ARM Cortex-A53
- 1G DDR3 SDRAM
- Mini PCIE interface support 4G module
- Built-in 4x4n 802.11n/Bluetooth 5.0 system-on-chip
- MTK7615 4x4ac wifi on board
- Support 1 SATA interface
- MicroSD slot supports up to 256GB expansion
- 8G eMMC flash (option 16/32/64G)
- 5 port 10/100/1000 Mb Ethernet port
- 1 Port USB 3.0
- Slow I/O:ADC, Audio Amplifier, GPIO, I2C, I2S, IR, PMIC I/F, PWM, RTC, SPI, UART
- POE function support
Development
Basic Development
Prepare to develop
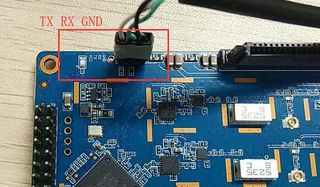
 * Prepare 8G/above TF card, USB-Serial interface, Ubuntu System
 * Using your USB-Serial(3.3V,Baud: 115200) Connect debug console on R64
 * Default IP address for LAN port: 192.168.1.1
 * User name/password: pi/bananapi ,root/bananapi.
 Or the user is root without a password.
 * WIFI: Operwrt

How to burn image to SD card
 1.You could download latest image from our forum
 * Here is the example image link:

 2.Install bpi-tools on your Ubuntu. If you can't access this URL or any other problems, please go to bpi-tools repo and install this tools manually.
 * apt-get install pv
 * curl -sL https://github.com/BPI-SINOVOIP/bpi-tools/raw/master/bpi-tools | sudo -E bash

 3.After you download the image, insert your TF card into your Ubuntu
 * Execute "bpi-copy xxx.img /dev/sdx" to install image on your TF card

 4.After step 3, then you can insert your TF card into R64, and press power button to setup R64
How to burn image to onboard eMMC
 Before burning image to eMMC, please prepare a SD card with flashed bootable image and a USB disk. Let's take OpenWrt image (mtk-bpi-r64-preloader-emmc.bin,2020-04-09-OpenWRT-mtk-bpi-r64-EMMC.img) for example, the steps are below:
 Note: You can download the .bin file from github: https://github.com/BPI-SINOVOIP/BPI-R64-openwrt/tree/master/staging_dir/target-aarch64_cortex-a53_musl/image
1. Insert the flashed SD card and power on to start the board.(the image on the SD card can be OpenWrt or other linux OS like ubuntu...)
2. Copy eMMC bootable OpenWrt image(mtk-bpi-r64-preloader-emmc.bin,2020-04-09-OpenWRT-mtk-bpi-r64-EMMC.img) to USB disk, if the image is compressed please uncompress it before copying to USB disk.
 3. Plug in USB disk to the board, and mount the USB to /mnt or other directory as follows: (you can skip mounting if it is mounted automatically)
    * mount -t vfat /dev/sda1 /mnt
    * change your directory to the mounting point, here is : cd /mnt
 4. Execute following command to enable and copy image to eMMC:
    * echo 0 > /sys/block/mmcblk0boot0/force_ro
    * dd if=2020-04-09-OpenWRT-mtk-bpi-r64-EMMC.img of=/dev/mmcblk0
    * dd if=mtk-bpi-r64-preloader-emmc.bin of=/dev/mmcblk0boot0
    * mmc bootpart enable 1 1   /dev/mmcblk0
5. Shutdown, remove SD card and USB disk, and restart the board from eMMC.
Network-Configuration
- Network-Configuration : http://www.fw-web.de/dokuwiki/doku.php?id=en:bpi-r2:network:start
Advanced Development
GPIO
40 Pins Definition
Error creating thumbnail: Unable to save thumbnail to destination
GPIO Control
- echo xxx > /sys/class/gpio/export
- echo in/out > /sys/class/gpio/gpioxxx/direction
- echo 0/1 > /sys/class/gpio/gpioxxx/value
Check the base gpio, you could see mine is 409
Error creating thumbnail: Unable to save thumbnail to destination
For example: if you want to change gpio 22 as out highlevel, you need input commands like this:
- echo 431(22+409) > /sys/class/gpio/export
- echo out > /sys/class/gpio/gpio431/direction
- echo 1 > /sys/class/gpio/gpio431/value
PWM Control
- echo x >/sys/class/pwm/pwmchip0/export
- echo 200000 >/sys/class/pwm/pwmchip0/pwmx/period
- echo 100000 >/sys/class/pwm/pwmchip0/pwmx/duty_cycle
- echo 1 >/sys/class/pwm/pwmchip0/pwmx/enable
SPI touch panel
SPI Panel module:
2.4" Touch Screen TFT LCD with SPI Interface, 240x320 (ILI9341 + ADS7843/XPT2046/HR2046)
SPI Panel <–> BPIR64
T_DO, T_DIN, T_CLK <–> SPIC_0: MOSI / MISO / CLK
T_CS <–> SPI-CE0
T_IRQ <–> IO-37
SDO, SCK, SDI <–> SPIC_1: MOSI / MISO / CLK
LED <–> PIN-31
DC <–> PIN-11
RESET <–> PIN-13
CS <–> SPI-CE1
GND <–> GND-9
VCC <–> 3.3V-1
DTS Modification:
/ {
       backlight: backlight {
               compatible = "gpio-backlight";
               gpios = <&pio 82 GPIO_ACTIVE_HIGH>;        //PIN31 IO-31 : GPIO82
               default-on;
       };
};
&pio {
       spic0_pins: spic0-pins {
               mux {
                       function = "spi";
                       groups = "spic0_0";
               };
       };

       spic1_pins: spic1-pins {
               mux {
                       function = "spi";
                       groups = "spic1_0";
               };
       };
}
&spi0 {
pinctrl-names = "default";
pinctrl-0 = <&spic0_pins>;
status = "okay";
touch@0 {
reg = <0>; //CE0
compatible = "ti,ads7843";
interrupt-parent = <&pio>;
interrupts = <86 0>; //PIN37: IO-37 == GPIO86
pendown-gpio = <&pio 86 0>;
spi-max-frequency = <1000000>;
vcc-supply = <®_3p3v>;
wakeup-source;
};
};
&spi1 {
       pinctrl-names = "default";
       pinctrl-0 = <&spic1_pins>;
       status = "okay";
       display@0{
               compatible = "ilitek,ili9341";
               reg = <0>;                                 //CE0
               spi-max-frequency = <32000000>;
               dc-gpios = <&pio 51 GPIO_ACTIVE_HIGH>;     //PIN11 UART1-TXD : GPIO51
               reset-gpios = <&pio 52 GPIO_ACTIVE_HIGH>;  //PIN13 UART1-RXD : GPIO52
               backlight = <&backlight>;
       };
};
Kernel config:
+CONFIG_FB_TFT_ILI9341
+CONFIG_FB_TFT
+CONFIG_FB
+CONFIG_BACKLIGHT_LCD_SUPPORT
+CONFIG_BACKLIGHT_CLASS_DEVICE
+CONFIG_BACKLIGHT_GPIO
+CONFIG_INPUT
+CONFIG_INPUT_TOUCHSCREEN
+CONFIG_TOUCHSCREEN_ADS7846
Application:
| Package | + Description | Source |
| fbv | framebuffer image viewer | https://github.com/godspeed1989/fbv |
| input-event-daemon | input-event-daemon with touchTEST event | https://github.com/SAM33/input-event-daemon |
input-event-daemon config that show image by touch area: (I don't know why are the coordinates so strange, but the result of my actual touch and print out that it is like this)
[Global]
listen = /dev/input/event0
listen = /dev/input/event1
[TouchTEST]
340,400,3440,1860 = cat /dev/zero > /dev/fb0; fbv -f /root/bpi_608x429.jpg -s 1
340,2260,3440,1860 = cat /dev/zero > /dev/fb0; fbv -f /root/openwrt_449x449.png -s 1
Banana Pi BPI-R64 SPI touch panel test: https://www.youtube.com/watch?v=ikag-D_TI0g&feature=youtu.be
Sata
- If you want to use Sata interface on R64, you need to give GPIO90 low level
- echo 499 > /sys/class/gpio/export
- echo out > /sys/class/gpio/gpio499/direction
- echo 0 > /sys/class/gpio/gpio499/value
- Test a TOSHIBA HDD DISK, the Read/Write performance are below:
- Read from disk: 50MB/s command: dd if=/dev/sda of=/dev/null bs=1M count=1024
- Write to disk: 38MB/s command: dd if=/dev/zero of=/dev/sda bs=1M count=1024
Error creating thumbnail: Unable to save thumbnail to destination
- Test a SAMSUNG SSD DISK, the Read/Write performance are below:
- Read from disk: 360MB/s command: dd if=/dev/sda of=/dev/null bs=1M count=1024
- Write to disk: 200MB/s command: dd if=/dev/zero of=/dev/sda bs=1M count=1024
Error creating thumbnail: Unable to save thumbnail to destination
PCIe
- If you want to use PCIe interface on R64, you need to give GPIO90 high level
- echo 499 > /sys/class/gpio/export
- echo out > /sys/class/gpio/gpio499/direction
- echo 1 > /sys/class/gpio/gpio499/value
- PCIe supports EC-25 4G module.
Error creating thumbnail: Unable to save thumbnail to destination
Error creating thumbnail: Unable to save thumbnail to destination
GMAC
Use iperf3 to test gmac
1. On PC Terminal:
- Execute "iperf3 -s"
2. On R64 console:
- TCP test: "iperf3 -c serverIP"
- UDP test: "iperf3 -u -c serverIP"
Error creating thumbnail: Unable to save thumbnail to destination
BT & BLE on R64
R64 BT Architectural
Error creating thumbnail: Unable to save thumbnail to destination
- BLE on R64
- Input Command "btmw-test", you will enter to "btmw_test_cli" command line
Error creating thumbnail: Unable to save thumbnail to destination
- Here are some example commands:
- MW_GAP name 7622_BT /*rename bt device*/
- MW_GAP info /*check local BT device info*/
- MW_GATTC scan /* start ble scan*/
- MW_GATTC stop_scan /* stop ble scan*/
R64 LAN Function
- LAN eth interface is eth2, use "ifconfig eth2 up" to enable it.
- Config the ip, "ifconfig eth2 192.168.1.1".
Error creating thumbnail: Unable to save thumbnail to destination
- Config your dhcp server, "vim /etc/dhcp/dhcpd.conf", add these configurations.
Error creating thumbnail: Unable to save thumbnail to destination
- Start dhcp server, "dhcpd eth2".
Error creating thumbnail: Unable to save thumbnail to destination
- then config iptables and set package forward.
- Add "net.ipv4.ip_forward=1" to "/etc/sysctl.conf"
- "/sbin/sysctl -p" to make forward work
- "iptables -t nat -A POSTROUTING -s 192.168.1.1/24 -o eth3 -j MASQUERADE"
Ap mode on R64
- Find "mt_wifi.ko" and insmod it.
- insmod ./lib/modules/4.4.92-BPI-R64-Kernel/extra/mt_wifi.ko
- Then you will see ra0 and rai0.
Error creating thumbnail: Unable to save thumbnail to destination
- ra0 is MT7622 2.4G wifi
- rai0 is MT7615 5G wifi
2.4G WiFi
- Use "ifconfig ra0 up" to enable it.
- Config the ip, "ifconfig ra0 192.168.1.1".
- Config your dhcp server, "vim /etc/dhcp/dhcpd.conf", add these configurations.
Error creating thumbnail: Unable to save thumbnail to destination
- Start dhcp server, "dhcpd ra0".
- then config iptables and set package forward.
- Add "net.ipv4.ip_forward=1" to "/etc/sysctl.conf"
- "/sbin/sysctl -p" to make forward work
- "iptables -t nat -A POSTROUTING -s 192.168.1.1/24 -o eth3 -j MASQUERADE"
5G WiFi
- Use "ifconfig rai0 up" to enable it.
- Config the ip, "ifconfig rai0 192.168.1.1".
- Config your dhcp server, "vim /etc/dhcp/dhcpd.conf", add these configurations.
Error creating thumbnail: Unable to save thumbnail to destination
- Start dhcp server, "dhcpd rai0".
- then config iptables and set package forward.
- Add "net.ipv4.ip_forward=1" to "/etc/sysctl.conf"
- "/sbin/sysctl -p" to make forward work
- "iptables -t nat -A POSTROUTING -s 192.168.1.1/24 -o eth3 -j MASQUERADE"
FAQ
- MT7622 Reference Manual for Develope Board(BPi)