Getting Started with M1P
Introduction
BPI-M1P


  The Banana Pi M1+ features onboard WiFi g/b/n. The board supports all classic projects and even more because of the onboard WIFi chip. Like its sibling, it can run operating systems including Android, Lubuntu, Ubuntu, Debian, and Raspbian.
  The Banana Pi M1+ is our upgraded M1 board. We feel like the onboard WiFi adds a lot more features to the board and makes it more convient for users to set up their linx desktop or router projects.
- Read more about : Banana Pi BPI-M1+
Key Features
- Dual-core 1.0GHz CPU
- 1 GB DDR3 memeory
- Mali-400 MP2 with Open GL ES 2.0/1.1
- WiFi onbaord
Development
Let's get start to develop on BPI-M1P, see amazing things happen.
Linux
Prepare to develop
 * Prepare 8G/above TF card, USB-Serial interface, PC with windows System
 * Using your USB-Serial Connect debug console on M1P
Load the linux image on M1+
1.Download the latest image from the forum.
2.Put the TF card into a card reader and plug it to your PC USB interface.
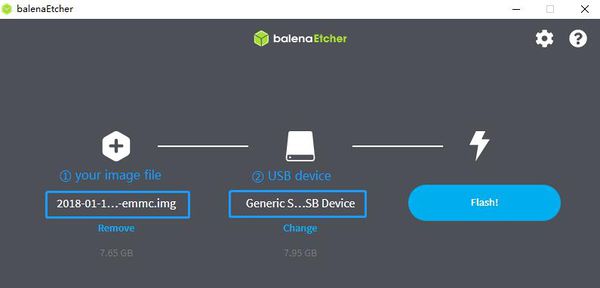
3.Download the flashing tools "BalenaEtcher" and start it.
4.Click "Flash from file" to select your image file.(.img or .zip)
5.Click "Select target" to choose your USB device.
6.Start to flash and wait for a moment.

Android
Load your first image on M1+
 1.You could download latest image from our forum.
 Ex:

 2.Put your TF card into a TF-USB adapter, and then plug adapter in your Windows PC usb interface.

 3.Prepare your image, and download image burning tools PhoenixCard.exe.

 4.Use "PhoenixCard.exe" to burn android image to TF card.
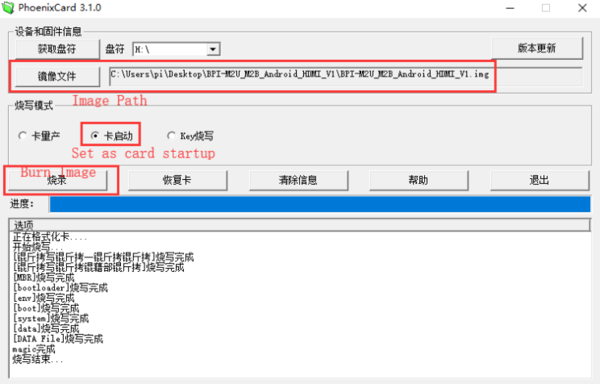

* Download PhoenixCard: https://pan.baidu.com/s/1-fjvPqtG_zewVzqnXf1AHw?pwd=eid9
Advanced Development
SATA
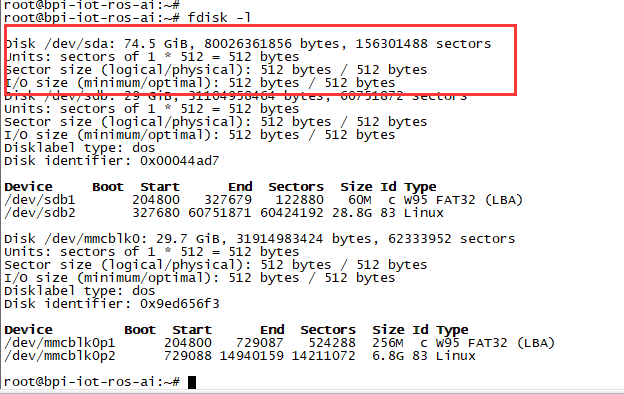
1. Mount SATA on M1P
- After insert sata interface, execute "fdisk -l"
- Then "mount /dev/sdx /mnt/xxx"

2. If you meet some errors when you mount SATA, try these following commands:
- "fdisk /dev/sdx" to create new partition , set your partition numbers and size, after created partitions, input "wq" to save and quit.
- "mkfs.ext2 /dev/sdx" to format the SATA
- "mount /dev/sdx /mnt/xxx"
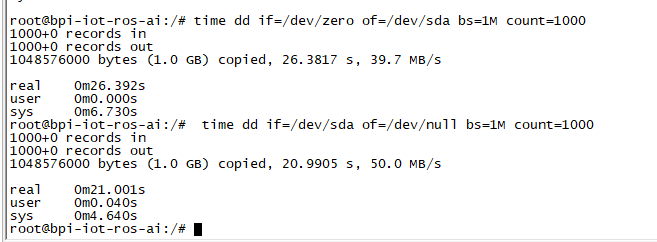
3. After you success to insert SATA, we could input following commands to test SATA interface:
- "time dd if=/dev/xxx of=/dev/null bs=1M count=1000" to test read speed
- "time dd if=/dev/zero of=/dev/sdx bs=1M count=1000" to test write speed

Touch screen
GMAC
Use iperf3 to test gmac
1. On PC Terminal:
- Execute "iperf3 -s"
2. On M1P console:
- TCP test: "iperf3 -c serverIP"
- UDP test: "iperf3 -u -c serverIP"

WiFi on M1P
WiFi Client
You have two ways to setup WiFi Client
1. Use commands to setup WiFi client
- ip link set wlan0 up
- iw dev wlan0 scan | grep SSID
- vim /etc/wpasupplicant/wpa_supplicant.conf
 network={
 ssid="ssid"
 psk="password"
 priority=1
 }
- wpa_supplicant -iwlan0 -c /etc/wpa_supplicant/wpa_supplicant.conf
- dhclient wlan0
2. Use UI interface to setup WiFi Client
Clear boot
- git clone https://github.com/BPI-SINOVOIP/BPI-files/tree/master/SD/100MB
- bpi-bootsel BPI-cleanboot-8k.img.gz /dev/sdX
IR function
- Execute "getevent"
- Use your IR device to send information to M1P

RPi.GPIO
Install RPi.GPIO
- Execute "git clone https://github.com/BPI-SINOVOIP/RPi.GPIO"
- after clone the repo, cd RPi,GPIO
- Execute "sudo apt-get update"
- Execute "sudo apt-get install python-dev python3-dev"
- Execute "sudo python setup.py install" or "sudo python3 setup.py install" to install the module
Using RPi.GPIO
- cd /usr/local/bin
- Execute "./bpi_test_g40.py" to test RPi.GPIO

WringPi
- GitHub: https://github.com/BPI-SINOVOIP/BPI-WiringPi2.git
- We also have built-in test command in "/usr/local/bin"
RGB 1602 LCD
- Execute "/usr/local/bin/bpi_test_lcd1602.sh"
8x8 RGB LED Martix
- Firstly you need a GPIO Extend Board for 8x8 LED Martix

- Execute "/usr/local/bin/bpi_test_gpio40.sh"
File System
- read only system change to read & write mode: "mount -o remount,rw /"
Install QT
- sudo apt-get install build-essential
- sudo apt-get install libgl1-mesa-dev
- sudo apt-get install libglu1-mesa-dev
- sudo apt-get install freeglut3-dev
- sudo apt-get install cmake
- sudo apt-get install qt5-default qtcreator
A20 CAN Bus
In order to port can4linux to the BananaPi, the CAN module description is needed from the A20 hardware manual. can4linux is a character-driver-based Linux driver used already on desktop PCs and embedded platforms like Freescale FlexCAN (the i.MX series of micro controllers) or Xiliny Zynq.
There is a more detailed document about CAN on the A20 at: https://dl.linux-sunxi.org/A20/CAN%20Bus1.pdf
This is a tutorial for using CAN BUS on bananapi with bananian 15-01
Thank selqcir share this example:
- Download and install "bananian-1501.img" into 8 GB SDCard.
- Expand the root file system using "bananian-config"
- Install missing package:
apt-get install git
apt-get update
apt-get upgrade
reboot
- Get last bananian available, and continu to install missing package:
git clone https://github.com/Bananian/linux-bananapi
apt-get install build-essential u-boot-tools uboot-mkimage
apt-get install libusb-1.0-0 libusb-1.0-0-dev git wget fakeroot kernel-package zlib1g-dev libncurses5-dev
apt-get install subversion
- Build kernel:
cd linux-bananapi
make menuconfig
- Exit without saving when menu appears
zcat /proc/config.gz > /root/linux-bananapi/.config
make uImage modules
make INSTALL_MOD_PATH=output modules_install
- At this step, kernel should be compiled and "Module.symvers" should be available
- Then rename modules and firmware provide by Bananian, and replace by the new one.
mv /lib/modules /lib/modules.old
mv /lib/firmware /lib/firmware.old
mv /root/linux-bananapi/output/lib/modules /lib/modules
mv /root/linux-bananapi/output/lib/firmware /lib/firmware
- Same for uImage:
mount /dev/mmcblk0p1 /mnt
cd /mnt
mv uImage uImage.old
mv /root/linux-bananapi/arch/arm/boot/uImage /mnt
reboot
- Create link for further build:
cd /lib/modules/3.4.104/
ln -s /root/linux-bananapi build
cd ~
- Get Can4Linux and build it:
svn checkout https://svn.code.sf.net/p/can4linux/code/trunk can4linux-code
cd /root/can4linux-code/can4linux/
make TARGET=BANANAPI
- Install module for each startup of the board:
insmod can4linux.ko
cp can4linux.ko /lib/modules/3.4.104/kernel/net/can/
depmod -A -v
modprobe -v can4linux
echo "" >> /etc/modules ; echo "can4linux" >> /etc/modules
reboot
- Build CAN example
apt-get install swig
apt-get install python-dev
cd can4linux-code/can4linux-examples/
- Update CAN speed and device in file "pyCan-example.py"
# setting the device number
device = 0
defaultBaudrate = '250'
- Connect CAN transceiver and CAN bus, and check with for example:
python pyCan-example.py
That's all
With this method, kernel version is "Linux bananapi 3.4.104" instead of "Linux bananapi 3.4.104+", because i was unable to find same sources than Bananian 15-01 , but CAN bus work !