快速上手 香蕉派 BPI-M3
Contents
- 1 介绍
- 2 Android 系统开发
- 3 Development For Linux
- 3.1 Basic Development
- 3.2 Advanced Development
- 3.3 FAQ
介绍
BPI-M3


Banana Pi M3 is a super charged single board computer with an Octa-core processor and 2GB of RAM. Along side the elite processing unit, it features Gigabit Ethernet, 2 USB, SATA, WiFi, Bluetooth, and HDMI connection. It can run on a variety of operating systems including Android, Lubuntu, Ubuntu, Debian, and Raspbian.
- 更多BPI-M3 产品资讯 : Banana Pi BPI-M3
关键特性
- Octa-core 1.8GHz Powerful CPU
- 2 GB LPDDR3 memory
- 8 GB eMMC storage
- WiFi & Bluetooth onboard
Android 系统开发
Load your first image on M3
 1.You could download latest image from our forum.
 Ex: http://wiki.banana-pi.org/Banana_Pi_BPI-M3#Android_5.1.1_V5

 2.Put your TF card into a TF-USB adapter, and then plug adapter in your Windows PC usb interface.

 3.Prepare your image, and download image burning tools PhoenixCard.exe.

 4.Use "PhoenixCard.exe" to burn android image to TF card.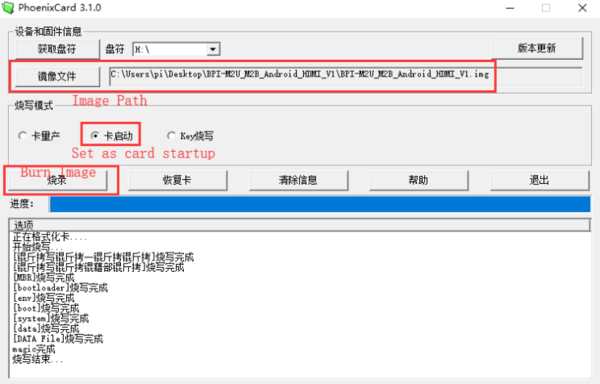

Load your image on M3 EMMC
1.The only different with sd card burning is the image burning mode item choice
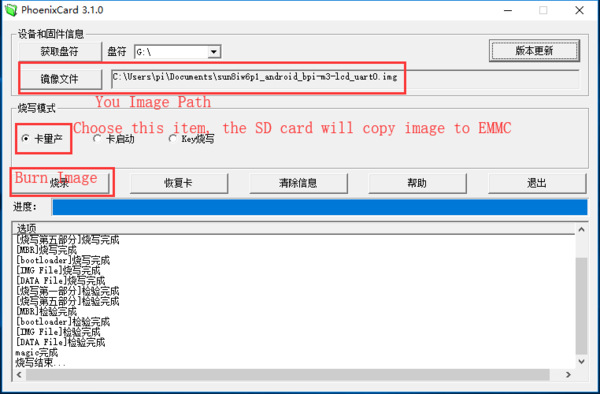 2.After succeed to burn image to SD, then plug SD card in your M3
3.Press power button, device will copy image to EMMC automatically
2.After succeed to burn image to SD, then plug SD card in your M3
3.Press power button, device will copy image to EMMC automatically

* Download PhoenixCard: https://pan.baidu.com/s/18Fo_JhYY02gmxtFw2Ps3rQ
How to buld M3 Bsp code
 * Prepare a PC which runs ubuntu
 * Install Docker-ce on your PC,https://docs.docker.com/install/linux/docker-ce/ubuntu/#install-docker-ce
 * After install Docker, execute "docker pull sinovoip/bpi-build:ubuntu12.04", to pull image
 * Then you pulled image, execute "docker run --privileged -d -p 2222:22 -v /media:/media sinovoip/bpi-build:ubuntu12.04"
 * "ssh -p 2222 [email protected] #default passwd is root"
 * Execute "git clone https://github.com/BPI-SINOVOIP/BPI-M3-bsp.git" on your ubuntu terminal
 * Execute "./build.sh" to build M3 bsp code
 * After built, open a new terminal, execute "docker cp xxxxx(your container id):xxxxx(your project path) xxxxx(your pc path)"
Development For Linux
Let's get start to develop on BPI-M3, see amazing things happen.
Basic Development
Prepare to develop
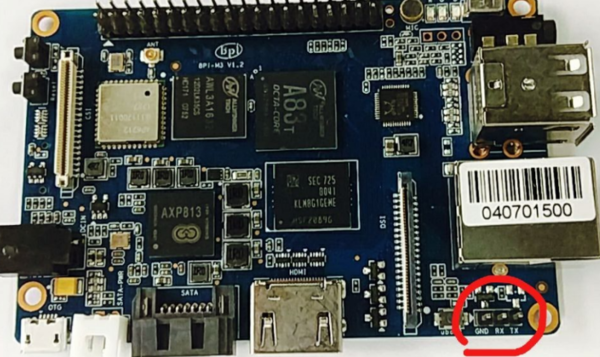
 * Prepare 8G/above TF card, USB-Serial interface, PC with Ubuntu System
 * Using your USB-Serial Connect debug console on M3

Load your first image on M3
 1.You could download latest image from our forum
 * Here is the example link: http://forum.banana-pi.org/t/banana-pi-bpi-m3-new-image-release-raspbian-jessie-8-0-2018-5-28-v1-1/5847

 2.Install bpi-tools on your system
 * apt-get install pv
 * curl -sL https://github.com/BPI-SINOVOIP/bpi-tools/raw/master/bpi-tools | sudo -E bash

 3.After you download the image, insert your TF card into your Ubuntu
 * Execute "bpi-copy xxx.img /dev/sdx" to install image on your TF card.

 4.After step 3, then you can insert your TF card into M3, and press power button setup M3
Load your first image on M3 EMMC
 * Run your M3 with TF card
 * Copy "xxx-sd-emmc-xxx.img.zip / xxx-sd-emmc-xxx.img" to your USB disk
 * Plug your USB disk in M3
 * After M3 recognise USB disk, execute "bpi-copy xxx-sd-emmc-xxx.img.zip / xxx-sd-emmc-xxx.img" to install image on EMMC
 * Then power off M3, take TF card out, power on M3
Update your image
For example, update your image to support new emmc5.1
  * execute “bpi-tools”, to update your bpi tools;
  * execute “bpi-update -c bpi-m3.conf”, to download new driver to update your image
  * execute “file *.tgz”, to check download files’ type is compressed data
  * execute “bpi-bootsel”, you will see the bootloader path, “/usr/lib/u-boot/bananapi/bpi-m3/BPI_M3_720P.img.gz”
  * execute “bpi-bootsel /usr/lib/u-boot/bananapi/bpi-m3/BPI_M3_720P.img.gz”, to update your bootloader
  * reboot
Make your own image
Make one raspbian image
- Prepare a SD card which have installed Raspbian system
- Boot your SD card with M3, after M3 finish starting, copy your files and config your Raspbian, then poweroff M3
- Plug your SD card in Linux PC, "cd /media", then "ln -s <your account> pi"
- Execute "bpi-migrate -c bpi-m3.conf -c raspbian-jessie-from-sd.conf -d /dev/sdx"
- Then you could get your own image now
Advanced Development
Install Docker
You could try armbian to install docker, here is the image: https://dl.armbian.com/bananapim3/Debian_stretch_dev.7z (Here Thanks for the armbian community)
Download this image to your ubuntu PC (I am using ubuntu PC), then decompress it
- 7z x Debian_stretch_xxx.img
- bpi-copy Debian_stretch_xxx.img /dev/sd< drive letter >
username: root, password: 1234
Here are steps to install docker:
- vim /etc/apt/sources.list
- add this source:“deb http://http.debian.net/debian jessie-backports main”
- apt-get update
- apt-get install docker.io
To have a test, if docker has installed in your image.
- sudo docker run --rm hello-world
SATA
1. Mount SATA on M3
- After insert sata interface, execute "fdisk -l"
- Then "mount /dev/sdx /mnt/xxx"
2. If you meet some errors when you mount SATA, try these following commands:
- "fdisk /dev/sdx" to create new partition , set your partition numbers and size, after created partitions, input "wq" to save and quit.
- "mkfs.ext2 /dev/sdx" to format the SATA
- "mount /dev/sdx /mnt/xxx"
3. After you success to insert SATA, we could input following commands to test SATA interface:
- "time dd if=/dev/xxx of=/dev/null bs=1M count=1000" to test read speed
- "time dd if=/dev/zero of=/dev/sdx bs=1M count=1000" to test write speed
OTG
1. On M3 console:
- Execute "./adbd.sh", then execute "ps -ax | grep adbd" to see if adbd is set up
2. On PC terminal:
- If adbd was succeed to set up, insert OTG-USB interface to M3 and PC(with Ubuntu system)
- Execute "adb devices" to see if PC has recognised M3 OTG
- If yes, we could execute "adb shell" to connect M3 by adb now
LCD 5" & LCD 7"
- Execute "bpi-bootsel", you'll see a list of boot files
- Find "BPI_M3_LCD7.img.gz"
- Then execute "bpi-bootsel /usr/lib/u-boot/bananapi/bpi-M3/BPI_M3_LCD7.img.gz"
Touch screen
GMAC
Use iperf3 to test gmac
1. On PC Terminal:
- Execute "iperf3 -s"
2. On M3 console:
- TCP test: "iperf3 -c serverIP"
- UDP test: "iperf3 -u -c serverIP"
Bluetooth
- Use bluetoothctl tool to operate BT
- Execute "bluetoothctl"
- If you don't know how to use bluetoothctl, type "help", you will see more commands
- Execute these commands:
WiFi on M3
WiFi Client
You have two ways to setup WiFi Client
1. Use commands to setup WiFi client
- ip link set wlan0 up
- iw dev wlan0 scan | grep SSID
- vim /etc/wpasupplicant/wpa_supplicant.conf
- network={ ssid="ssid" psk="password" priority=1 }
- wpa_supplicant -i wlan0 -c /etc/wpa_supplicant/wpa_supplicant.conf
- dhclient wlan0
2. Use UI interface to setup WiFi Client
Clear boot
- git clone https://github.com/BPI-SINOVOIP/BPI-files/tree/master/SD/100MB
- bpi-bootsel BPI-cleanboot-8k.img.gz /dev/sdX
Camara function
We use HDF5640(The left one) camara and HDF8865(The right one).
Guvcview
- Use your UI interface to operate camara
- Applications -> Sound & Video -> guvcview
Shell
Ov5640
- We also have built-in command in "/usr/local/bin" to test camara
- "./test_ov5640_image_mode.sh" to test picture taking function
- "./cameratest.sh" to test video recording function
Ov8865
- "/test_ov8865.sh"
IR function
- Execute "getevent"
- Use your IR device to send information to M3
BPI-Tools
Install Bpi-tools
- Execute "curl -sL https://github.com/BPI-SINOVOIP/bpi-tools/raw/master/bpi-tools | sudo -E bash - "
Update Bpi-tools
- Execute "bpi-tools"
RPi.GPIO
Install RPi.GPIO
- Execute "git clone https://github.com/BPI-SINOVOIP/RPi.GPIO"
- after clone the repo, cd RPi,GPIO
- Execute "sudo apt-get update"
- Execute "sudo apt-get install python-dev python3-dev"
- Execute "sudo python setup.py install" or "sudo python3 setup.py install" to install the module
Using RPi.GPIO
- cd /usr/local/bin
- Execute "./bpi_test_g40.py" to test RPi.GPIO
WiringPi
- GitHub: https://github.com/BPI-SINOVOIP/BPI-WiringPi2.git
- We also have built-in test command in "/usr/local/bin"
How to Update WiringPi
- Execute "bpi-update -c pkglist.conf"
- Execute "bpi-update -c bpi-pkg-bpi-wiringpi.conf"
RGB 1602 LCD
- Execute "/usr/local/bin/bpi_test_lcd1602.sh"
0.96 Inch OLED Display
- Execute "/usr/local/bin/bpi_test_52pi.sh"
8x8 RGB LED Martix
- Firstly you need a GPIO Extend Board for 8x8 LED Martix
- Execute "/usr/local/bin/bpi_test_gpio40.sh"
GPU
- Execute "glmark2-es" to start OpenGL test
- glmark2 Score: 258

File System
- read only system change to read & write mode: "mount -o remount,rw /"