|
|
| (7 intermediate revisions by 2 users not shown) |
| Line 3: |
Line 3: |
| | | | |
| | Need to be prepared: | | Need to be prepared: |
| − | *BPI-UNO32 1 | + | *BPI-UNO32 1 or BPI:bit 1 |
| | *Jumper Cap 4 | | *Jumper Cap 4 |
| | *microUSB 1 | | *microUSB 1 |
| Line 16: |
Line 16: |
| | [[File:Uno32_start_1.png]] | | [[File:Uno32_start_1.png]] |
| | | | |
| − | open VS Code \(you can also choose other compilers\) and open BPI-UNO32 on the PlatformIO Home page Code project, for example, to open a test code engineering folderPlatformIO\_VSCode。 | + | open Arduino IDE and install ESP32 Expansion pack |
| − | *Project:
| |
| − | [[File:Uno32_start_2.png]]
| |
| | | | |
| − | open the VS Code terminal console, input , compile the program, input , compile and burn the program. (if it hasn't been compiled before, it may be slow to compile the first time and need to be connected because he needs to get the corresponding platform information).
| + | Arduino IDE Software:(*[[https://www.arduino.cc/en/Main/Software Arduino IDE]]) |
| | | | |
| − | *platformio run: | + | ESP32 Expansion pack:(*[[https://github.com/espressif/arduino-esp32/blob/master/README.md Installation guide]]) ->Installation Instructions |
| − | [[File:Uno32_start_3.png]] | |
| − | *platformio run --target upload:
| |
| − | [[File:Uno32_start_4.png]]
| |
| | | | |
| − | 2,then open the serial port assistant tool, select BPI-UNO32 on the computer corresponding to the serial serial number, the serial port settings are selected as:
| + | *Open Arduino IDE and setup baord: |
| − | Baud rate: 115200 Data bit: 8 Parity check: no Stop bit:
| + | [[File:ArduinoIDE-1.png]] |
| − | *Serial Config:
| |
| − | [[File:Uno32_start_5.png]] | |
| | | | |
| − | 3,Test content:
| + | If you install ESP32 package you can ESP32 board in Tools->Boards see <ESP32 Arduino> |
| | | | |
| − | *RGB LED fading. | + | *Arduino IDE Compile and Download: |
| − | *AD acquisition and testing of 6 ADC\_channel1.
| + | [[File:ArduinoIDE-2.png]] |
| − | *WiFi scan testing. | + | *Arduino IDE serial port setup: |
| − | *Control test of buzzer gradient.
| + | [[File:ArduinoIDE-3.png]] |
| | | | |
| − | ===Ardino IDE===
| + | 2,You can click Serial Monitor in Arduino IDE. It will open a new window ,in this window ,you can setup serial : |
| − | | + | *Serial Config: |
| − | *[[How to use with Arduino IDE]]
| + | [[File:ArduinoIDE-4.png]] |
| − | | |
| − | ===uPyCraft(microPyhton)===
| |
| − | 1,first open the uPyCraft software, click the Tools->Serial port to select the port in the upper toolbar. After selecting port, the software will automatically decide whether to burn the firmware, if necessary, the interface will be popped up.
| |
| − | | |
| − | uPyCraft(microPyhton):
| |
| − | | |
| − | *first open the uPyCraft software, click the Tools->Serial port to select the port in the upper toolbar. After selecting port, the software will automatically decide whether to burn the firmware, if necessary, the interface will be popped up.
| |
| − | | |
| − | [[File:Uno32_pic_11.png]]
| |
| − | | |
| − | 2,when the software interface is opened, we choose ESP32 in board. If erase\_flash chooses yes, it will wipe out the original flash first, and generally choose to erase it, so that the original flash will have an impact on it now.
| |
| − | | |
| − | [[File:Uno32_pic_12.png]]
| |
| − | | |
| − | 3, after the selection, click Yes to start the burning, there will be the following dialog, only to wait for it.
| |
| − | | |
| − | [[File:Uno32_pic_13.png]]
| |
| − | | |
| − | when the Burn column is full, the dialog box automatically closes and displays the software master interface.
| |
| − | | |
| − | [[File:Uno32_pic_14.png]]
| |
| − | | |
| − | 4,In the main interface we can clickto “connect" connected. It is located in the lower row of the toolbar. The following interface will appear after the connection
| |
| − | | |
| − | [[File:Uno32_pic_15.png]]
| |
| − | | |
| − | This means we can appear > > > for interactive programming like to Python in the following dialogue.
| |
| − | | |
| − | Basic function test:
| |
| − | | |
| − | You can visit GitHub to download the test code, compile, burn, and observe the test results through the serial port.
| |
| − |
| |
| − | Project link \(PlatformIO\):https://github.com/yelvlab/BPI-UNO32/tree/master/Test_Code/PlatformIO_VSCode
| |
| − | | |
| − | | |
| − | * Arduino IDE:Open File -> Preferences, as shown in the following figure: | |
| − | [[File:Uno32_pic_1.png]] | |
| − | | |
| − | * Click the button in the red circle above and add the following URL in the newly popped
| |
| − | ::window:https://git.oschina.net/dfrobot/FireBeetle-ESP32/raw/master/package\_esp32\_index.json
| |
| − | ::As shown below:
| |
| − | | |
| − | [[File:Uno32_pic_2.png]]
| |
| − | | |
| − | * Open Tools->Board->Board Manager. Pull down to see FireBeetle-ESP32 and click Install.Please select the relevant model after installation.
| |
| − | | |
| − | [[File:Uno32_pic_3.png]]
| |
| − | | |
| − | * Open a project in the upper left corner of the file, or open an example.
| |
| − | | |
| − | [[File:Uno32_pic_4.png]]
| |
| − | | |
| − | * Select a correct port in Tools -> Ports, then click ”compile"will be compiled code,clickwill "run" be burn program。
| |
| − | | |
| − | [[File:Uno32_pic_5.png]]
| |
| − | | |
| − | [[File:Uno32_pic_6.png]]
| |
| − | | |
| − | *PlatformIO for Atom/VS Code
| |
| − | | |
| − | | |
| − | 1,First open the PlatformIO Home page, then click Open Project to open the project. \(You can choose the test code.\) If you write your own code to burn, then the platformio.ini file should write the following code
| |
| − | | |
| − | [env:BPI-uno32]
| |
| − | platform = espressif32
| |
| − | board = nodemcu-32s
| |
| − | framework = arduino
| |
| − | | |
| − | [[File:Uno32_pic_7.png]]
| |
| − | | |
| − | [[File:Uno32_pic_8.png]]
| |
| − | | |
| − | 2,The code path under PlatformIO project is generally src/main.cpp. Open the code and use Ctrl+\` to open the terminal debugger. Enter platformio run --target upload.
| |
| − | [[File:Uno32_pic_9.png]]
| |
| − | | |
| − | 3,Make sure the board is connected. The program will be compiled first and then burned into the BPI-uno32 board. There are some points to note. If the above code does not specify the port, please try to avoid other serial devices connected on the computer. For serial port numbers, run platformio --help.
| |
| − | | |
| − | [[File:Uno32_pic_10.png]]
| |
Ardino IDE
How to setup and start
Need to be prepared:
- BPI-UNO32 1 or BPI:bit 1
- Jumper Cap 4
- microUSB 1
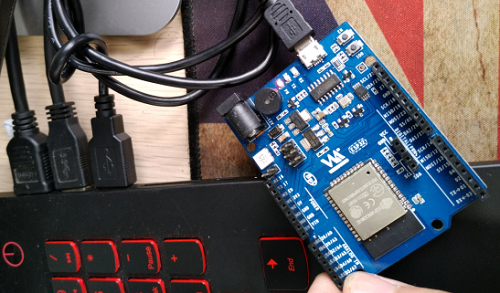
quickstart:
1,connect the four jumper caps to the top of the board, respectively, to connect the RGB LED to the buzzer. Then use the microUSB line to connect the development board to the computer.
open Arduino IDE and install ESP32 Expansion pack
Arduino IDE Software:(*[Arduino IDE])
ESP32 Expansion pack:(*[Installation guide]) ->Installation Instructions
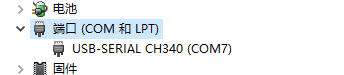
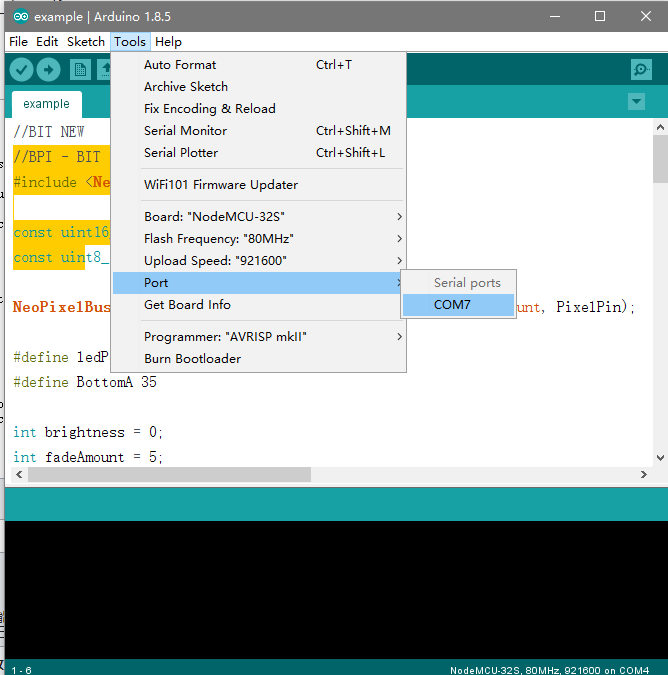
- Open Arduino IDE and setup baord:
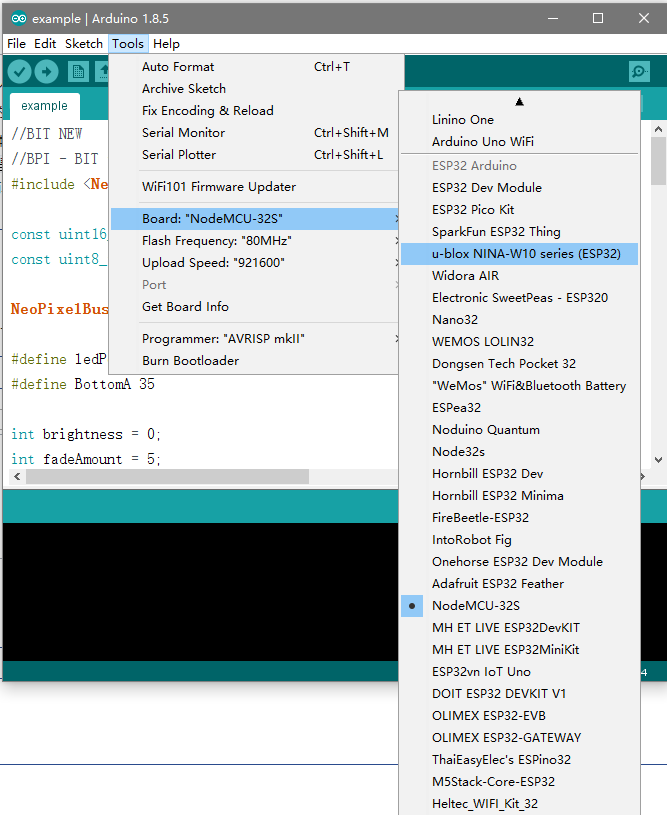
If you install ESP32 package you can ESP32 board in Tools->Boards see <ESP32 Arduino>
- Arduino IDE Compile and Download:
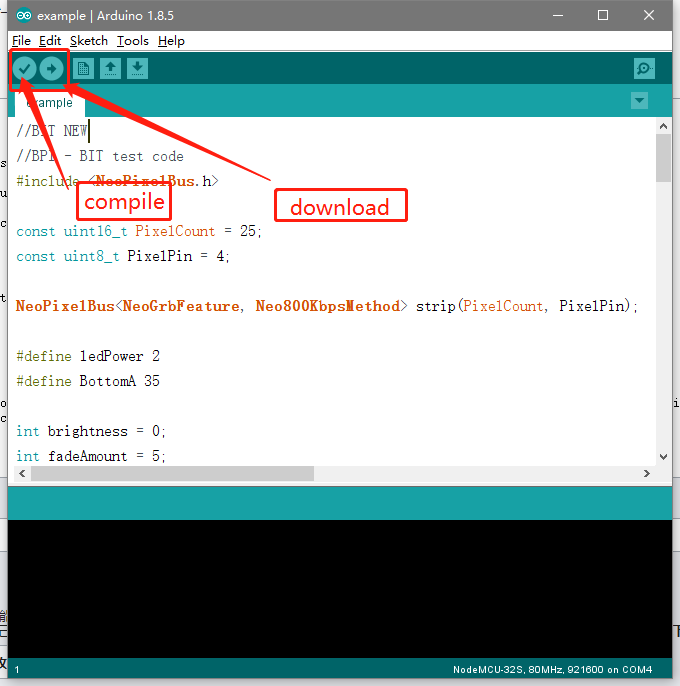
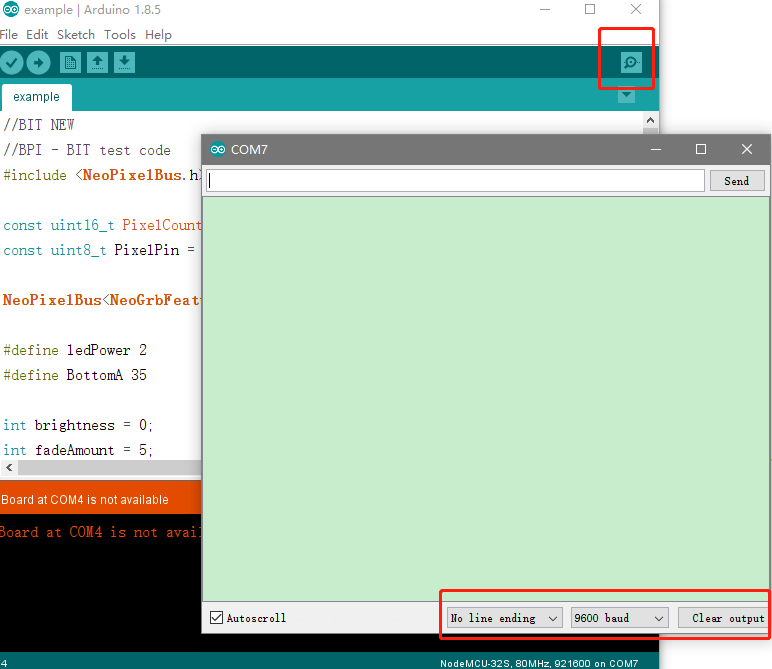
- Arduino IDE serial port setup:
2,You can click Serial Monitor in Arduino IDE. It will open a new window ,in this window ,you can setup serial :