Difference between revisions of "Getting Started with W2"
JackZengWiki (talk | contribs) (→WiFi & BT) |
(→Install Linux Image) |
||
| (44 intermediate revisions by 3 users not shown) | |||
| Line 1: | Line 1: | ||
=Introduction= | =Introduction= | ||
| − | + | [[File:Banana Pi BPI-W2 1.JPG|thumb|Overview [[Banana Pi BPI-W2]]]] | |
[[File:Android_6.0_1.jpg|thumb|Overview: BPI-W2 Android 6.0]] | [[File:Android_6.0_1.jpg|thumb|Overview: BPI-W2 Android 6.0]] | ||
[[File:W2_debian.jpg|thumb|[http://forum.banana-pi.org/t/banana-pi-bpi-w2-new-image-debian-9-linux-image-release-2018-09-18/6797 Debian 9 Linux Image Release 2018-09-18]]] | [[File:W2_debian.jpg|thumb|[http://forum.banana-pi.org/t/banana-pi-bpi-w2-new-image-debian-9-linux-image-release-2018-09-18/6797 Debian 9 Linux Image Release 2018-09-18]]] | ||
| Line 15: | Line 15: | ||
==Basic Development== | ==Basic Development== | ||
| − | ===Prepare | + | ===Prepare=== |
* Prepare 8G/above TF card, USB-Serial interface, PC with Ubuntu System | * Prepare 8G/above TF card, USB-Serial interface, PC with Ubuntu System | ||
* Using your USB-Serial Connect debug console on W2 | * Using your USB-Serial Connect debug console on W2 | ||
| Line 23: | Line 23: | ||
[[Image:W2_debug_console.jpg]] | [[Image:W2_debug_console.jpg]] | ||
| − | === | + | ===Install Linux Image=== |
| − | + | Download the [http://wiki.banana-pi.org/Banana_Pi_BPI-W2#Image_Release latest Linux Images] | |
| − | + | ||
| − | + | :'''Note: Board SW4 switch to 1 for sd boot''' | |
| − | + | ||
| − | + | Install Image to SD Card with Win32 Disk Imager On Windows | |
| − | + | :[http://wiki.banana-pi.org/Quick_Start_Banana_pi_SBC#Format_your_SD_under_Windows_os How to Format SD card on Windows] | |
| − | + | :[http://wiki.banana-pi.org/Quick_Start_Banana_pi_SBC#how_to_write_Linux_image How to Install Image On SD Card with Win32 Disk Imager] | |
| − | + | ||
| − | + | Install Image to SD Card On Linux PC with bpi-tools | |
| − | + | :Install bpi-tools on your linux. If you can't access this URL or any other problems, please go to [https://github.com/BPI-SINOVOIP/bpi-tools bpi-tools repo] and install this tools manually. | |
| + | $ apt-get install pv | ||
| + | $ curl -sL https://github.com/BPI-SINOVOIP/bpi-tools/raw/master/bpi-tools | sudo -E bash | ||
| + | |||
| + | :After you download the image, insert your TF card into your Linux PC | ||
| + | $ bpi-copy xxx.img /dev/sdx | ||
| + | |||
| + | :After step 2, then you can insert your TF card into W2, and press power button setup W2. | ||
| + | |||
| + | Install Image to SD Card with Etcher on Windows, Linux and MacOS | ||
| + | |||
| + | :[https://www.balena.io/etcher/ Balena Etcher] is an open source project by Balena, Flash OS images to SD cards & USB drives | ||
| + | |||
| + | Install Image to EMMC with SD Ubuntu | ||
| + | |||
| + | :Prepare a sd with Linux image installed, bootup board from sd card. Copy a Linux image to udisk and plug in W2, mount udisk and use command "bpi-copy xxx-emmc-xxx.img" to flash image to Emmc. After flash successfully, power off the board, eject sdcard and power on again. | ||
| + | |||
| + | ===Install Android image=== | ||
| + | Download the latest [http://wiki.banana-pi.org/Banana_Pi_BPI-W2#Android Android image] | ||
| + | |||
| + | Download [https://download.banana-pi.dev/d/3ebbfa04265d4dddb81b/files/?p=%2FTools%2Fimage_download_tools%2Fw2_android_usb_download_tool.zip BPI-W2 USB flash tool] | ||
| + | |||
| + | Note: | ||
| + | |||
| + | :1. BPI-W2 USB flash tool is a usb download tool for flashing android image to board emmc, and only support Windows platform. | ||
| + | :2. Make sure SW4 switch to '0' for emmc boot. | ||
| + | :3. Read w2_android_usb_download_tool/document/bananapi_w2_usb_download_tool_guide.doc before flashing image. | ||
| + | |||
| + | [https://download.banana-pi.dev/d/3ebbfa04265d4dddb81b/files/?p=%2FImages%2FBPI-W2%2Fdocs%2FBananapi-W2-Android-Custom-IR-Remote.pdf How to support your IR Remote] | ||
| + | |||
| + | [https://download.banana-pi.dev/d/3ebbfa04265d4dddb81b/files/?p=%2FImages%2FBPI-W2%2Fdocs%2FBananapi-W2-Android-Custom-Bootlogo.pdf How to custom your Boot Logo] | ||
==Advanced Development== | ==Advanced Development== | ||
| Line 100: | Line 130: | ||
[[Image:RTL8822BE_STA.jpg]] | [[Image:RTL8822BE_STA.jpg]] | ||
=====AP===== | =====AP===== | ||
| + | Developing | ||
| + | ===Develop 4G module with W2=== | ||
| − | |||
| − | |||
| − | |||
| + | ===GPU=== | ||
| + | * Execute "glmark2-es" to start OpenGL test | ||
| + | * glmark2 Score: 30 | ||
| + | [[Image:M3_GPU_Test.png | 320px]] | ||
===Make your own image=== | ===Make your own image=== | ||
Revision as of 02:23, 3 September 2020
Introduction


Read more: Banana Pi BPI-W2
Development
Let's get start to develop on BPI-W2, see amazing things happen.
Old page:Getting Started with BPI-W2
Basic Development
Prepare
- Prepare 8G/above TF card, USB-Serial interface, PC with Ubuntu System
- Using your USB-Serial Connect debug console on W2


Install Linux Image
Download the latest Linux Images
- Note: Board SW4 switch to 1 for sd boot
Install Image to SD Card with Win32 Disk Imager On Windows
Install Image to SD Card On Linux PC with bpi-tools
- Install bpi-tools on your linux. If you can't access this URL or any other problems, please go to bpi-tools repo and install this tools manually.
    $ apt-get install pv
    $ curl -sL https://github.com/BPI-SINOVOIP/bpi-tools/raw/master/bpi-tools | sudo -E bash
- After you download the image, insert your TF card into your Linux PC
$ bpi-copy xxx.img /dev/sdx
- After step 2, then you can insert your TF card into W2, and press power button setup W2.
Install Image to SD Card with Etcher on Windows, Linux and MacOS
- Balena Etcher is an open source project by Balena, Flash OS images to SD cards & USB drives
Install Image to EMMC with SD Ubuntu
- Prepare a sd with Linux image installed, bootup board from sd card. Copy a Linux image to udisk and plug in W2, mount udisk and use command "bpi-copy xxx-emmc-xxx.img" to flash image to Emmc. After flash successfully, power off the board, eject sdcard and power on again.
Install Android image
Download the latest Android image
Download BPI-W2 USB flash tool
Note:
- 1. BPI-W2 USB flash tool is a usb download tool for flashing android image to board emmc, and only support Windows platform.
- 2. Make sure SW4 switch to '0' for emmc boot.
- 3. Read w2_android_usb_download_tool/document/bananapi_w2_usb_download_tool_guide.doc before flashing image.
Advanced Development
GPIO
GPIO Control
PWM Control
SATA
1. Mount dev on W2
- After insert sata interface, execute "fdisk -l"
- Then "mount /dev/sdx /mnt/xxx"


2. If you meet some errors when you mount SATA, try these following commands:
- "fdisk /dev/sdx" to create new partition , set your partition numbers and size, after created partitions, input "wq" to save and quit.
- "mkfs.ext2 /dev/sdx" to format the SATA
- "mount /dev/sdx /mnt/xxx"
SSD
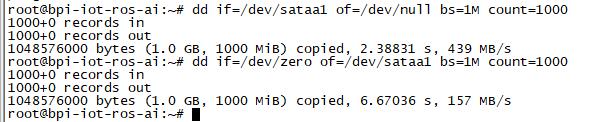
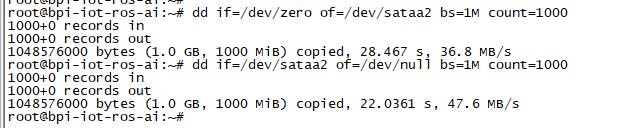
1. After you success to insert SATA, we could input following commands to test SATA interface:
- "time dd if=/dev/xxx of=/dev/null bs=1M count=1000" to test read speed
- "time dd if=/dev/zero of=/dev/sdx bs=1M count=1000" to test write speed

HDD
1. After you success to insert SATA, we could input following commands to test SATA interface:
- "time dd if=/dev/xxx of=/dev/null bs=1M count=1000" to test read speed
- "time dd if=/dev/zero of=/dev/sdx bs=1M count=1000" to test write speed

NetWork
GMAC
- iperf3 -c [server]

- iperf3 -u -c [server]

- iperf3 -s

WiFi & BT
1.If you want to use WiFi or BT, you could use RTL8822BE module.

STA
1. Use commands to setup WiFi client
- ip link set wlan0 up
- iw dev wlan0 scan | grep SSID
- vim /etc/wpa_supplicant/wpa_supplicant.conf
network={
ssid="ssid"
psk="password"
priority=1
}
- wpa_supplicant -iwlan0 -c /etc/wpa_supplicant/wpa_supplicant.conf
- dhclient wlan0
2. Use UI interface to setup WiFi Client

AP
Developing
Develop 4G module with W2
GPU
- Execute "glmark2-es" to start OpenGL test
- glmark2 Score: 30
