Getting Started with R2
Contents
Introduction
The Banana Pi R2 is a router based development board, which can run on a variety of open source operating systems including OpenWrt, Android, and Bananian. It has 4 Gigabit LAN ports, 1 Gigabit WAN, and 300Mbs wireless N capabilities.
Read more: Banana Pi BPI-R2
Key Features
- MediaTek MT7623N, Quad-core ARM Cortex-A7
- Mali 450 MP4 GPU
- 2G DDR3 SDRAM
- 1x Mini PCIE interface
- 2x SATA interface
- 4x Gigabit LAN 1x Gigabit WAN
Hardware
BPI-R2 SATA interface
BPI-R2 support 2 sata interface and onboard power port.

you can use sata line connect your hardisk on BPI-R2.
- Test a SAMSUNG SSD DISK, the Read/Write performance are below:
- Read from disk: 230MB/s \(command: dd if=/dev/sda of=/dev/zero bs=1M count=10240\)
- Write to disk: 192MB/s \(command: dd if=/dev/zero of=/dev/sda bs=1M count=1024 oflag=direct\)
- Note:
- if you use 3.5 big hardisk ,you may need power with outside power. on board power maybe can not support enough current
Development
Let's get start to develop on BPI-R2, see amazing things happen.
Basic Development
Prepare to develop
 * Prepare 16G/above TF card, USB-Serial interface, Ubuntu System
 * Using your USB-Serial Connect debug console on R2
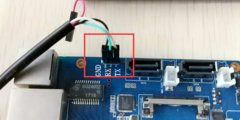

* BananaPi R2 - Debug-UART :http://www.fw-web.de/dokuwiki/doku.php?id=en:bpi-r2:debug-uart
Load your first image on R2
 1.You could download latest image from our forum
 * Here is the example image link: http://forum.banana-pi.org/t/bpi-r2-new-image-release-ubuntu-16-04-v1-3-2018-3-30/5293

 2.Install bpi-tools on your Ubuntu
 * apt-get install pv
 * curl -sL https://github.com/BPI-SINOVOIP/bpi-tools/raw/master/bpi-tools | sudo -E bash

 3.After you download the image, insert your TF card into your Ubuntu
 * Execute "bpi-copy xxx.img /dev/sdx" to install image on your TF card

 4.After step 3, then you can insert your TF card into R2, and press power button for around 10s to setup R2
Ubuntu On SD Card
1. Clone Bsp project from Github * Execute "git clone [email protected]:BPI-SINOVOIP/BPI-R2-bsp.git" 2. Execute "./build.sh", to build your own uboot and kernel.3. After finish built, Execute "cd SD", plug your Ubuntu TFcard in PC. 4. Execute "bpi-update -c bpi-r2.conf -d /dev/sdX", to update the compiled kernel to your TFcard.

Ubuntu On Emmc
 1. If you want to install Ubuntu on EMMC, follow these steps:

   bpi-copy  <XXX.img.zip> /dev/mmcblk1
 * XXX.img.zip is ubuntu image we can get it from http://www.banana-pi.org/r2-download.html
 * power off
 * remove SD & power on
OpenWrt On SD & Emmc Steps
 1. Clone OpenWrt project from Github.
 * Execute "git clone https://github.com/garywangcn/bpi-r2_lede.git"

 2. You need to have installed gcc, binutils, bzip2, flex, python, perl, make, find, grep, diff, unzip, gawk, getopt, subversion, libz-dev and libc headers.

 3. Run "./scripts/feeds update -a" to get all the latest package definitions defined in feeds.conf / feeds.conf.default respectively and "./scripts/feeds install -a" to install symlinks of all of them into package/feeds/.

 4. Use "make menuconfig" to configure your image.
 * Choose "Target System" to config as "MediaTek Ralink ARM"
 * Choose "Boot Loaders" to config as "u-boot-bpi_r2"

 5. Execute "make -j1 V=s" to build your own OpenWrt image.

 6. After built, we have two ways to install image.
 (1) Plug your TFcard in Ubuntu PC, and enter to "build_dir/target-arm_cortex-a7+neon-vfpv4_musl_eabi/linux-mediatek_32/",
     you will find two images:
     * mtk-bpi-r2-EMMC.img
     * mtk-bpi-r2-SD.img
 (2) Write image to TF card, execute "dd if=mtk-bpi-r2-SD.img of=/dev/sdX"

 (3) If you want to install image to EMMC, We need another system which is running on SD card to program EMMC image to EMMC, please follow below steps to do:
     * Copy EMMC image to a running system which is from SD card
     * Program EMMC image to User Data Area of EMMC: dd if=mtk-bpi-r2-EMMC.img of=/dev/mmcblk0 (assume /dev/mmcblk0 is for EMMC)
     * Unlock EMMC boot0 block: echo 0 > /sys/block/mmcblk0boot0/force_ro
     * Program preloader to EMMC boot0 block: dd if=mtk-bpi-r2-EMMC.img of=/dev/mmcblk0boot0 bs=1M count=1
     * Change the Partition configurion of EMMC is 48h: reboot the system which is running SD, and enter the U-boot command line, run command emmc pconf 48 (for this steps, we can change partition configuration in userspace by using mmc-utils,see more information in BPI-R2 OpenWrt(LEDE) Souce code : 2018-04-11)
     * Power off, remove SD card, and then power on R2 board

 7. This step is for upgrade, if you don't want to install image after you built, you could use runtime upgrade.
 * Copy "bin/targets/mediatek/32/lede-mediatek-32-bananapi,bpi-r2-sysupgrade.tar" to R2 board which is running OpenWrt system(no matter where(SD or EMMC) it boots from), and then run command "sysupgrade lede-mediatek-32-bananapi,bpi-r2-sysupgrade.tar" to update both kernel and rootfs.
- 1,Banana Pi R2 install openWRT: https://www.cnblogs.com/topbin/p/8794152.html
- 2,Banana Pi R2 Openwrt Network port configuration analysis : https://www.cnblogs.com/topbin/p/9518279.html
- 3,Banana Pi R2 developing a simple router based on Openwrt : https://www.cnblogs.com/topbin/p/9519881.html
- 4,Banana Pi R2 Openwrt Luci : https://www.cnblogs.com/topbin/p/9519875.html
Network-Configuration
- Network-Configuration : http://www.fw-web.de/dokuwiki/doku.php?id=en:bpi-r2:network:start
Advanced Development
GPIO
GPIO Control
- echo xxx > /sys/class/gpio/export
- echo in/out > /sys/class/gpio/gpioxxx/direction
- echo 0/1 > /sys/class/gpio/gpioxxx/value
Check the base gpio, you could see mine is 233

For example: if you want to change gpio 22 as out highlevel, you need input commands like this:
- echo 255(22+233) > /sys/class/gpio/export
- echo out > /sys/class/gpio/gpio255/direction
- echo 1 > /sys/class/gpio/gpio255/value
PWM Control
- echo x >/sys/class/pwm/pwmchip0/export
- echo 200000 >/sys/class/pwm/pwmchip0/pwmx/period
- echo 100000 >/sys/class/pwm/pwmchip0/pwmx/duty_cycle
- echo 1 >/sys/class/pwm/pwmchip0/pwmx/enable
More about GPIO : http://www.fw-web.de/dokuwiki/doku.php?id=en:bpi-r2:gpio
Develop 4G module with R2
Gets more info from here:
WiFi and Ap mode on R2 Ubuntu
WiFi Client
- wmt_loader (ignore errors)
- stp_uart_launcher -p /etc/firmware &
- ip link set wlan0 up
- iw dev wlan0 scan | grep SSID
- vim /etc/wpasupplicant/wpa_supplicant.conf
- network={ ssid=“ssid” psk=“password” priority=1}
- wpa_supplicant -i wlan0 -c /etc/wpa_supplicant/wpa_supplicant.conf
- dhclient wlan0
AP mode
- wmt_loader (ignore errors)
- stp_uart_launcher -p /etc/firmware &
- echo A >/dev/wmtWifi
- create your hostapd.conf: "vim /etc/hostapd/hostapd.conf "
 interface=ap0
 bridge=br0
 ssid=test_r2
 driver=nl80211
 country_code=US
 hw_mode=b
 channel=1
 max_num_sta=5
 wpa=2
 auth_algs=1
 rsn_pairwise=CCMP
 wpa_key_mgmt=WPA-PSK
 wpa_passphrase=ledetest
 logger_stdout=-1
 logger_stdout_level=2
- According to your network interface(can search internet) to config ap0:
my network interface which can search internet is wan, and ip is 192.168.30.102, so I config ap0 as follows:
“ifconfig ap0 192.168.30.188 netmask 255.255.255.0”
- Run hostapd : “hostapd -d /etc/hostapd/hostapd.conf”
- Config dhcp file : “vim /etc/dhcp/dhcpd.conf”
 subnet 192.168.30.0 netmask 255.255.255.0 {
 range 192.168.30.2 192.168.30.250;
 option domain-name-servers 8.8.8.8;
 option routers 192.168.30.1; }
- Config dhcp of ap0, then the devices which connect ap0 could get IP: "dhcpd ap0 -pf /var/run/dhcpd.pid "
- And a bridge
- brctl addbr br0
- brctl addif br0 ap0
- brctl addif br wan
- Config br0 : “ifconfig br0 192.168.30.180 netmask 255.255.255.0”
- Add br0 gw as : “route add -net default netmask 255.255.255.0 gw 192.168.30.1 dev br0”
WiFi and Ap mode on R2 Openwrt
AP mode
1. Make a bash script
- vim setup.sh
 #!/bin/ash
 wmt_loader &
 sheep 3
 stp_uart_launcher -p /etc/firmware &
 sleep 5
 echo A > /dev/wmtWifi &
 sleep 5
 hostapd -d hostapd.conf
2. Create your hostapd.conf
- vim hostapd.conf
 interface=ap0
 bridge=br-lan
 ssid=BPI_R2
 driver=nl80211
 country_code=CN
 hw_mode=g
 channel=1
 max_num_sta=5
 wpa=2
 auth_algs=1
 rsn_pairwise=CCMP
 wpa_key_mgmt=WPA-PSK
 wpa_passphrase=ledetest
 logger_stdout=-1
 logger_stdout_level=2
3. Make it run
- ./setup.sh
4. Add it to starting progress
- vim /etc/rc.local
 cd /root/
 sleep 6
 ./setup.sh &
5. If your Ap is not stable, please limit the speed, here I limit download speed as 8Mbit/s, upload as 4Mbit/s
- tc qdisc add dev ap0 root handle 1: htb default 11
- tc class add dev ap0 parent 1:1 classid 1:2 htb rate 8Mbit ceil 4Mbit prio 2
Make your own image
- Prepare a SD card which have installed Ubuntu system
- Boot your SD card with R2, after R2 finish starting, copy your files and config your Ubuntu, then poweroff R2
- Plug your SD card in Linux PC, "cd /media", then "ln -s <your account> pi"
- Execute "bpi-migrate -c bpi-r2.conf -c ubuntu-mate-from-sd.conf -d /dev/sdx"
- Then you could get your own image now
FAQ
- 1.Banana Pi BPI-R2 Razberry board OpenHab2
Reference Link
http://www.fw-web.de/dokuwiki/doku.php?id=en:bpi-r2:start