Difference between revisions of "Getting Started with BPI-W3"
| (41 intermediate revisions by the same user not shown) | |||
| Line 1: | Line 1: | ||
| − | [[ | + | =Introduction= |
| − | + | [[File:Banana Pi BPI-W3 LGA 1.jpg|thumb|[[Banana Pi BPI-W3]] with Rockchip RK3588 chip design]] | |
| − | [[File: | + | [[File:Banana_Pi_BPI-RK3588-LGA_5.jpg|thumb| RK3588 LGA BGA core board with Rockchip RK3588]] |
| + | [[File:BPI-RK3588_board_core_2.jpg|thumb|[[BPI-RK3588 Core board and development Kit]] Gold finger interface core board]] | ||
| + | [[File:Banana_pi_BPI-R1_1.JPG|thumb|[[Banana Pi BPI-R1]] Allwinner A20]] | ||
| + | [[File:BPI-R2_3.JPG|thumb|[[Banana Pi BPI-R2]] with MTK MT7623N chip design]] | ||
| + | [[File:Banana_Pi_BPI-R2_Pro_1_750.jpg|thumb|[[Banana Pi BPI-R2 Pro]] Rockchip RK3568 design]] | ||
| + | [[File:BPI-R64_3.JPG|thumb|[[Banana Pi BPI-R64]] MTK MT7622]] | ||
| + | [[File:O2A0500.jpg|thumb|[[Banana Pi BPI-W2]] with Realtek RTD1296 chip design]] | ||
| + | [[File:Banana_Pi_BPI-R3_Router_2.jpg|thumb|[[Banana Pi BPI-R3]] with MediaTek MT7986(Filogic 830)]] | ||
| + | [[File:Banana_Pi_BPI-M2S_1.jpg|thumb|[[Banana Pi BPI-M2S]] Amlogic A311D chip]] | ||
| + | =specifications= | ||
| − | + | =Linux= | |
| + | The below steps is to flash linux release image into BPI-W3 | ||
| + | ==Prepare== | ||
| + | :1. Good Type-C data cable for image download into EMMC | ||
| + | :2. Usb to ttl cable if you need debug, default baudrate is 1500000. | ||
| + | :3. Windows or Linux PC. | ||
| + | :4. Download the Linux Release Image [https://wiki.banana-pi.org/Banana_Pi_BPI-W3#Image Release Linux Release Image], and confirm that the md5 checksum is correct before flashing. | ||
| + | Note: The below picture is for BPI-W3's Debug Connecting, the red usb cable is Type-C data cable for image download, the three colors usb to ttl cable is linux serial console, please install CH340E's USB convert serial driver. | ||
| + | :[[File:linux_download.jpg|820px]] | ||
| − | == | + | ==Starting the board for the first time== |
| + | BPI-W3 can be started with eMMC Module or μSD Card.. | ||
| − | + | ===Install Whole Image with Usb Download Tool=== | |
| − | + | ====Windows Driver install==== | |
| + | 1. Download and install [https://download.banana-pi.dev/d/ca025d76afd448aabc63/files/?p=%2FTools%2Fimage_download_tools%2FDriverAssitant_v5.11.zip Rockchip USB driver] | ||
| + | :[[File:driver_install_2.PNG]] | ||
| + | 2. Download [https://download.banana-pi.dev/d/ca025d76afd448aabc63/files/?p=%2FTools%2Fimage_download_tools%2FUpdate-EMMC-Tools.zip Rockchip USB Download Tool for EMMC upgrade] | ||
| + | :This tool defaults language is Chinese. you can change it to English after extract the package. Open RKDevTool_Release_v2.84/config.ini with an text editor (like notepad). The starting lines are: | ||
| − | == | + | #Language Selection: Selected=1(Chinese); Selected=2(English) |
| + | [Language] | ||
| + | Kinds=2 | ||
| + | Selected=2 | ||
| + | LangPath=Language\ | ||
| − | + | 3. Open RKDevTool.exe, Switch to the “upgrade firmware” page. Press the “firmware” button to open the image file to be upgraded. The upgrade tool displays detailed firmware information. | |
| − | + | Note: Because Linux's release image is very large, So you need wait for a long time when Software open and analysis the image file. | |
| − | + | :[[File:Bpi-r2pro-Firmware.png]] | |
| − | |||
| − | |||
| − | |||
| − | |||
| − | |||
| − | |||
| − | |||
| − | |||
| − | + | 4. Disconnect power adapter, connect dual male usb cable from the top usb host port to PC.Use the Type-C data cable to connect one end to the PC and the other end to the BPI-W3 board. | |
| − | |||
| − | |||
| − | |||
| − | |||
| − | + | 5. There have two usb download mode for image upgrade. | |
| − | + | :*'''Uboot Usb Download Mode (loader mode)''' | |
| − | + | ::It's supposed to use this way if board already flashed a bootable uboot before. | |
| + | :*'''Maskrom Usb Download Mode''' | ||
| − | + | :Press the Recovery button or Maskrom button beside 3pin uart header and hold, connect the power adapter or press the RST button if power adapter already connected, about two seconds later, release the button. PC will Identify the device if RK usb driver installed correctly. | |
| − | + | :[[File:device_manage.PNG]] | |
| − | |||
| − | |||
| − | |||
| − | |||
| − | |||
| − | + | :The download tool also show the download mode if device connected. | |
| − | + | :[[File:load_download.PNG]] | |
| − | + | :[[File:maskrom_download.PNG]] | |
| − | |||
| − | |||
| − | |||
| − | |||
| − | |||
| − | |||
| − | |||
| − | |||
| − | |||
| − | |||
| − | |||
| − | |||
| − | |||
| − | |||
| − | |||
| − | |||
| − | |||
| − | |||
| − | |||
| − | + | 6. Press the “upgrade” button to start the upgrade. | |
| − | + | :[[File:upgrade.PNG]] | |
| − | + | 7: If the upgrade fails, you can try to erase the Emmc by pressing the EraseFlash button first, and then upgrade image again. | |
| + | :[[File:erase.PNG]] | ||
| − | + | ===Install Separate Images with Usb Download Tool=== | |
| + | 1. Download [https://download.banana-pi.dev/d/ca025d76afd448aabc63/files/?p=%2FTools%2Fimage_download_tools%2FUpdate-EMMC-Tools.zip Rockchip USB Download Tool for EMMC upgrade] | ||
| + | 2. Open RKDevTool.exe, Switch to the “Download Image” page. The upgrade tool displays detailed all firmware image information. Then all image file is ready, you may push "run", the upgrade process begin. | ||
| + | Note: Because Linux's release package, Example: Ubuntu-22.04-Desktop-EMMCBoot-rockdev-MT7531SW-DSA.zip, unzip it into the same folder "Update-EMMC-Tools" inside. | ||
| + | :[[File:Bpi-r2pro-emmc-flash.png]] | ||
| − | + | ===Install Image with SDcard=== | |
| − | + | 1. Download Rockchip [https://download.banana-pi.dev/d/ca025d76afd448aabc63/files/?p=%2FTools%2Fimage_download_tools%2FUpdate-SD-Tools.zip SDDiskTool]. | |
| − | |||
| − | |||
| − | + | 2. Insert microSD card to Windows PC, 8GB sdcard size at least. | |
| − | |||
| − | |||
| − | + | 3. Run SD_Firmware_Tool, check the “Upgrade Firmware” box and select the correct removable disk device, Choose firmware image, then Click Create button to make it and wait until it is finshed | |
| − | + | :[[File:sd_download.png]] | |
| − | |||
| − | + | 4. Safely remove the microSD card, insert it into the R2pro board, power on the board, it will start Linux System. | |
| − | |||
| − | |||
| − | |||
| − | |||
| − | |||
| − | + | ==Build Linux BSP Source Code== | |
| − | + | :1. Get Linux source code | |
| − | |||
| − | + | $ git clone https://github.com/BPI-SINOVOIP/BPI-W3-BSP | |
| − | |||
| − | |||
| − | + | :2. Build the Linux BSP Source code | |
| − | + | ==Dual Display== | |
| + | Note: All linux Image suuport dual display HDMI and MIPI-DSI together, MIPI-DSI only support 1200x1920. | ||
| + | Note: HDMI Display | ||
| + | :[[File:HDMI.jpg|640px]] | ||
| + | Note: MIPI-DSI panel Display | ||
| + | :[[File:mipi-dsi.jpg|640px]] | ||
| − | + | ==Wlan&BT== | |
| − | + | :J14 M.2 KEY E Slot is used for connect Wlan&BT adapter, default image support RTL8822CE(PCIE+USB) and RTL8822CS(SDIO+UART). | |
| − | |||
| − | |||
| − | |||
| − | |||
| − | |||
| − | |||
| − | |||
| − | + | ==HDMI RX== | |
| − | + | The ArmSoM-w3 uses an hdmi_in port built into the rk3588 chip,You can use the v4l2 command to test the hdmi in interface. | |
| − | |||
| − | |||
| − | |||
| − | |||
| − | |||
| − | + | ====View all video nodes==== | |
| − | + | ||
| − | + | ls /dev/video* | |
| − | |||
| − | |||
| − | |||
| − | |||
| − | |||
| − | |||
| − | |||
| − | |||
| − | |||
| − | |||
| − | |||
| − | |||
| − | |||
| − | |||
| − | |||
| − | |||
| − | |||
| − | |||
| − | |||
| − | |||
| − | |||
| − | |||
| − | |||
| − | |||
| − | |||
| − | |||
| − | |||
| − | |||
| − | |||
| − | |||
| − | |||
| − | |||
| − | |||
| − | |||
| − | |||
| − | |||
| − | |||
| − | |||
| − | |||
| − | |||
| − | |||
| − | |||
| − | |||
| − | |||
| − | |||
| − | |||
| − | |||
| − | |||
| − | |||
| − | |||
| − | |||
| − | |||
| − | |||
| − | |||
| − | |||
| − | |||
| − | |||
| − | |||
| − | |||
| − | |||
| − | |||
| − | |||
| − | |||
| − | |||
| − | |||
| − | |||
| − | |||
| − | |||
| − | |||
| − | |||
| − | |||
| − | |||
| − | |||
| − | |||
| − | |||
| − | |||
| − | |||
| − | |||
| − | |||
| − | |||
| − | |||
| − | |||
| − | |||
| − | |||
| − | |||
| − | |||
| − | |||
| − | |||
| − | |||
| − | |||
| − | |||
| − | |||
| − | == | ||
| − | = | ||
| − | |||
| − | |||
| − | |||
| − | |||
| − | |||
| − | |||
| − | |||
| − | |||
| − | |||
| − | |||
| − | |||
| − | |||
| − | |||
| − | |||
| − | |||
| − | |||
| − | |||
| − | |||
| − | |||
| − | |||
| − | |||
| − | |||
| − | |||
| − | |||
| − | |||
| − | |||
| − | |||
| − | |||
| − | |||
| − | |||
| − | * | ||
| − | |||
| − | |||
| − | |||
| − | |||
| − | |||
| − | |||
| − | |||
| − | |||
| − | |||
| − | |||
| − | |||
| − | |||
| − | === | + | ====Look for the rk hdmirx device==== |
| − | + | Run the v4l2-ctl -d command to specify the vidoe node. Run the -D command to view the node information. Check the rk_hdmirx device using the Driver name. | |
| − | |||
| − | |||
| − | |||
| − | |||
| − | |||
| − | + | # v4l2-ctl -d /dev/video0 -D | |
| + | Driver Info: | ||
| + | Driver name : rk_hdmirx | ||
| + | Card type : rk_hdmirx | ||
| + | Bus info : fdee0000.hdmirx-controller | ||
| + | Driver version : 5.10.66 | ||
| + | Capabilities : 0x84201000 | ||
| + | Video Capture Multiplanar | ||
| + | Streaming | ||
| + | Extended Pix Format | ||
| + | Device Capabilities | ||
| + | Device Caps : 0x04201000 | ||
| + | Video Capture Multiplanar | ||
| + | Streaming | ||
| + | Extended Pix Format | ||
| − | + | ====Query resolution and image format==== | |
| − | + | To query the current resolution and image format: | |
| − | + | # v4l2-ctl -d /dev/video17 --get-fmt-video | |
| − | + | Format Video Capture Multiplanar: | |
| − | + | Width/Height : 3840/2160 | |
| − | + | Pixel Format : 'NV16' | |
| − | + | Field : None | |
| + | Number of planes : 1 | ||
| + | Flags : premultiplied-alpha, 000000fe | ||
| + | Colorspace : Unknown (1025fcdc) | ||
| + | Transfer Function : Unknown (00000020) | ||
| + | YCbCr Encoding : Unknown (000000ff) | ||
| + | Quantization : Default | ||
| + | Plane 0 : | ||
| + | Bytes per Line : 3840 | ||
| + | Size Image : 16588800 | ||
| − | + | ====Grab image file==== | |
| + | Save the image file to the device, adb pull to the PC, and view it through 7yuv and other tools: | ||
| − | == | + | v4l2-ctl --verbose -d /dev/video17 \ |
| − | + | --set-fmt-video=width=3840,height=2160,pixelformat='NV16' \ | |
| − | + | --stream-mmap=4 --stream-skip=3 \ | |
| + | --stream-to=/data/4k60_nv16.yuv \ | ||
| + | --stream-count=5 --stream-poll | ||
| − | = | + | ====Querying the HDMI RX status==== |
| + | Query the current status of HDMI RX, including signal locking, image format, Timings information, Pixl Clk, etc. | ||
| − | + | # cat /d/hdmirx/status | |
| + | status: plugin | ||
| + | Clk-Ch:Lock Ch0:Lock Ch1:Lock Ch2:Lock | ||
| + | Ch0-Err:0 Ch1-Err:0 Ch2-Err:0 | ||
| + | Color Format: YUV422 Store Format: YUV422 (8 bit) | ||
| + | Mode: 3840x2160p60 (4400x2250) hfp:172 hs:92 hbp:296 vfp:8 vs:10 vbp:72 | ||
| + | Pixel Clk: 594024000 | ||
Revision as of 23:40, 24 May 2023
Contents
Introduction


specifications
Linux
The below steps is to flash linux release image into BPI-W3
Prepare
- 1. Good Type-C data cable for image download into EMMC
- 2. Usb to ttl cable if you need debug, default baudrate is 1500000.
- 3. Windows or Linux PC.
- 4. Download the Linux Release Image Release Linux Release Image, and confirm that the md5 checksum is correct before flashing.
Note: The below picture is for BPI-W3's Debug Connecting, the red usb cable is Type-C data cable for image download, the three colors usb to ttl cable is linux serial console, please install CH340E's USB convert serial driver.

Starting the board for the first time
BPI-W3 can be started with eMMC Module or μSD Card..
Install Whole Image with Usb Download Tool
Windows Driver install
1. Download and install Rockchip USB driver

2. Download Rockchip USB Download Tool for EMMC upgrade
- This tool defaults language is Chinese. you can change it to English after extract the package. Open RKDevTool_Release_v2.84/config.ini with an text editor (like notepad). The starting lines are:
 #Language Selection: Selected=1(Chinese); Selected=2(English)
 [Language]
 Kinds=2
 Selected=2
 LangPath=Language\
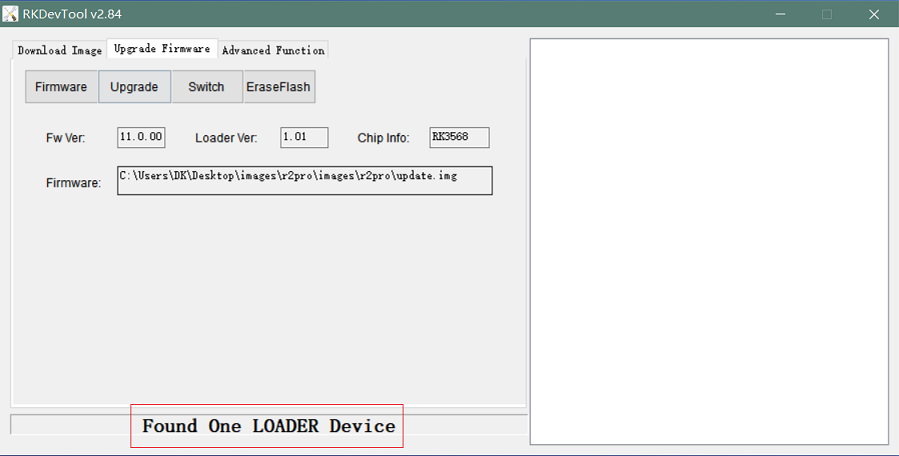
3. Open RKDevTool.exe, Switch to the “upgrade firmware” page. Press the “firmware” button to open the image file to be upgraded. The upgrade tool displays detailed firmware information.
Note: Because Linux's release image is very large, So you need wait for a long time when Software open and analysis the image file.

4. Disconnect power adapter, connect dual male usb cable from the top usb host port to PC.Use the Type-C data cable to connect one end to the PC and the other end to the BPI-W3 board.
5. There have two usb download mode for image upgrade.
- Uboot Usb Download Mode (loader mode)
- It's supposed to use this way if board already flashed a bootable uboot before.
- Maskrom Usb Download Mode
- Press the Recovery button or Maskrom button beside 3pin uart header and hold, connect the power adapter or press the RST button if power adapter already connected, about two seconds later, release the button. PC will Identify the device if RK usb driver installed correctly.
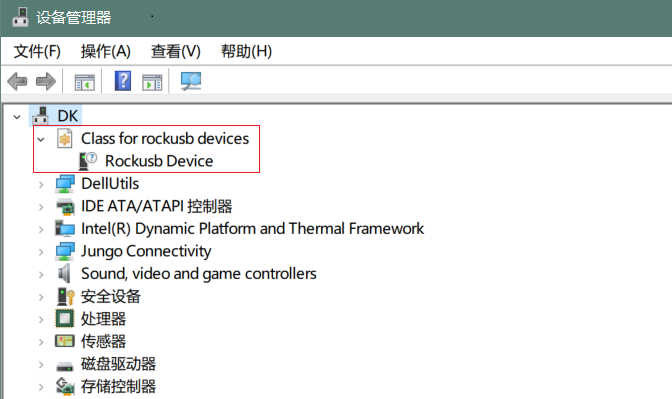

- The download tool also show the download mode if device connected.


6. Press the “upgrade” button to start the upgrade.

7: If the upgrade fails, you can try to erase the Emmc by pressing the EraseFlash button first, and then upgrade image again.

Install Separate Images with Usb Download Tool
1. Download Rockchip USB Download Tool for EMMC upgrade 2. Open RKDevTool.exe, Switch to the “Download Image” page. The upgrade tool displays detailed all firmware image information. Then all image file is ready, you may push "run", the upgrade process begin.
Note: Because Linux's release package, Example: Ubuntu-22.04-Desktop-EMMCBoot-rockdev-MT7531SW-DSA.zip, unzip it into the same folder "Update-EMMC-Tools" inside.

Install Image with SDcard
1. Download Rockchip SDDiskTool.
2. Insert microSD card to Windows PC, 8GB sdcard size at least.
3. Run SD_Firmware_Tool, check the “Upgrade Firmware” box and select the correct removable disk device, Choose firmware image, then Click Create button to make it and wait until it is finshed

4. Safely remove the microSD card, insert it into the R2pro board, power on the board, it will start Linux System.
Build Linux BSP Source Code
- 1. Get Linux source code
$ git clone https://github.com/BPI-SINOVOIP/BPI-W3-BSP
- 2. Build the Linux BSP Source code
Dual Display
  Note: All linux Image suuport dual display HDMI and MIPI-DSI together, MIPI-DSI only support 1200x1920.
  Note: HDMI Display

Note: MIPI-DSI panel Display

Wlan&BT
- J14 M.2 KEY E Slot is used for connect Wlan&BT adapter, default image support RTL8822CE(PCIE+USB) and RTL8822CS(SDIO+UART).
HDMI RX
The ArmSoM-w3 uses an hdmi_in port built into the rk3588 chip,You can use the v4l2 command to test the hdmi in interface.
View all video nodes
ls /dev/video*
Look for the rk hdmirx device
Run the v4l2-ctl -d command to specify the vidoe node. Run the -D command to view the node information. Check the rk_hdmirx device using the Driver name.
# v4l2-ctl -d /dev/video0 -D
Driver Info:
Driver name : rk_hdmirx
Card type : rk_hdmirx
Bus info : fdee0000.hdmirx-controller
Driver version : 5.10.66
Capabilities : 0x84201000
Video Capture Multiplanar
Streaming
Extended Pix Format
Device Capabilities
Device Caps : 0x04201000
Video Capture Multiplanar
Streaming
Extended Pix Format
Query resolution and image format
To query the current resolution and image format:
# v4l2-ctl -d /dev/video17 --get-fmt-video
Format Video Capture Multiplanar:
Width/Height : 3840/2160
Pixel Format : 'NV16'
Field : None
Number of planes : 1
Flags : premultiplied-alpha, 000000fe
Colorspace : Unknown (1025fcdc)
Transfer Function : Unknown (00000020)
YCbCr Encoding : Unknown (000000ff)
Quantization : Default
Plane 0 :
Bytes per Line : 3840
Size Image : 16588800
Grab image file
Save the image file to the device, adb pull to the PC, and view it through 7yuv and other tools:
v4l2-ctl --verbose -d /dev/video17 \
--set-fmt-video=width=3840,height=2160,pixelformat='NV16' \
--stream-mmap=4 --stream-skip=3 \
--stream-to=/data/4k60_nv16.yuv \
--stream-count=5 --stream-poll
Querying the HDMI RX status
Query the current status of HDMI RX, including signal locking, image format, Timings information, Pixl Clk, etc.
# cat /d/hdmirx/status
status: plugin
Clk-Ch:Lock Ch0:Lock Ch1:Lock Ch2:Lock
Ch0-Err:0 Ch1-Err:0 Ch2-Err:0
Color Format: YUV422 Store Format: YUV422 (8 bit)
Mode: 3840x2160p60 (4400x2250) hfp:172 hs:92 hbp:296 vfp:8 vs:10 vbp:72
Pixel Clk: 594024000