Difference between revisions of "快速上手 M1P"
JackZengWiki (talk | contribs) (→Introduction) |
JackZengWiki (talk | contribs) (→Development) |
||
| Line 14: | Line 14: | ||
* WiFi onbaord | * WiFi onbaord | ||
| − | = | + | =开发= |
| − | + | ==基础开发== | |
| − | == | + | ===开发前准备=== |
| − | === | + | * 准备一张容量不低于8Gb的TF卡, USB-Serial 串口线, 一台运行Ubuntu系统的PC机 |
| − | * | + | * 使用你的串口线去连接M1P的调试串口 |
| − | * | ||
| − | === | + | ===烧录第一个Linux镜像到 M1P=== |
| − | 1. | + | 1.你可以从下面链接下载最近的镜像 |
| + | * http://forum.banana-pi.org/t/bananapi-m1-m1p-r1-new-image-android-and-ubuntu-sever-release-2018-07-28/6357 | ||
| − | 2. | + | 2.在你的Ubuntu系统电脑上安装bpi-tools, 执行以下命令即可安装: |
* apt-get install pv | * apt-get install pv | ||
* curl -sL https://github.com/BPI-SINOVOIP/bpi-tools/raw/master/bpi-tools | sudo -E bash | * curl -sL https://github.com/BPI-SINOVOIP/bpi-tools/raw/master/bpi-tools | sudo -E bash | ||
| − | 3. | + | 3.下载完镜像后, 插入TF卡到你的Ubuntu电脑中 |
| − | * | + | * 运行命令 "bpi-copy xxx.img /dev/sdx" 烧录镜像到你的TF卡中. |
| − | 4. | + | 4.烧录完成后, 把TF卡插到M1P中, 按住M1P的电源键启动M1. |
| − | == | + | ==进阶开发== |
| − | ===SATA=== | + | ===SATA 接口=== |
| − | 1. | + | 1. 挂载 SATA 到 M1P |
| − | * | + | * 将硬盘接到SATA接口后, 执行命令"fdisk -l" |
| − | * | + | * 然后执行命令 "mount /dev/sdx /mnt/xxx" |
[[Image:M1P_Sata.png]] | [[Image:M1P_Sata.png]] | ||
| − | 2. | + | 2. 如果你在挂载SATA的过程中遇到一些错误, 你可以尝试以下步骤来修复: |
| − | * "fdisk /dev/sdx" | + | * "fdisk /dev/sdx" 来创建一个新的分区, 设置分区号和大小, 创建分区之后, 输入 "wq" 来保存退出. |
| − | * "mkfs.ext2 /dev/sdx" | + | * "mkfs.ext2 /dev/sdx" 来格式化 SATA |
* "mount /dev/sdx /mnt/xxx" | * "mount /dev/sdx /mnt/xxx" | ||
| − | 3. | + | 3. 挂载SATA成功后, 可以执行以下命令来测试SATA接口的性能: |
* "time dd if=/dev/xxx of=/dev/null bs=1M count=1000" to test read speed | * "time dd if=/dev/xxx of=/dev/null bs=1M count=1000" to test read speed | ||
* "time dd if=/dev/zero of=/dev/sdx bs=1M count=1000" to test write speed | * "time dd if=/dev/zero of=/dev/sdx bs=1M count=1000" to test write speed | ||
[[Image:Sata_test.png]] | [[Image:Sata_test.png]] | ||
| − | === | + | ===触摸屏=== |
===GMAC=== | ===GMAC=== | ||
| − | + | 使用 iperf3 来测试 gmac | |
| − | 1. | + | 1. 在 PC 终端启动Server: |
| − | * | + | * 执行命令 "iperf3 -s" |
| − | 2. | + | 2. 在开发板端启动Client: |
| − | * TCP | + | * 测试 TCP: "iperf3 -c serverIP" |
| − | * UDP | + | * 测试 UDP: "iperf3 -u -c serverIP" |
[[Image:M1P_Gmac_test.png]] | [[Image:M1P_Gmac_test.png]] | ||
===WiFi on M1P=== | ===WiFi on M1P=== | ||
====WiFi Client==== | ====WiFi Client==== | ||
| − | + | 这里提供两种方法来开启WiFi | |
| − | 1. | + | 1. 使用命令行来开启WiFi |
| − | + | ip link set wlan0 up | |
| − | + | iw dev wlan0 scan | grep SSID | |
| − | + | vim /etc/wpasupplicant/wpa_supplicant.conf | |
| − | + | network={ ssid="ssid" psk="password" priority=1 } | |
| − | + | wpa_supplicant -B -dd -i wlan0 -c /etc/wpa_supplicant/wpa_supplicant.conf | |
| − | + | dhclient wlan0 | |
| + | 2. 使用图形界面来开启WiFi | ||
2. Use UI interface to setup WiFi Client | 2. Use UI interface to setup WiFi Client | ||
| − | === | + | ===清除 boot=== |
| − | + | 1. 执行以下命令来清除boot | |
| − | + | git clone https://github.com/BPI-SINOVOIP/BPI-files/tree/master/SD/100MB | |
| + | bpi-bootsel BPI-cleanboot-8k.img.gz /dev/sdX | ||
| − | === | + | ===红外功能=== |
| − | * | + | * 执行命令 "getevent" |
| − | * | + | * 使用红外控制器发送数据到 M1P |
[[Image:M1P_IR.png]] | [[Image:M1P_IR.png]] | ||
===RPi.GPIO=== | ===RPi.GPIO=== | ||
| − | ==== | + | ====安装 RPi.GPIO==== |
| − | |||
| − | |||
| − | |||
| − | |||
| − | |||
| − | ==== | + | 执行命令 "git clone https://github.com/BPI-SINOVOIP/RPi.GPIO" |
| + | 克隆代码后, 进入到 "cd RPi,GPIO" | ||
| + | 执行命令 "sudo apt-get update" | ||
| + | 执行命令 "sudo apt-get install python-dev python3-dev" | ||
| + | 执行命令 "sudo python setup.py install" or "sudo python3 setup.py install" to install the module | ||
| + | |||
| + | ====使用 RPi.GPIO==== | ||
* cd /usr/local/bin | * cd /usr/local/bin | ||
| − | * | + | * 执行命令 "./bpi_test_g40.py" 可以测试Rpi.GPIO |
[[Image: RPi_GPIO.png]] | [[Image: RPi_GPIO.png]] | ||
| Line 104: | Line 107: | ||
===WringPi=== | ===WringPi=== | ||
* GitHub: https://github.com/BPI-SINOVOIP/BPI-WiringPi2.git | * GitHub: https://github.com/BPI-SINOVOIP/BPI-WiringPi2.git | ||
| − | * | + | * 我们提供了集成的命令在 "/usr/local/bin" 中 |
====RGB 1602 LCD==== | ====RGB 1602 LCD==== | ||
| − | * | + | * 执行命令 "/usr/local/bin/bpi_test_lcd1602.sh" |
====8x8 RGB LED Martix==== | ====8x8 RGB LED Martix==== | ||
| − | * | + | * 首先你需要一个8x8 LED Martix 的 GPIO 扩展板 |
[[Image: WringPi_LED_Martix_Extend_Board.png]] | [[Image: WringPi_LED_Martix_Extend_Board.png]] | ||
| − | * | + | * 执行命令 "/usr/local/bin/bpi_test_gpio40.sh" |
===File System=== | ===File System=== | ||
| − | * | + | * 只读文件系统改为可读可写: "mount -o remount,rw /" |
| − | === | + | ===安装 QT=== |
* sudo apt-get install build-essential | * sudo apt-get install build-essential | ||
* sudo apt-get install libgl1-mesa-dev | * sudo apt-get install libgl1-mesa-dev | ||
Revision as of 01:51, 12 October 2018
介绍
BPI-M1P

  Banana Pi M1+ 提供板载 WiFi g/b/n支持, 开发板支持所有项目甚至更多的板载WiFi, 其可以运行Android, Lubuntu, Ubuntu, Debian, and Raspbian等系统.
  Banana Pi M1+ 是 M1 的升级版, 新增 WiFi 后, 用户可以更加方便的开发自己的应用或者路由项目.
- 关于更多 : Banana Pi BPI-M1+
关键特性
- Dual-core 1.0GHz CPU
- 1 GB DDR3 memeory
- Mali-400 MP2 with Open GL ES 2.0/1.1
- WiFi onbaord
开发
基础开发
开发前准备
 * 准备一张容量不低于8Gb的TF卡, USB-Serial 串口线, 一台运行Ubuntu系统的PC机
 * 使用你的串口线去连接M1P的调试串口
烧录第一个Linux镜像到 M1P
 1.你可以从下面链接下载最近的镜像
 * http://forum.banana-pi.org/t/bananapi-m1-m1p-r1-new-image-android-and-ubuntu-sever-release-2018-07-28/6357

 2.在你的Ubuntu系统电脑上安装bpi-tools, 执行以下命令即可安装:
 * apt-get install pv
 * curl -sL https://github.com/BPI-SINOVOIP/bpi-tools/raw/master/bpi-tools | sudo -E bash

 3.下载完镜像后, 插入TF卡到你的Ubuntu电脑中
 * 运行命令 "bpi-copy xxx.img /dev/sdx" 烧录镜像到你的TF卡中.

 4.烧录完成后, 把TF卡插到M1P中, 按住M1P的电源键启动M1.
进阶开发
SATA 接口
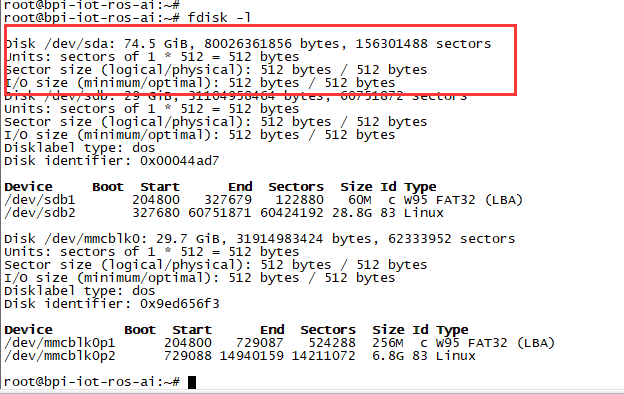
1. 挂载 SATA 到 M1P
- 将硬盘接到SATA接口后, 执行命令"fdisk -l"
- 然后执行命令 "mount /dev/sdx /mnt/xxx"

2. 如果你在挂载SATA的过程中遇到一些错误, 你可以尝试以下步骤来修复:
- "fdisk /dev/sdx" 来创建一个新的分区, 设置分区号和大小, 创建分区之后, 输入 "wq" 来保存退出.
- "mkfs.ext2 /dev/sdx" 来格式化 SATA
- "mount /dev/sdx /mnt/xxx"
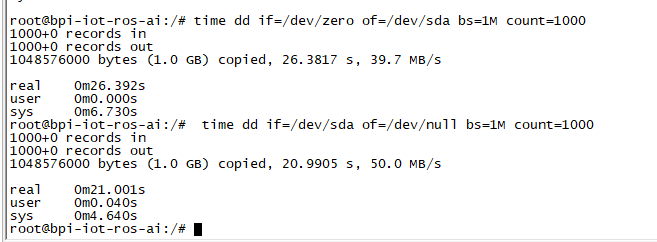
3. 挂载SATA成功后, 可以执行以下命令来测试SATA接口的性能:
- "time dd if=/dev/xxx of=/dev/null bs=1M count=1000" to test read speed
- "time dd if=/dev/zero of=/dev/sdx bs=1M count=1000" to test write speed

触摸屏
GMAC
使用 iperf3 来测试 gmac
1. 在 PC 终端启动Server:
- 执行命令 "iperf3 -s"
2. 在开发板端启动Client:
- 测试 TCP: "iperf3 -c serverIP"
- 测试 UDP: "iperf3 -u -c serverIP"

WiFi on M1P
WiFi Client
这里提供两种方法来开启WiFi
1. 使用命令行来开启WiFi ip link set wlan0 up iw dev wlan0 scan | grep SSID vim /etc/wpasupplicant/wpa_supplicant.conf network={ ssid="ssid" psk="password" priority=1 } wpa_supplicant -B -dd -i wlan0 -c /etc/wpa_supplicant/wpa_supplicant.conf dhclient wlan0 2. 使用图形界面来开启WiFi
2. Use UI interface to setup WiFi Client
清除 boot
1. 执行以下命令来清除boot git clone https://github.com/BPI-SINOVOIP/BPI-files/tree/master/SD/100MB bpi-bootsel BPI-cleanboot-8k.img.gz /dev/sdX
红外功能
- 执行命令 "getevent"
- 使用红外控制器发送数据到 M1P

RPi.GPIO
安装 RPi.GPIO
执行命令 "git clone https://github.com/BPI-SINOVOIP/RPi.GPIO" 克隆代码后, 进入到 "cd RPi,GPIO" 执行命令 "sudo apt-get update" 执行命令 "sudo apt-get install python-dev python3-dev" 执行命令 "sudo python setup.py install" or "sudo python3 setup.py install" to install the module
使用 RPi.GPIO
- cd /usr/local/bin
- 执行命令 "./bpi_test_g40.py" 可以测试Rpi.GPIO

WringPi
- GitHub: https://github.com/BPI-SINOVOIP/BPI-WiringPi2.git
- 我们提供了集成的命令在 "/usr/local/bin" 中
RGB 1602 LCD
- 执行命令 "/usr/local/bin/bpi_test_lcd1602.sh"
8x8 RGB LED Martix
- 首先你需要一个8x8 LED Martix 的 GPIO 扩展板

- 执行命令 "/usr/local/bin/bpi_test_gpio40.sh"
File System
- 只读文件系统改为可读可写: "mount -o remount,rw /"
安装 QT
- sudo apt-get install build-essential
- sudo apt-get install libgl1-mesa-dev
- sudo apt-get install libglu1-mesa-dev
- sudo apt-get install freeglut3-dev
- sudo apt-get install cmake
- sudo apt-get install qt5-default qtcreator
A20 CAN Bus
In order to port can4linux to the BananaPi, the CAN module description is needed from the A20 hardware manual. can4linux is a character-driver-based Linux driver used already on desktop PCs and embedded platforms like Freescale FlexCAN (the i.MX series of micro controllers) or Xiliny Zynq.
There is a more detailed document about CAN on the A20 at: https://dl.linux-sunxi.org/A20/CAN%20Bus1.pdf
This is a tutorial for using CAN BUS on bananapi with bananian 15-01
Thank selqcir share this example:
- Download and install "bananian-1501.img" into 8 GB SDCard.
- Expand the root file system using "bananian-config"
- Install missing package:
apt-get install git
apt-get update
apt-get upgrade
reboot
- Get last bananian available, and continu to install missing package:
git clone https://github.com/Bananian/linux-bananapi
apt-get install build-essential u-boot-tools uboot-mkimage
apt-get install libusb-1.0-0 libusb-1.0-0-dev git wget fakeroot kernel-package zlib1g-dev libncurses5-dev
apt-get install subversion
- Build kernel:
cd linux-bananapi
make menuconfig
- Exit without saving when menu appears
zcat /proc/config.gz > /root/linux-bananapi/.config
make uImage modules
make INSTALL_MOD_PATH=output modules_install
- At this step, kernel should be compiled and "Module.symvers" should be available
- Then rename modules and firmware provide by Bananian, and replace by the new one.
mv /lib/modules /lib/modules.old
mv /lib/firmware /lib/firmware.old
mv /root/linux-bananapi/output/lib/modules /lib/modules
mv /root/linux-bananapi/output/lib/firmware /lib/firmware
- Same for uImage:
mount /dev/mmcblk0p1 /mnt
cd /mnt
mv uImage uImage.old
mv /root/linux-bananapi/arch/arm/boot/uImage /mnt
reboot
- Create link for further build:
cd /lib/modules/3.4.104/
ln -s /root/linux-bananapi build
cd ~
- Get Can4Linux and build it:
svn checkout https://svn.code.sf.net/p/can4linux/code/trunk can4linux-code
cd /root/can4linux-code/can4linux/
make TARGET=BANANAPI
- Install module for each startup of the board:
insmod can4linux.ko
cp can4linux.ko /lib/modules/3.4.104/kernel/net/can/
depmod -A -v
modprobe -v can4linux
echo "" >> /etc/modules ; echo "can4linux" >> /etc/modules
reboot
- Build CAN example
apt-get install swig
apt-get install python-dev
cd can4linux-code/can4linux-examples/
- Update CAN speed and device in file "pyCan-example.py"
# setting the device number
device = 0
defaultBaudrate = '250'
- Connect CAN transceiver and CAN bus, and check with for example:
python pyCan-example.py
That's all
With this method, kernel version is "Linux bananapi 3.4.104" instead of "Linux bananapi 3.4.104+", because i was unable to find same sources than Bananian 15-01 , but CAN bus work !