Getting Started with M4
Contents
Introduction
BPI-M4
Banana Pi BPI-M4 use Realtek RTD1395 chp design ,it is a 64-bit quad-core A53 mini single board computer. It features 1 GB of RAM and 8 GB eMMC. It also has onboard WiFi for b/g/n/ac and BT 4.2. On the ports side, the BPI-M4 has 4 USB 2.0 ports, 1 USB TYPE C port, 1 HDMI port, 1 audio jack. support M.2 Key E PCIE 2.0 interface.
- Read more about : Banana Pi BPI-M4
Key Features
- Realtek RTD1395 ARM Cortex-A53 Quad-Core 64 Bit
- Mali 470 MP4 GPU OpenGL ES 1.1/2.0 H.264 H.265,2K4K
- Onboard1 GB DDR4 (option 2 GB)
- 8G eMMC flash (max 64 GB)
- 10/100 Mbit/s Ethernet and RTL8821 module support Wi-Fi 802.11 b/g/n/AC + Bluetooth 4.2
- USB 2.0 TYPE C
- M.2 Key E slot PCIE 2.0 and USB 2.0
- PoE function support
Development For Android
Basic Development
Install Android
1.Install bootcode (in bpi-m4_bootcode&bootloader_20190625.zip)
1.1 Connect BPI-M4 and PC with debug console, Switch BPI-M4 SW2 to 1, open "hypertrm.exe" on PC.
 1.2 Set Baud rate: 115200, data bit: 8 bit, stop bit: 1 bit, Parity: NONE, Flow control: NONE
1.3 Press "Ctrl+q" on PC, then power on BPI-M4, hypertrm will print "/d/g/r"
1.4 Press “h” button on PC,choose Transfer->Send File in the menu, then choose file ” bootcode/android_2133/hwsetting.bin”(or RTD1395_hwsetting_BOOT_2DDR4_ 8Gb_s2133.bin) , protocol choose “Ymodem-G”.
1.5 After send file, if transfer successfully, you will see the following picture:
1.6 Press “d” button on PC,choose Transfer->Send File in the menu, then choose file ”
bootcode/android_2133/recovery.bin(or Recovery-bananapi-0001-RTD1395
_hwsetting_BOOT_2DDR4_8Gb_s2133.bin) , choose “Ymodem-G”.
1.7 After transfer these two files, press “g” to execute it.
2.Install bootloader (in bpi-m4_bootcode&bootloader_20190625.zip)
2.1Press “Esc” button on PC, power on BPI-M4 to enter boot command line.
2.2Input “Realtek> usb start” to recognise udisk 2.3Input “Realtek> fatload usb 0:1 0x01500000 bootloader.bin ” to load bootloader from udisk
2.4Input “Realtek> chain 0x01500000 ” to install bootloader
3.Install Android Image (In bpi-m4_Android_8_1_system.zip)
3.1Unzip bpi-m4_Android_8_1_system.zip, then copy these files in to udisk, then plug udisk on Bpi-M4
3.2Reset Bpi-M4,enter to boot command line 3.3Input “Realtek> usb start” to recognise udisk 3.4Input “Realtek> fatload usb 0:1 0x02100000 rescue.emmc.dtb ” to load rescue.emmc.dtb from udisk
3.4 Input “Realtek> fatload usb 0:1 0x03000000 emmc.uImage ” to load emmc.uImage from udisk
3.5 Input “Realtek> fatload usb 0:1 0x02200000 rescue.root.emmc.cpio.gz_pad.img” to load rescue.root.emmc.cpio.gz_pad.img from udisk
3.6 Input “Realtek>fatload usb 0:1 0x0f900000 bluecore.audio.enc.A01” to load bluecore.audio.enc.A01 from udisk
3.7 Input “Realtek> boot k”, you will wait for around 5-10 mins, please do not operate during the debug console print log, it will reboot after this.
Development For Linux
Basic Development
Advanced Development
Installed Docker
To have a test, if docker has installed in your image.
- sudo docker run --rm hello-world
EMAC
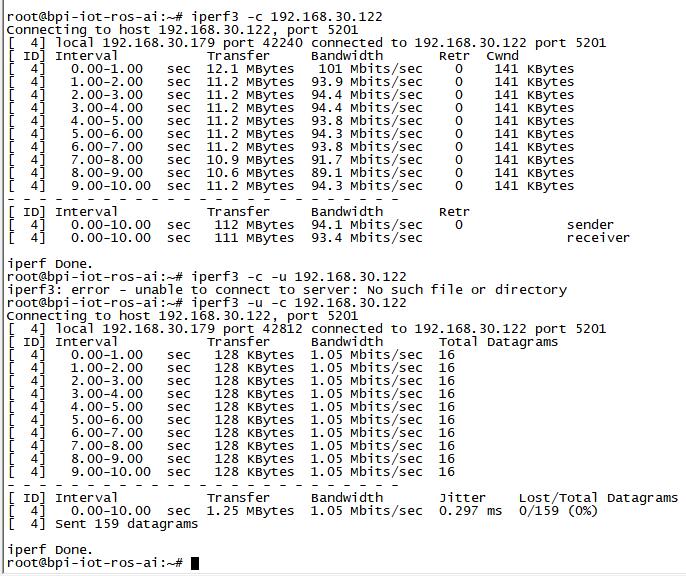
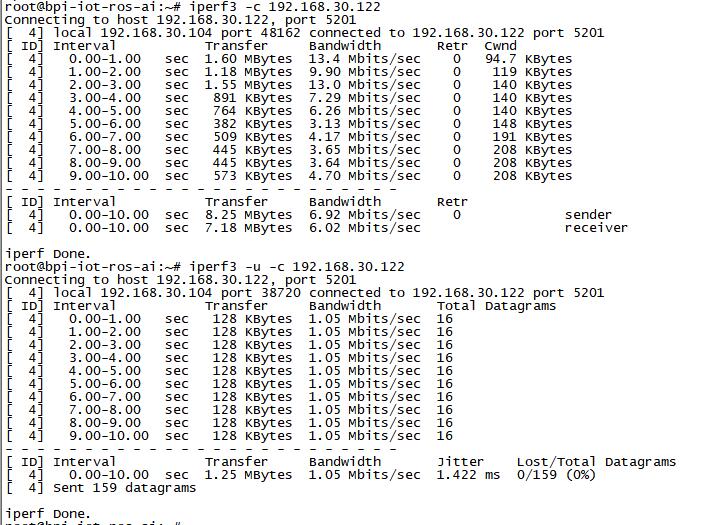
Use iperf3 to test gmac
1. On PC Terminal:
- Execute "iperf3 -s"
2. On M3 console:
- TCP test: "iperf3 -c serverIP"
- UDP test: "iperf3 -u -c serverIP"
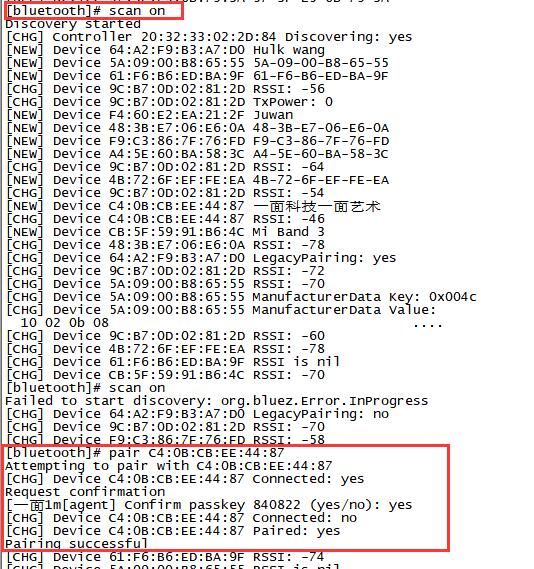
Bluetooth
You have two ways to setup BT
1. Use commands to setup BT
- Use bluetoothctl tool to operate BT
- Execute "bluetoothctl"
- If you don't know how to use bluetoothctl, type "help", you will see more commands
- Execute these commands:
2. Use UI interface to setup BT
WiFi on M4
WiFi Client
You have two ways to setup WiFi Client
1. Use commands to setup WiFi client
- ip link set wlan0 up
- iw dev wlan0 scan | grep SSID
- vim /etc/wpa_supplicant/wpa_supplicant.conf
 network={
 ssid="ssid"
 psk="password"
 priority=1
 }
- wpa_supplicant -iwlan0 -c /etc/wpa_supplicant/wpa_supplicant.conf
- dhclient wlan0
2. Use UI interface to setup WiFi Client

