Getting Started with R64
Contents
Introduction
The Banana Pi R64 is a router based development board, which can run on a variety of open source operating systems including OpenWrt,Linux. It has 4 Gigabit LAN ports, 1 Gigabit WAN, and AC wifi AP function. use 64 bit chip design.
Read more: Banana Pi BPI-R64
Key Features
- MediaTek MT7622,1.35GHZ 64 bit dual-core ARM Cortex-A53
- 1G DDR3 SDRAM
- Mini PCIE interface support 4G module
- Built-in 4x4n 802.11n/Bluetooth 5.0 system-on-chip
- MTK7615 4x4ac wifi on board
- Support 1 SATA interface
- MicroSD slot supports up to 256GB expansion
- 8G eMMC flash (option 16/32/64G)
- 5 port 10/100/1000 Mb Ethernet port
- 1 Port USB 3.0
- Slow I/O:ADC, Audio Amplifier, GPIO, I2C, I2S, IR, PMIC I/F, PWM, RTC, SPI, UART
- POE function support
Development
Basic Development
Prepare to develop
 * Prepare 8G/above TF card, USB-Serial interface, Ubuntu System
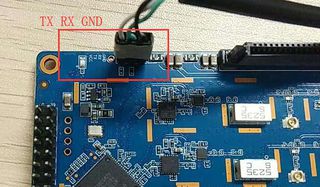
 * Using your USB-Serial Connect debug console on R64
Load your first image on R64
 1.You could download latest image from our forum
 * Here is the example image link:

 2.Install bpi-tools on your Ubuntu
 * apt-get install pv
 * curl -sL https://github.com/BPI-SINOVOIP/bpi-tools/raw/master/bpi-tools | sudo -E bash

 3.After you download the image, insert your TF card into your Ubuntu
 * Execute "bpi-copy xxx.img /dev/sdx" to install image on your TF card

 4.After step 3, then you can insert your TF card into R64, and press power button to setup R64
Ubuntu On Emmc
 1. If you want to install image on EMMC, follow these steps:
 * Burn an image to sd card, and set up R64 with sd card.
 * Copy the image which name contains "xxx-emmc-xxx" to U disk.
 * mount U disk to R64, then use bpi-copy to burn image to Emmc.
bpi-copy <XXX.img.zip>
 * After this, reboot R64.
 * Remove SD & power on.
Network-Configuration
- Network-Configuration : http://www.fw-web.de/dokuwiki/doku.php?id=en:bpi-r2:network:start
Advanced Development
GPIO
GPIO Control
- echo xxx > /sys/class/gpio/export
- echo in/out > /sys/class/gpio/gpioxxx/direction
- echo 0/1 > /sys/class/gpio/gpioxxx/value
Check the base gpio, you could see mine is 409
For example: if you want to change gpio 22 as out highlevel, you need input commands like this:
- echo 431(22+409) > /sys/class/gpio/export
- echo out > /sys/class/gpio/gpio431/direction
- echo 1 > /sys/class/gpio/gpio431/value
PWM Control
- echo x >/sys/class/pwm/pwmchip0/export
- echo 200000 >/sys/class/pwm/pwmchip0/pwmx/period
- echo 100000 >/sys/class/pwm/pwmchip0/pwmx/duty_cycle
- echo 1 >/sys/class/pwm/pwmchip0/pwmx/enable
Sata
- Test a TOSHIBA HDD DISK, the Read/Write performance are below:
- Read from disk: 50MB/s command: dd if=/dev/sda of=/dev/null bs=1M count=1024
- Write to disk: 38MB/s command: dd if=/dev/zero of=/dev/sda bs=1M count=1024
- Test a SAMSUNG SSD DISK, the Read/Write performance are below:
- Read from disk: 360MB/s command: dd if=/dev/sda of=/dev/null bs=1M count=1024
- Write to disk: 200MB/s command: dd if=/dev/zero of=/dev/sda bs=1M count=1024
GMAC
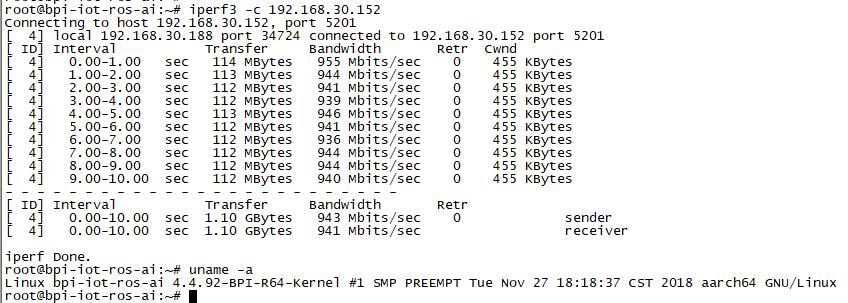
Use iperf3 to test gmac
1. On PC Terminal:
- Execute "iperf3 -s"
2. On R64 console:
- TCP test: "iperf3 -c serverIP"
- UDP test: "iperf3 -u -c serverIP"
WiFi and Ap mode on R2 Ubuntu
WiFi Client
- wmt_loader (ignore errors)
- stp_uart_launcher -p /etc/firmware &
- ip link set wlan0 up
- iw dev wlan0 scan | grep SSID
- vim /etc/wpasupplicant/wpa_supplicant.conf
 network={
 ssid="ssid"
 psk="password"
 priority=1
 }
- wpa_supplicant -i wlan0 -c /etc/wpa_supplicant/wpa_supplicant.conf
- dhclient wlan0
AP mode
- wmt_loader (ignore errors)
- stp_uart_launcher -p /etc/firmware &
- echo A >/dev/wmtWifi
- create your hostapd.conf: "vim /etc/hostapd/hostapd.conf "
 interface=ap0
 bridge=br0
 ssid=test_r2
 driver=nl80211
 country_code=US
 hw_mode=b
 channel=1
 max_num_sta=5
 wpa=2
 auth_algs=1
 rsn_pairwise=CCMP
 wpa_key_mgmt=WPA-PSK
 wpa_passphrase=ledetest
 logger_stdout=-1
 logger_stdout_level=2
- According to your network interface(can search internet) to config ap0:
my network interface which can search internet is wan, and ip is 192.168.30.102, so I config ap0 as follows:
“ifconfig ap0 192.168.30.188 netmask 255.255.255.0”
- Run hostapd : “hostapd -d /etc/hostapd/hostapd.conf”
- Config dhcp file : “vim /etc/dhcp/dhcpd.conf”
 subnet 192.168.30.0 netmask 255.255.255.0 {
 range 192.168.30.2 192.168.30.250;
 option domain-name-servers 8.8.8.8;
 option routers 192.168.30.1; }
- Config dhcp of ap0, then the devices which connect ap0 could get IP: "dhcpd ap0 -pf /var/run/dhcpd.pid "
- And a bridge
- brctl addbr br0
- brctl addif br0 ap0
- brctl addif br wan
- Config br0 : “ifconfig br0 192.168.30.180 netmask 255.255.255.0”
- Add br0 gw as : “route add -net default netmask 255.255.255.0 gw 192.168.30.1 dev br0”


