Getting Started with M2M: Difference between revisions
Jump to navigation
Jump to search
| Line 16: | Line 16: | ||
=Development= | =Development= | ||
==Basic Development== | ==Basic Development== | ||
===Prepare=== | ===Prepare to develop=== | ||
Prepare 8G/above TF card, USB-Serial interface, PC with Ubuntu System | * Prepare 8G/above TF card, USB-Serial interface, PC with Ubuntu System | ||
* Using your USB-Serial Connect debug console on M2M | |||
[[Image:M2M__debug_console.png | 240px]] [[Image:M2M__pin_define.png | 240px]] | [[Image:M2M__debug_console.png | 240px]] [[Image:M2M__pin_define.png | 240px]] | ||
====Install Bpi tools==== | |||
* apt-get install pv | |||
* curl -sL https://github.com/BPI-SINOVOIP/bpi-tools/raw/master/bpi-tools | sudo -E bash | |||
=== | ====Load your first Linux image on SD card==== | ||
: | * you could download image from here: http://forum.banana-pi.org/t/bpi-m2m-r16-new-image-release-ubuntu-16-04-2018-08-25/6596 | ||
* after download image, copy it to your ubuntu PC | |||
* plug your sd card to your ubuntu PC, and Execute "fdisk -l" to check the SD card drive letter | |||
* Execute "bpi-copy xxx.img /dev/sd<drive letter>" | |||
: | * Ex: my sd card is recognised as /dev/sdf | ||
* I can use "bpi-copy xxx.img /dev/sdf" to install image on my SD card. | |||
===Compile code=== | |||
* git clone https://github.com/BPI-SINOVOIP/BPI-M2M-bsp.git | |||
[[Image:m2m_code.png]] | |||
After download code, execute "./build.sh" to compile it. | |||
* ./build.sh | |||
[[Image:m2m_build.png]] | |||
: | [[Image:m2m_build_success.png]] | ||
===Update your image=== | |||
====Update rootfs & kernel==== | |||
After we succeed to the code, Bootloader, kernel, rootfs will be generated in "SD" directory, then how to update the image? | |||
* cd SD/bpi-m2m | |||
[[Image:m2m_code_sd.png]] | |||
Plug in your SD card to Ubuntu PC, then execute "fdisk -l" to check which /dev/sdX were generated by system | |||
== | [[Image:m2m_code_sd_dev.png]] | ||
* bpi-update -c bpi-m2m.conf -d /dev/sde | |||
[[Image:m2m_bpi_update.png]] | |||
====Update boot==== | |||
* cd 100MB | |||
Execute "df -l" to check which /dev/sdX is "BPI-BOOT" | |||
* df -l | |||
[[Image:m2m_df_l.png]] | |||
* bpi-bootsel BPI-M2M-LCD7-8k.img.gz /dev/sd1 | |||
[[Image:m2m_bootsel.png]] | |||
===Make your own image=== | |||
===Bluetooth=== | ===Bluetooth=== | ||
Revision as of 08:33, 10 July 2020
Introduction
BPI-M2M


Banana Pi M2M is another ARM SoC powered development board that offers great computing performance in an ultra portable form factor. It is a 51mm square with Allwinner A33 Quad-core A7 SoC and 512MB DDR3 RAM.
- Read more about : Banana Pi BPI-M2M
Key Features
- Quad Core ARM Cortex A7 CPU. R16
- 512MB DDR3 SDRAM
- WiFi (AP6212) & Bluetooth onboard
Development
Basic Development
Prepare to develop
 * Prepare 8G/above TF card, USB-Serial interface, PC with Ubuntu System
 * Using your USB-Serial Connect debug console on M2M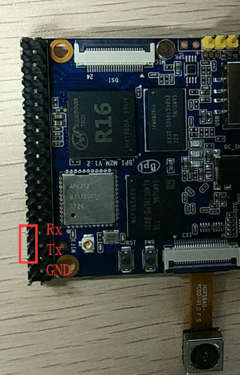
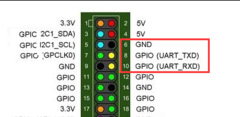


Install Bpi tools
- apt-get install pv
- curl -sL https://github.com/BPI-SINOVOIP/bpi-tools/raw/master/bpi-tools | sudo -E bash
Load your first Linux image on SD card
- you could download image from here: http://forum.banana-pi.org/t/bpi-m2m-r16-new-image-release-ubuntu-16-04-2018-08-25/6596
- after download image, copy it to your ubuntu PC
- plug your sd card to your ubuntu PC, and Execute "fdisk -l" to check the SD card drive letter
- Execute "bpi-copy xxx.img /dev/sd<drive letter>"
- Ex: my sd card is recognised as /dev/sdf
- I can use "bpi-copy xxx.img /dev/sdf" to install image on my SD card.
Compile code

After download code, execute "./build.sh" to compile it.
- ./build.sh


Update your image
Update rootfs & kernel
After we succeed to the code, Bootloader, kernel, rootfs will be generated in "SD" directory, then how to update the image?
- cd SD/bpi-m2m

Plug in your SD card to Ubuntu PC, then execute "fdisk -l" to check which /dev/sdX were generated by system

- bpi-update -c bpi-m2m.conf -d /dev/sde

Update boot
- cd 100MB
Execute "df -l" to check which /dev/sdX is "BPI-BOOT"
- df -l

- bpi-bootsel BPI-M2M-LCD7-8k.img.gz /dev/sd1

Make your own image
Bluetooth
- Use bluetoothctl tool to operate BT
- Execute "bluetoothctl"
- If you don't know how to use bluetoothctl, type "help", you will see more commands
- Execute these commands:

WiFi Client
You have two ways to setup WiFi Client
1. Use commands to setup WiFi client
- ip link set wlan0 up
- iw dev wlan0 scan | grep SSID
- vim /etc/wpasupplicant/wpa_supplicant.conf
 network={
 ssid="ssid"
 psk="password"
 priority=1
 }
- wpa_supplicant -iwlan0 -c /etc/wpa_supplicant/wpa_supplicant.conf
- dhclient wlan0
2. Use UI interface to setup WiFi Client
StartX
- apt-get install xorg
- apt-get install xserver-xorg
- apt-get install xinit
https://askubuntu.com/questions/518454/what-does-startx-command-do
NAS Application
1. Usb hub + sata to usb
- HDD is supported


- SSD is supported


Camara function
We use HDF5640 camara.

Guvcview
- Use your UI interface to operate camara
- Applications -> Sound & Video -> guvcview
Shell
- We also have built-in command in /usr/local/bin to test camara
- "./test_ov5640_image_mode.sh" to test picture taking function
- "./cameratest.sh" to test video recording function
BPI-Tools
Install Bpi-tools
- Execute "curl -sL https://github.com/BPI-SINOVOIP/bpi-tools/raw/master/bpi-tools | sudo -E bash - "
Update Bpi-tools
- Execute "bpi-tools"

RPi.GPIO
Install RPi.GPIO
- Execute "git clone https://github.com/BPI-SINOVOIP/RPi.GPIO"
- after clone the repo, cd RPi.GPIO
- Execute "sudo apt-get update"
- Execute "sudo apt-get install python-dev python3-dev"
- Execute "sudo python setup.py install" or "sudo python3 setup.py install" to install the module
Using RPi.GPIO
- cd /usr/local/bin
- Execute "./bpi_test_g40.py" to test RPi.GPIO

WiringPi
- GitHub: https://github.com/BPI-SINOVOIP/BPI-WiringPi2.git
- We also have built-in test command in "/usr/local/bin"
How to Update WiringPi
- Execute "bpi-update -c pkglist.conf"

- Execute "bpi-update -c bpi-pkg-bpi-wiringpi.conf"

RGB 1602 LCD
- Execute "/usr/local/bin/bpi_test_lcd1602.sh"

0.96 Inch OLED Display
- Execute "/usr/local/bin/bpi_test_52pi.sh"
8x8 RGB LED Martix
- Firstly you need a GPIO Extend Board for 8x8 LED Martix

- Execute "/usr/local/bin/bpi_test_gpio40.sh"
