Difference between revisions of "快速上手 BPI-W2"
JackZengWiki (talk | contribs) (→OpenWrt) |
JackZengWiki (talk | contribs) (→烧录kernel 4.4的OpenWRT) |
||
| Line 245: | Line 245: | ||
2)连接W2的调试串口到 windows PC: | 2)连接W2的调试串口到 windows PC: | ||
* 运行 hypertrm ,配置串口参数 | * 运行 hypertrm ,配置串口参数 | ||
| − | * 按住 “ctrl + q” | + | * 按住 “ctrl+q” 然后重启开发板, 当终端界面出现’ d/g/r ' 后就松掉; |
| − | * | + | * 输入 “h” 然后发送硬件配置二进制文件 (RTD1296_hwsetting_BOOT_4DDR4_4Gb_s1866_padding.bin) 在 Y-modem 模式. |
| − | * | + | * 等待传输完成, 然后输入下面的参数: |
| − | + | s98007058 | |
| − | + | 01500000 | |
| − | + | * 输入 “d” 然后发送uboot二进制文件 (dvrboot.exe.bin) 在 Y-modem 模式. | |
| − | * | + | * 传输完成后, 输入 “g” 然后uboot将被自动烧录到eMMC. |
| − | * | ||
After succeed to burn u-boot on W2, then install OpenWRT on W2. | After succeed to burn u-boot on W2, then install OpenWRT on W2. | ||
Revision as of 03:10, 15 October 2018
Contents
介绍
关于更多: Banana Pi BPI-W2
开发
基础开发
开发前准备
- 准备一张容量不低于8Gb的TF卡, USB-Serial 串口线, 一台运行Ubuntu系统的PC机
- 使用你的串口线去连接W2的调试串口
Load your first image on W2
1.你可以从下面链接下载最近的镜像
* http://forum.banana-pi.org/t/bananapi-w2-ubuntu-18-04-new-image-release-2018-09-17/6790

2.在你的Ubuntu系统电脑上安装bpi-tools, 执行以下命令即可安装:
* apt-get install pv
* curl -sL https://github.com/BPI-SINOVOIP/bpi-tools/raw/master/bpi-tools | sudo -E bash

3.下载完镜像后, 插入TF卡到你的Ubuntu电脑中
* 运行命令 "bpi-copy xxx.img /dev/sdx" 烧录镜像到你的TF卡中.

4.烧录完成后, 把TF卡插到W2中, 按住W2的电源键启动W2.
构建W2镜像
在SD卡上制作bootloader
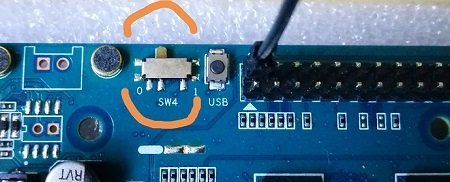
由SW4控制, W2有两种启动方式
- 0 从 emmc 启动.
- 1 从 SPI + SD 启动.
打开W2的电源后, 这里需要三个步骤来加载内核, 通常这三个步骤被称作bootloader
- 第一步 1: CPU 初始化 - 这份代码属于CPU内部;
- 第二步 2: 初始化我们要启动的Flash 通常这步被称作preloader
- 第三步 3: u-boot;
RTD1296 支持从 eMMC 和 SPI flash 启动, 因此如果你想要从sd卡启动W2, (这意味着我们把 u-boot 放进 SD 中.) 第二步的代码必须要写到 SPI flash中, 通常工厂需要把这一步做好. 实际上, 如果W2从eMMC启动, 第二步的代码需要写道eMMC, 请留意这里我们在介绍怎么烧录uboot, 通常这一步也是工厂做好. 在eMMC和SD卡中的uboot是不同的, 通常eMMC的uboot名称为dvrboot.exe.bin, SD卡的uboot名称为u-boot.bin.
把uboot写入SD卡
SD的uboot相关资料在这里: https://drive.google.com/drive/folders/17ShSHLOvxeYA6tI9HQXOAb3O7RjqfD_6?usp=sharing
- 第一步 1: 编译SD卡系统:
- 第二步 2: 从eMMC启动, 然后按住‘Esc’, 开发板会进到u-boot命令行;
- 第三步 3: 使用 tftp 来获取 u-boot.bin 文件;
tftp 0x1500000 u-boot.bin
- step4: 使用sd命令将uboot写入 SD 卡:
sd write 0x1500000 0x50 0x3f0
- forum pthread
Ubuntu
如何制作和运行 64-bit ubuntu 16.04 在sd卡上
1.要求:
- 1. 一台运行Ubuntu的PC主机;
- 2. 一块W2的开发板;
- 3. 一片sd卡;
- 4. 下载最新的Ubuntu压缩包(ubuntu-base-16.04.4-base-arm64.tar.gz):
- 5.硬件配置文件, u-boot 二进制文件, 内核镜像文件和音视频文件, 可以从下面链接下载:
- https://drive.google.com/file/d/1LX4FwXcSzkuI4BUPEVxbUyeG_UYwIkwY/view?usp=sharing 17
- oRTD1296_hwsetting_BOOT_4DDR4_4Gb_s1866_padding.bin – hardware config
- odvrboot.exe.bin – u-boot binary
- ouImage – kernel image
- obluecore.audio – audio and video firmware for RTK1296
- https://drive.google.com/file/d/1LX4FwXcSzkuI4BUPEVxbUyeG_UYwIkwY/view?usp=sharing 17
2.将bootloader写入到 W2 flash:
香蕉派 W2 可以从 EMMC flash 或者是 SPI flash 启动, 区别在于bootloader的位置不同, 接下来介绍如何把 bootloader 写入 EMMC, 如果你不准备开发u-boot, 则不必关心这个.
通常见到的 W2开发板, 工厂已经提前烧录好bootloader了, 但是如果bootloader的版本不对, 这里你可以按照以下步骤自己烧录.
要求:
- 1. 首先需要安装一个PC端的串口工具, 如:hypertrm. (这里我推荐使用 “hypertrm”, 因为其它工具数据传输可能失败);
- 2. 下载uboot二进制文件(dvrboot.exe.bin);
- 3. 下载 W2硬件配置二进制文件(RTD1296_hwsetting_BOOT_4DDR4_4Gb_s1866_padding.bin);
步骤:
- 1. 通过串口将 W2开发板与PC连接, 然后运行终端软件, 设置串口参数 (115200, 8N1, none);
- 2. 按住 “ctrl+q” 然后重启开发板, 当终端界面出现’ d/g/r ' 后就松掉;
- 3. 输入 “h” 然后发送硬件配置二进制文件 (RTD1296_hwsetting_BOOT_4DDR4_4Gb_s1866_padding.bin) 在 Y-modem 模式.
- 4. 等待传输完成, 然后输入下面的参数:
s98007058
01500000
- 5. 输入 “d” 然后发送uboot二进制文件 (dvrboot.exe.bin) 在 Y-modem 模式.
- 6. 传输完成后, 输入 “g” 然后uboot将被自动烧录到eMMC.
3. 在Ubuntu PC上面制作一个根文件系统.
Ubuntu 架构是 arm64, 适用于W2, Ubuntu上面大多数的arm64软件包都适用于W2.
需求:
- 1. 运行Linux系统的PC主机
- 2. 最新版本的Ubuntu arm64 压缩包(ubuntu-base-16.04.4-base-arm64.tar.gz) is downloaded from ubuntu website: http://cdimage.ubuntu.com/ubuntu-base/releases/16.04/release/ 17
PC端步骤:
- 1. mkdir rootfs
- 2. su root
- 3. tar zxvf ubuntu-base-16.04.4-base-arm64.tar.gz -C rootfs
- 4. write a shell script file, please copy below contents to the file ch-mount.sh (vi ch-mount.sh and copy):
!/bin/bash
function mnt() {
    echo "MOUNTING"
    sudo mount -t proc /proc ${2}proc
    sudo mount -t sysfs /sys ${2}sys
    sudo mount -o bind /dev ${2}dev
    sudo mount -o bind /dev/pts ${2}dev/pts
    sudo chroot ${2}
}
function umnt() {
    echo "UNMOUNTING"
    sudo umount ${2}proc
    sudo umount ${2}sys
    sudo umount ${2}dev/pts
    sudo umount ${2}dev
}
if [ "$1" == "-m" ] && [ -n "$2" ] ;
then
    mnt $1 $2
elif [ "$1" == "-u" ] && [ -n "$2" ];
then
    umnt $1 $2
else
    echo ""
    echo "Either 1'st, 2'nd or both parameters were missing"
    echo ""
    echo "1'st parameter can be one of these: -m(mount) OR -u(umount)"
    echo "2'nd parameter is the full path of rootfs directory(with trailing '/')"
    echo ""
    echo "For example: ch-mount -m /media/sdcard/"
    echo ""
    echo 1st parameter : ${1}
    echo 2nd parameter : ${2}
fi
- 5. apt-get install qemu-user-static
- 6. cp /usr/bin/qemu-aarch64-static rootfs/usr/bin
- 7. cp -b /etc/resolv.conf rootfs/etc/
- 8. ./ch-mount.sh -m rootfs/
- 9. apt-get install iputils-ping
- 10. apt-get install udev
- 11. apt-get install net-tools
- 12. Modify the root password by running: “passwd root”
- 13. exit
- 14. ./ch-mount.sh -u rootfs/
到这一步, 跟文件系统已经被制作好了, 下一步我们把根文件系统写入到sd卡中.
4. 在PC上写系统到SD卡上:
需求:
- 1. 一张SD卡;
- 2. 下载设备树二进制文件: bpi-w2.dtb;
- 3. 下载内核镜像文件: uImage;
- 4. 下载音视频固件: bluecore.audio;
步骤:
- 1. 使用fdisk命令在SD卡上创建两个分区: 格式化第一个分区为 FAT32, 第二个分区为 ext4; 推荐设置第一个分区的大小少于100M;
- 2. 复制三个文件: bpi-w2.dtb, uImage, bluecore.audio 到第一分区;
- 3. 使用root用户把刚才我们自己编译的根文件系统复制到第二分区:
cp -a rootfs/* /media/xxx/sdxx/
sync
- 4. 弹出插入 W2的SD卡, 然后断电重启, 观察W2的启动情况.
5. 设置网络, 安装需要的软件包.
步骤:
- 1. 使用root用户登录;
- 2. 使用ifconfig配置网卡: ifconfig eth1 192.168.2.231
- 3. 添加可以连接网络的默认网关: route add default gw 192.168.2.1
- 4. 添加DNS: echo ‘nameserver 8.8.8.8’ >> /etc/resolv.conf
- 5. apt-get update
- 6. 然后你就可以通过apt-get安装软件包了.
6.更多:
一些功能在W2上面暂时无法使用, 因为kernel仍然在开发中, 我们正在努力完善W2的功能, 请多在论坛上多留意W2的信息.
PDF文件下载
在Ubuntu 16.04 安装运行 Node.js 和 http-server
- 安装 Node.js
在Ubuntu 16.04上, 在W2上安装Node.js是非常简便的. 请按照以下步骤来安装 node.js:
   1.  apt-get install nodejs
   2.  apt-get install npm
   3.  npm install -g http-server
   4.  make a link to nodejs:  cd /usr/bin/; ln -sf nodejs node
烧录kernel 4.4的OpenWRT
1.Burn OpenWRT on W2 steps:
W2 OpenWRT的 Bootloader 是 u-boot64, 有两种方式可以烧录到W2的EMMC中.
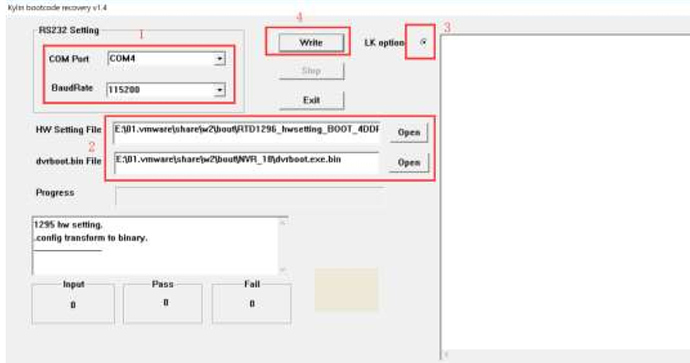
A. 使用 RTK MP_Tool 烧录 uboot 到 W2:
1)你需要以下的文件和工具:
- MP_Tool
- RTD1296_hwsetting_BOOT_4DDR4_4Gb_s1866.config(硬件配置文件)
- dvrboot.exe.bin(u-boot二进制文件)
2)连接 W2 调试串口到 windows PC,然后运行 MP_Tool:
- 设置串口参数
- 选择配置文件和uboot文件
- 选择 "LK option"
- 点击 Wirte 按钮 然后开机 W2, 等待烧录后回应 "OK"
B. 使用 hypertrm 烧录 uboot 到 W2:
1)你需要以下文件和工具:
- hypertrm
- RTD1296_hwsetting_BOOT_4DDR4_4Gb_s1866_padding.bin(硬件配置二进制文件)
- dvrboot.exe.bin(u-boot 二进制文件)
2)连接W2的调试串口到 windows PC:
- 运行 hypertrm ,配置串口参数
- 按住 “ctrl+q” 然后重启开发板, 当终端界面出现’ d/g/r ' 后就松掉;
- 输入 “h” 然后发送硬件配置二进制文件 (RTD1296_hwsetting_BOOT_4DDR4_4Gb_s1866_padding.bin) 在 Y-modem 模式.
- 等待传输完成, 然后输入下面的参数:
s98007058 01500000
- 输入 “d” 然后发送uboot二进制文件 (dvrboot.exe.bin) 在 Y-modem 模式.
- 传输完成后, 输入 “g” 然后uboot将被自动烧录到eMMC.
After succeed to burn u-boot on W2, then install OpenWRT on W2.
1)You need these tools and files:
- U disk
- install.img
2)Burn OpenWRT on W2 steps:
- Format U disk as FAT32 filesystem
- Copy install.img to U disk root directory
- Decompress install.img to get four files:
emmc.uImage
rescue.root.emmc.cpio.gz_pad.img
bluecore.audio
rescue.emmc.dtb
- Plug U disk to W2 USB3.0 interface,holding press “Esc” button to power on W2 board
- Then W2 board will go into u-boot console
- Input these commands step by step:
  setenv bootargs "earlycon=uart8250,mmio32,0x98007800 console=ttyS0,115200 loglevel=7

  init=/etc/init root=/dev/mmcblk0p1 rootfstype=squashfs rootwait"
save
go ru
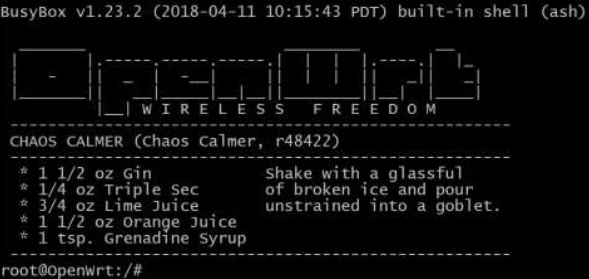
- Waiting for OpenWRT burning,after finished,W2 will reboot and go into OpenWRT system.
3.Image & Tools link:
Baidu Drive: https://pan.baidu.com/s/1Rs9F46wNJibORaeCfVh4wg PinCode:1w4w
Google Drive:https://drive.google.com/file/d/10kfP142Jw0sA92uwaIYZt7CeXcDKelO1/view?usp=sharing
4.BPI-W2 run OpenWRT video:
