Difference between revisions of "Getting Started with M4"
(→Development For Linux) |
(→Install Linux Image) |
||
| (21 intermediate revisions by one other user not shown) | |||
| Line 23: | Line 23: | ||
===Install Android Image=== | ===Install Android Image=== | ||
| − | Download the latest [https://download.banana-pi.dev/d/3ebbfa04265d4dddb81b/?p=%2FImages%2FBPI-M4%2Fandroid8&mode=list android image] | + | Download the latest [https://download.banana-pi.dev/d/3ebbfa04265d4dddb81b/?p=%2FImages%2FBPI-M4%2Fandroid8&mode=list android image] |
| + | |||
| + | Download [https://download.banana-pi.dev/d/3ebbfa04265d4dddb81b/files/?p=%2FTools%2Fimage_download_tools%2Fm4_android_usb_download_tool.zip BPI-M4 USB flash tool] | ||
Note: | Note: | ||
| Line 29: | Line 31: | ||
1. BPI-M4 Android8 image only support 2GB ddr board. | 1. BPI-M4 Android8 image only support 2GB ddr board. | ||
2. BPI-M4 USB flash tool is a usb download tool for flashing android image to board emmc, and only support Windows platform. | 2. BPI-M4 USB flash tool is a usb download tool for flashing android image to board emmc, and only support Windows platform. | ||
| − | 3. Make sure SW2 (board bottom near sd slot) switch to '1' | + | 3. Make sure SW2 (board bottom near sd slot) switch to '''1''' |
| − | 4. Read document/bananapi_m4_usb_download_tool_guide.doc before flashing image. | + | 4. Read document/bananapi_m4_usb_download_tool_guide.doc in usb flash tool package before flashing image. |
=Development For Linux= | =Development For Linux= | ||
| − | ===Install Linux Image | + | ===Install Linux Image=== |
Download the latest [https://download.banana-pi.dev/d/3ebbfa04265d4dddb81b/?p=%2FImages%2FBPI-M4%2Flinux&mode=list Linux image] | Download the latest [https://download.banana-pi.dev/d/3ebbfa04265d4dddb81b/?p=%2FImages%2FBPI-M4%2Flinux&mode=list Linux image] | ||
| − | :Note: Board SW2 switch to '''0''' | + | :Note: |
| + | ::1. Board SW2 (board bottom near sd slot) switch to '''0''' | ||
| + | ::2. For the compatibility of new 2GB and 1GB board with one Linux image, the old batch (before May, 2020) 1GB board must [https://download.banana-pi.dev/d/3ebbfa04265d4dddb81b/?p=%2FImages%2FBPI-M4%2Flinux-spiloader&mode=list update the spirom firmware], so it can run the new release image. | ||
| + | ::3. Login user/password: pi/bananapi or root/bananapi | ||
| − | Install Image to SD Card On | + | Install Image to SD Card On Linux PC with bpi-tools |
| − | :1.Install bpi-tools on your | + | :1.Install bpi-tools on your linux |
$ apt-get install pv | $ apt-get install pv | ||
$ curl -sL https://github.com/BPI-SINOVOIP/bpi-tools/raw/master/bpi-tools | sudo -E bash | $ curl -sL https://github.com/BPI-SINOVOIP/bpi-tools/raw/master/bpi-tools | sudo -E bash | ||
| − | :2. | + | :If you can't access this URL or any other problems, please go to [https://github.com/BPI-SINOVOIP/bpi-tools bpi-tools repo] and install this tools manually. |
| − | $ bpi-copy xxx.img /dev/ | + | |
| − | Install Image to SD Card with Etcher | + | :2.Insert your TF card into your PC |
| + | $ bpi-copy xxx.img /dev/sdX | ||
| + | :Actually bpi-copy is the same as this dd command | ||
| + | $ sudo unzip -p xxx-bpi-m4-xxx.img.zip | pv | dd of=/dev/sdX bs=10M status=noxfer | ||
| + | |||
| + | Install Image to SD Card with Etcher on Windows, Linux and MacOS | ||
:[https://www.balena.io/etcher/ Balena Etcher] is an open source project by Balena, Flash OS images to SD cards & USB drives | :[https://www.balena.io/etcher/ Balena Etcher] is an open source project by Balena, Flash OS images to SD cards & USB drives | ||
| Line 52: | Line 62: | ||
Install Image to EMMC with SD Ubuntu | Install Image to EMMC with SD Ubuntu | ||
:1.Prepare a sd which is installed ubuntu image and bootup with sdcard | :1.Prepare a sd which is installed ubuntu image and bootup with sdcard | ||
| − | :2.Copy emmc image to udisk | + | :2.Copy emmc image to udisk, plug in board, then mount udisk. |
| − | :3.After mount udisk, use command | + | :3.After mount udisk, use bpi-copy command to install image on Emmc. |
| − | :4.After success | + | $ sudo bpi-copy xxx-bpi-m4-xxx.img.zip /dev/mmcblk1 |
| + | :Actually bpi-copy is the same as this dd command | ||
| + | $ sudo unzip -p xxx-bpi-m4-xxx.img.zip | pv | dd of=/dev/mmcblk1 bs=10M status=noxfer | ||
| + | :4.After success install, power off the board, eject the sdcard and power on with emmc boot. | ||
| + | |||
| + | ===Enable SPI=== | ||
| + | Without device-tree overlay support, 40pin header SPI function is disabled default because pins multiplexing with uart2, it can be enabled according to this topic | ||
| + | |||
| + | :https://forum.banana-pi.org/t/banana-pi-bpi-m4-how-to-get-i2c-and-spi-running-tutorial/12824 | ||
| + | |||
| + | or by fdtput command without building kernel. Make sure boot partition mounted before doing this. | ||
| + | |||
| + | # fdtput -t s /media/pi/BPI-BOOT/bananapi/bpi-m4/linux/rtd-1395-bananapi-m4-2GB.dtb /spi@9801BD00 status okay | ||
| + | # fdtput -t s /media/pi/BPI-BOOT/bananapi/bpi-m4/linux/rtd-1395-bananapi-m4-1GB.dtb /spi@9801BD00 status okay | ||
| + | # reboot | ||
===Installed Docker=== | ===Installed Docker=== | ||
| Line 60: | Line 84: | ||
* sudo docker run --rm hello-world | * sudo docker run --rm hello-world | ||
| + | |||
===EMAC=== | ===EMAC=== | ||
Use iperf3 to test gmac | Use iperf3 to test gmac | ||
Latest revision as of 23:52, 24 May 2023
Contents
Introduction
BPI-M4
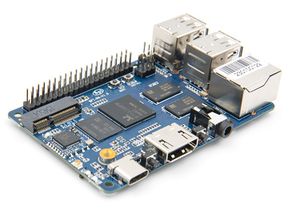
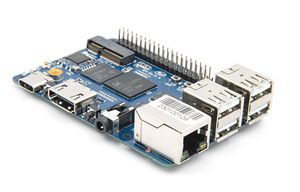
Banana Pi BPI-M4 use Realtek RTD1395 chp design ,it is a 64-bit quad-core A53 mini single board computer. It features 1 GB of RAM and 8 GB eMMC. It also has onboard WiFi for b/g/n/ac and BT 4.2. On the ports side, the BPI-M4 has 4 USB 2.0 ports, 1 USB TYPE C port, 1 HDMI port, 1 audio jack. support M.2 Key E PCIE 2.0 interface.
- Read more about : Banana Pi BPI-M4
Key Features
- Realtek RTD1395 ARM Cortex-A53 Quad-Core 64 Bit
- Mali 470 MP4 GPU OpenGL ES 1.1/2.0 H.264 H.265,2K4K
- Onboard1 GB DDR4 (option 2 GB)
- 8G eMMC flash (max 64 GB)
- 10/100 Mbit/s Ethernet and RTL8821 module support Wi-Fi 802.11 b/g/n/AC + Bluetooth 4.2
- USB 2.0 TYPE C
- M.2 Key E slot PCIE 2.0 and USB 2.0
- PoE function support
Development For Android
Install Android Image
Download the latest android image
Download BPI-M4 USB flash tool
Note:
 1. BPI-M4 Android8 image only support 2GB ddr board.
 2. BPI-M4 USB flash tool is a usb download tool for flashing android image to board emmc, and only support Windows platform.
 3. Make sure SW2 (board bottom near sd slot) switch to 1
 4. Read document/bananapi_m4_usb_download_tool_guide.doc in usb flash tool package before flashing image.
Development For Linux
Install Linux Image
Download the latest Linux image
- Note:
- 1. Board SW2 (board bottom near sd slot) switch to 0
- 2. For the compatibility of new 2GB and 1GB board with one Linux image, the old batch (before May, 2020) 1GB board must update the spirom firmware, so it can run the new release image.
- 3. Login user/password: pi/bananapi or root/bananapi
Install Image to SD Card On Linux PC with bpi-tools
- 1.Install bpi-tools on your linux
    $ apt-get install pv
    $ curl -sL https://github.com/BPI-SINOVOIP/bpi-tools/raw/master/bpi-tools | sudo -E bash
- If you can't access this URL or any other problems, please go to bpi-tools repo and install this tools manually.
- 2.Insert your TF card into your PC
$ bpi-copy xxx.img /dev/sdX
- Actually bpi-copy is the same as this dd command
$ sudo unzip -p xxx-bpi-m4-xxx.img.zip | pv | dd of=/dev/sdX bs=10M status=noxfer
Install Image to SD Card with Etcher on Windows, Linux and MacOS
- Balena Etcher is an open source project by Balena, Flash OS images to SD cards & USB drives
Install Image to EMMC with SD Ubuntu
- 1.Prepare a sd which is installed ubuntu image and bootup with sdcard
- 2.Copy emmc image to udisk, plug in board, then mount udisk.
- 3.After mount udisk, use bpi-copy command to install image on Emmc.
$ sudo bpi-copy xxx-bpi-m4-xxx.img.zip /dev/mmcblk1
- Actually bpi-copy is the same as this dd command
$ sudo unzip -p xxx-bpi-m4-xxx.img.zip | pv | dd of=/dev/mmcblk1 bs=10M status=noxfer
- 4.After success install, power off the board, eject the sdcard and power on with emmc boot.
Enable SPI
Without device-tree overlay support, 40pin header SPI function is disabled default because pins multiplexing with uart2, it can be enabled according to this topic
or by fdtput command without building kernel. Make sure boot partition mounted before doing this.
 # fdtput -t s /media/pi/BPI-BOOT/bananapi/bpi-m4/linux/rtd-1395-bananapi-m4-2GB.dtb /spi@9801BD00 status okay
 # fdtput -t s /media/pi/BPI-BOOT/bananapi/bpi-m4/linux/rtd-1395-bananapi-m4-1GB.dtb /spi@9801BD00 status okay
 # reboot
Installed Docker
To have a test, if docker has installed in your image.
- sudo docker run --rm hello-world
EMAC
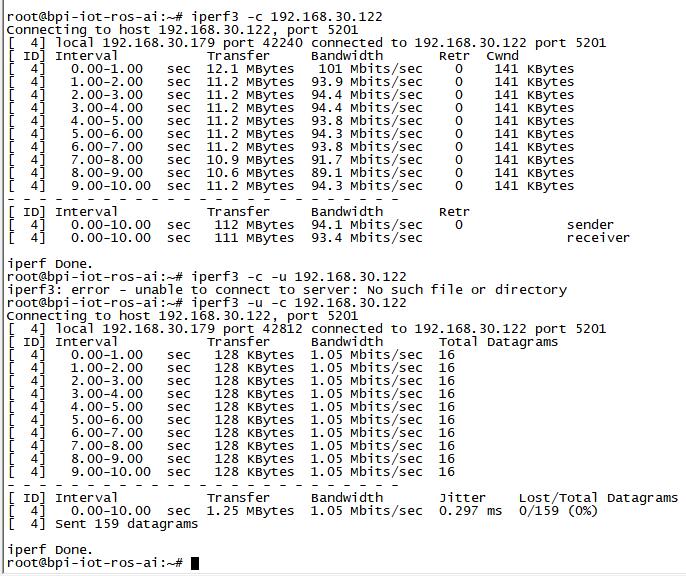
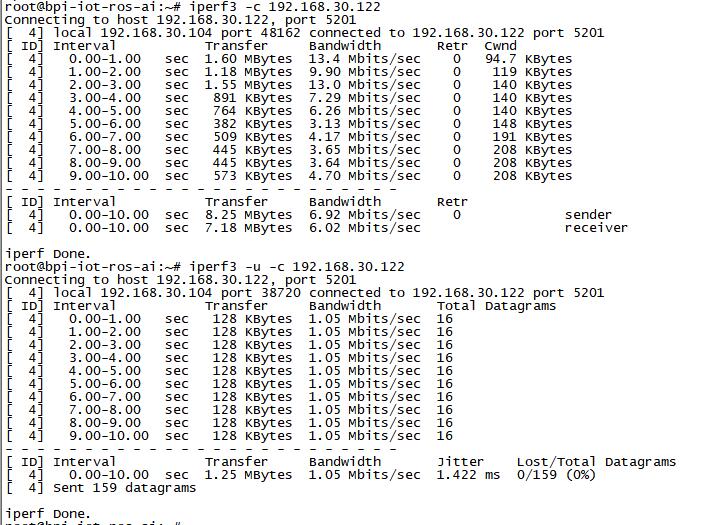
Use iperf3 to test gmac
1. On PC Terminal:
- Execute "iperf3 -s"
2. On M3 console:
- TCP test: "iperf3 -c serverIP"
- UDP test: "iperf3 -u -c serverIP"
Bluetooth
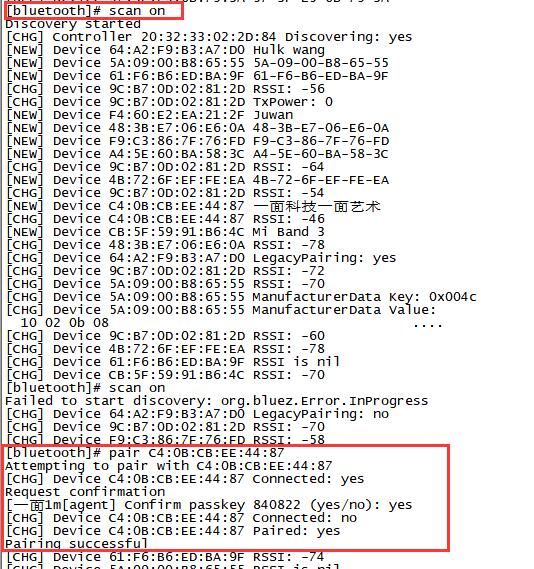
You have two ways to setup BT
1. Use commands to setup BT
- Use bluetoothctl tool to operate BT
- Execute "bluetoothctl"
- If you don't know how to use bluetoothctl, type "help", you will see more commands
- Execute these commands:
2. Use UI interface to setup BT
WiFi on M4
WiFi Client
You have two ways to setup WiFi Client
1. Use commands to setup WiFi client
- ip link set wlan0 up
- iw dev wlan0 scan | grep SSID
- vim /etc/wpa_supplicant/wpa_supplicant.conf
 network={
 ssid="ssid"
 psk="password"
 priority=1
 }
- wpa_supplicant -iwlan0 -c /etc/wpa_supplicant/wpa_supplicant.conf
- dhclient wlan0
2. Use UI interface to setup WiFi Client
