Getting Started with M2P: Difference between revisions
JackZengWiki (talk | contribs) |
|||
| (98 intermediate revisions by 5 users not shown) | |||
| Line 1: | Line 1: | ||
[[zh:快速上手 香蕉派 BPI-M2+]] | |||
=Introduction= | =Introduction= | ||
[[File:Banana_pi_BPI-M2+_2.jpg|thumb|Overview: [[Banana Pi BPI-M2+ ]]]] | |||
[[File:M2p_ubunu.jpg|thumb|Overview: BPI-M2+ Ubuntu linux]] | |||
[[File:M2p_debian.jpg|thumb|Overview:BPI-M2+ Debian linux]] | |||
[[File:Rasbian.jpg|thumb|Overview:BPI-M2+ Rasbian linux]] | |||
Banana Pi M2+ is mini size development board that offers great computing performance in an ultra portable form factor.It is a 65mm*65mm fantastic mini size board with Allwinner H series chips. It comes with different versions but share the same interfaces. | |||
Read more: [[Banana Pi BPI- | *Read more about : [[Banana Pi BPI-M2+]] | ||
*Burn image : [[Quick Start Banana pi SBC]] | |||
==Key Features== | ==BPI-M2+ H3== | ||
===Key Features=== | |||
* Quad-core 1.2GHz Cortex-A7 H3 | |||
* 1GB DDR3 | |||
* 8GB eMMC onboard | |||
* WiFi and BlueTooth onboard | |||
* 10/100/1000Mbps Ethernet Port | |||
=Development For Android= | |||
===Load your first image on M2P=== | |||
* Download PhoenixCard: https://pan.baidu.com/s/1-fjvPqtG_zewVzqnXf1AHw?pwd=eid9 | |||
1.You could download latest image from our forum. | |||
Ex: http://forum.banana-pi.org/t/bananapi-bpi-m2p-h3-new-image-android7-0-release-2018-6-30/6147 | |||
2.Put your TF card into a TF-USB adapter, and then plug adapter in your Windows PC usb interface. | |||
3.Prepare your image, and download image burning tools PhoenixCard.exe. | |||
4.Use "PhoenixCard.exe" to burn android image to TF card. | |||
* Here is the example of M3 | |||
[[Image:M3_Android_Burning.png]] | |||
== | ===Load your image on M2P EMMC=== | ||
1.The only different with sd card burning is the image burning mode item choice | |||
* Here is the example of M3 | |||
[[Image:M3_Android_Emmc_Burning.png]] | |||
2.After succeed to burn image to SD, then plug SD card in your M2P | |||
3.Press power button, device will copy image to EMMC automatically | |||
* Download PhoenixCard: https://pan.baidu.com/s/1-fjvPqtG_zewVzqnXf1AHw?pwd=eid9 | |||
=Development= | =Development For Linux= | ||
==Basic Development== | ==Basic Development== | ||
===Prepare to develop=== | ===Prepare to develop=== | ||
* Prepare 8G/above TF card, USB-Serial interface, PC with Ubuntu System | |||
* Using your USB-Serial Connect debug console on M2P | |||
===Load your first image on M2P=== | ===Load your first image on M2P=== | ||
1.You could download latest image from our forum | |||
* Here is the example forum thread link: http://forum.banana-pi.org/t/banana-pi-bpi-m2p-new-image-release-ubuntu-16-04-v1-1/5719 | |||
2.Install bpi-tools on your Ubuntu. If you can't access this URL or any other problems, please go to [https://github.com/BPI-SINOVOIP/bpi-tools bpi-tools repo] and install this tools manually. | |||
* apt-get install pv | |||
* curl -sL https://github.com/BPI-SINOVOIP/bpi-tools/raw/master/bpi-tools | sudo -E bash | |||
3.After you download the image, insert your TF card into your Ubuntu | |||
* Execute "bpi-copy xxx.img /dev/sdx" to install image on your TF card. | |||
4.After step 3, then you can insert your TF card into M2P, and press power button setup M2P. | |||
5.Login user/password: pi/bananapi or root/bananapi. | |||
===Load your first image on M2P EMMC=== | |||
* Run your M2P with TF card | |||
* Copy "xxx-sd-emmc-xxx.img.zip / xxx-sd-emmc-xxx.img" to your USB disk | |||
* Plug your USB disk in M2P | |||
* After M2P recognise USB disk, execute "bpi-copy xxx-sd-emmc-xxx.img.zip / xxx-sd-emmc-xxx.img" to install image on EMMC | |||
* Then power off M2P, take TF card out, power on M2P with EMMC | |||
=== | ===Update your image=== | ||
For example, update your image to support new emmc5.1 | |||
* execute “bpi-tools”, to update your bpi tools; | |||
* execute “bpi-update -c bpi-m2p.conf”, to download new driver to update your image | |||
* execute “file *.tgz”, to check download files’ type is compressed data | |||
* execute “bpi-bootsel”, you will see the bootloader path, “/usr/lib/u-boot/bananapi/bpi-m2p/BPI_M2P_720P.img.gz” | |||
* execute “bpi-bootsel /usr/lib/u-boot/bananapi/bpi-m2p/BPI_M2P_720P.img.gz”, to update your bootloader | |||
* reboot | |||
==Advanced Development== | ==Advanced Development== | ||
===How to build uboot & kernel=== | |||
====Install tools==== | |||
* apt-get udpate | |||
* apt-get install gcc-arm-linux-gnueabihf u-boot-tools | |||
* apt-get install pv | |||
* curl -sL https://github.com/BPI-SINOVOIP/bpi-tools/raw/master/bpi-tools | sudo -E bash | |||
====Clone code==== | |||
* git clone: https://github.com/BPI-SINOVOIP/BPI-M2P-bsp.git | |||
* ./build.sh | |||
===How to create an image === | |||
* Prepare a SD card which have installed system(Ubuntu/Raspbian/..) | |||
* Boot your SD card with M2P, after M2P finish starting, copy your files and config your system, then poweroff M2P. [If you don't want to config your system, you can skip this step] | |||
* Plug your SD card in PC(which is running Linux), "cd /media", then "ln -s <your account> pi" | |||
* Execute "bpi-migrate -c bpi-m2p.conf -c ubuntu-mate-from-sd.conf -d /dev/sdx" | |||
* Then you could get your own image now | |||
===GPIO Control=== | |||
* To access a GPIO pin you first need to export it with | |||
echo XX > /sys/class/gpio/export | |||
* with XX being the number of the desired pin. To obtain the correct number you have to calculate it from the pin name (like PH18) | |||
(position of letter in alphabet - 1) * 32 + pin number | |||
for PH18 this would be ( 8 - 1) * 32 + 18 = 224 + 18 = 242 (since 'h' is the 8th letter) | |||
* echo "out/in" > /sys/class/gpio/gpio*NUMBER*/direction | |||
* echo "0/1" > /sys/class/gpio/gpio*NUMBER*/value | |||
===OTG=== | |||
1. On M2P console: | |||
* Execute "./adbd.sh", then execute "ps -ax | grep adbd" to see if adbd is set up | |||
2. On PC terminal: | |||
* If adbd was succeed to set up, insert OTG-USB interface to M2P and PC(with Ubuntu system) | |||
* Execute "adb devices" to see if PC has recognised M2P OTG | |||
* If yes, we could execute "adb shell" to connect M2P by adb now | |||
===GMAC=== | |||
* Use iperf3 to test gmac | |||
[[Image:M2P_GMAC.png]] | |||
===Bluetooth=== | |||
* Use bluetoothctl tool to operate BT | |||
* Execute "bluetoothctl" | |||
* If you don't know how to use bluetoothctl, type "help", you will see more commands | |||
* Execute these commands: | |||
[[Image:M2P_BT_bluetoothctl.png]] | |||
[[Image:M2P_BT.png]] | |||
===WiFi on M2P=== | |||
Driver code: | |||
*https://github.com/BPI-SINOVOIP/BPI_WiFi_Firmware | |||
====WiFi Client==== | ====WiFi Client==== | ||
'''You have two ways to setup WiFi Client''' | |||
1. Use commands to setup WiFi client | |||
* ip link set wlan0 up | |||
* iw dev wlan0 scan | grep SSID | |||
* vim /etc/wpasupplicant/wpa_supplicant.conf | |||
network={ | |||
ssid="ssid" | |||
psk="password" | |||
priority=1 | |||
} | |||
* wpa_supplicant -iwlan0 -c /etc/wpa_supplicant/wpa_supplicant.conf | |||
* dhclient wlan0 | |||
2. Use UI interface to setup WiFi Client | |||
===Change Logo=== | |||
1.Download M2P bsp code | |||
* Execute command “git clone https://github.com/BPI-SINOVOIP/BPI-M2P-bsp” | |||
* After you cloned project, execute command “cd BPI-M2P-bsp” | |||
2.Change to your boot logo | |||
* Prepare a ".bmp" picture, here I rotate 180°, as follows : | |||
[[Image:M2P_CL_1.png]] | |||
* Change your picture name as "bootlogo.bmp" | |||
* put your picture to "sunxi-pack/chips/sun8iw7p1/configs/BPI-M2P-xxxP/" | |||
Here I replaced “bootlogo.bmp” which is under | |||
“sunxi-pack/chips/sun8iw7p1/configs/BPI-M2P-720P/” as an example: | |||
[[Image:M2P_CL_2.png]] | |||
3.Build your code | |||
* "./build.sh BPI-M2P-720P" | |||
* choose 1 | |||
[[Image:M2P_CL_3.png]] | |||
* After you built the project, you will see “SD” directory | |||
[[Image:M2P_CL_4.png]] | |||
4.Install a raspbian image on your SD card | |||
5.Plug your SD card into your Ubuntu PC | |||
(1) check your SD card was recognised as /dev/sdxx, as you can see, mine sd card was recognised as /dev/sde | |||
[[Image:M2P_CL_5.png]] | |||
6.Then “cd SD/bpi-m2p/100MB” | |||
7.Execute command “bpi-bootsel BPI-M2P-720P.img.gz /dev/sde” | |||
[[Image:M2P_CL_6.png]] | |||
8.Insert your updated SD card to board, and power on, you will see: | |||
===Clear boot=== | |||
* git clone https://github.com/BPI-SINOVOIP/BPI-files/tree/master/SD/100MB | |||
* bpi-bootsel BPI-cleanboot-8k.img.gz /dev/sdX | |||
===Camara function=== | |||
We use HDF5640 camara. | |||
[[Image:ov5640_camara.png]] | |||
====Guvcview==== | |||
* Use your UI interface to operate camara | |||
* Applications -> Sound & Video -> guvcview | |||
[[Image:guvcview_ov5640.png]] | |||
====Shell==== | |||
* We also have built-in command in /usr/local/bin to test camara | |||
* "./test_ov5640_image_mode.sh" to test picture taking function | |||
* "./cameratest.sh" to test video recording function | |||
===IR function=== | |||
* Execute "getevent" | |||
* Use your IR device to send information to M2P | |||
[[Image:IR_getevent.png]] | |||
===BPI-Tools=== | |||
====Install Bpi-tools==== | |||
* Execute "curl -sL https://github.com/BPI-SINOVOIP/bpi-tools/raw/master/bpi-tools | sudo -E bash - " | |||
====Update Bpi-tools==== | |||
* Execute "bpi-tools" | |||
[[Image: Bpi-tools.png]] | |||
===RPi.GPIO=== | |||
====Install RPi.GPIO==== | |||
* Execute "git clone https://github.com/BPI-SINOVOIP/RPi.GPIO" | |||
* after clone the repo, cd RPi.GPIO | |||
* Execute "sudo apt-get update" | |||
* Execute "sudo apt-get install python-dev python3-dev" | |||
* Execute "sudo python setup.py install" or "sudo python3 setup.py install" to install the module | |||
====Using RPi.GPIO==== | |||
* cd /usr/local/bin | |||
* Execute "./bpi_test_g40.py" to test RPi.GPIO | |||
[[Image: RPi_GPIO.png]] | |||
===WiringPi=== | |||
* GitHub: https://github.com/BPI-SINOVOIP/BPI-WiringPi2.git | |||
* We also have built-in test command in "/usr/local/bin" | |||
====How to Update WiringPi==== | |||
* Execute "bpi-update -c pkglist.conf" | |||
[[Image: Update_Pkglist.png]] | |||
* Execute "bpi-update -c bpi-pkg-bpi-wiringpi.conf" | |||
[[Image: Update_WringPi.png]] | |||
====RGB 1602 LCD==== | |||
* Execute "/usr/local/bin/bpi_test_lcd1602.sh" | |||
[[Image: WringPi_1602_LCD.png]] | |||
====0.96 Inch OLED Display==== | |||
* Execute "/usr/local/bin/bpi_test_52pi.sh" | |||
[[Image: WringPi_0.96_OLED.png]] | |||
==== | ====8x8 RGB LED Martix==== | ||
* Firstly you need a GPIO Extend Board for 8x8 LED Martix | |||
[[Image: WringPi_LED_Martix_Extend_Board.png]] | |||
* Execute "/usr/local/bin/bpi_test_gpio40.sh" | |||
[[Image: WringPi_LED_Martix.png]] | |||
==FAQ== | ==FAQ== | ||
Latest revision as of 01:18, 20 March 2023
Introduction


Banana Pi M2+ is mini size development board that offers great computing performance in an ultra portable form factor.It is a 65mm*65mm fantastic mini size board with Allwinner H series chips. It comes with different versions but share the same interfaces.
- Read more about : Banana Pi BPI-M2+
- Burn image : Quick Start Banana pi SBC
BPI-M2+ H3
Key Features
- Quad-core 1.2GHz Cortex-A7 H3
- 1GB DDR3
- 8GB eMMC onboard
- WiFi and BlueTooth onboard
- 10/100/1000Mbps Ethernet Port
Development For Android
Load your first image on M2P
* Download PhoenixCard: https://pan.baidu.com/s/1-fjvPqtG_zewVzqnXf1AHw?pwd=eid9
 1.You could download latest image from our forum.
 Ex: http://forum.banana-pi.org/t/bananapi-bpi-m2p-h3-new-image-android7-0-release-2018-6-30/6147

 2.Put your TF card into a TF-USB adapter, and then plug adapter in your Windows PC usb interface.

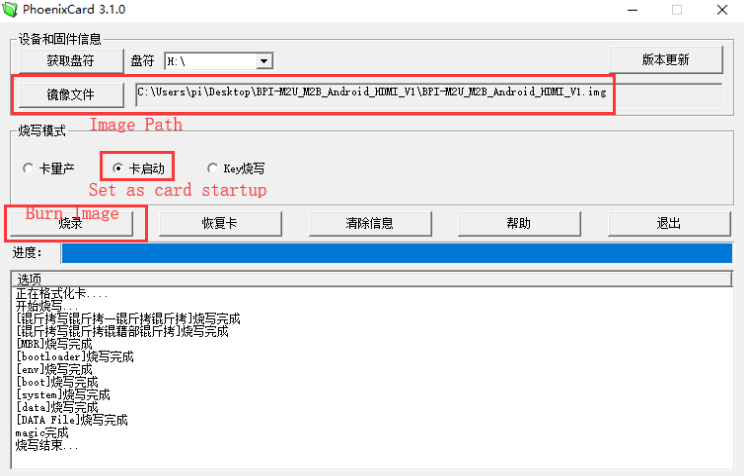
 3.Prepare your image, and download image burning tools PhoenixCard.exe.

 4.Use "PhoenixCard.exe" to burn android image to TF card.
* Here is the example of M3

Load your image on M2P EMMC
1.The only different with sd card burning is the image burning mode item choice
* Here is the example of M3
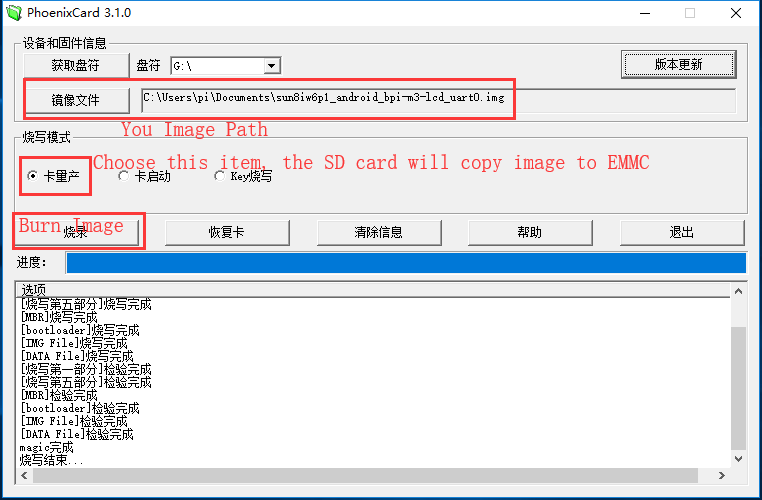 2.After succeed to burn image to SD, then plug SD card in your M2P
3.Press power button, device will copy image to EMMC automatically
2.After succeed to burn image to SD, then plug SD card in your M2P
3.Press power button, device will copy image to EMMC automatically

* Download PhoenixCard: https://pan.baidu.com/s/1-fjvPqtG_zewVzqnXf1AHw?pwd=eid9
Development For Linux
Basic Development
Prepare to develop
 * Prepare 8G/above TF card, USB-Serial interface, PC with Ubuntu System
 * Using your USB-Serial Connect debug console on M2P
Load your first image on M2P
 1.You could download latest image from our forum
 * Here is the example forum thread link: http://forum.banana-pi.org/t/banana-pi-bpi-m2p-new-image-release-ubuntu-16-04-v1-1/5719

 2.Install bpi-tools on your Ubuntu. If you can't access this URL or any other problems, please go to bpi-tools repo and install this tools manually.
 * apt-get install pv
 * curl -sL https://github.com/BPI-SINOVOIP/bpi-tools/raw/master/bpi-tools | sudo -E bash

 3.After you download the image, insert your TF card into your Ubuntu
 * Execute "bpi-copy xxx.img /dev/sdx" to install image on your TF card.

 4.After step 3, then you can insert your TF card into M2P, and press power button setup M2P.

 5.Login user/password: pi/bananapi or root/bananapi.
Load your first image on M2P EMMC
 * Run your M2P with TF card
 * Copy "xxx-sd-emmc-xxx.img.zip / xxx-sd-emmc-xxx.img" to your USB disk
 * Plug your USB disk in M2P
 * After M2P recognise USB disk, execute "bpi-copy xxx-sd-emmc-xxx.img.zip / xxx-sd-emmc-xxx.img" to install image on EMMC
 * Then power off M2P, take TF card out, power on M2P with EMMC
Update your image
For example, update your image to support new emmc5.1
  * execute “bpi-tools”, to update your bpi tools;
  * execute “bpi-update -c bpi-m2p.conf”, to download new driver to update your image
  * execute “file *.tgz”, to check download files’ type is compressed data
  * execute “bpi-bootsel”, you will see the bootloader path, “/usr/lib/u-boot/bananapi/bpi-m2p/BPI_M2P_720P.img.gz”
  * execute “bpi-bootsel /usr/lib/u-boot/bananapi/bpi-m2p/BPI_M2P_720P.img.gz”, to update your bootloader
  * reboot
Advanced Development
How to build uboot & kernel
Install tools
- apt-get udpate
- apt-get install gcc-arm-linux-gnueabihf u-boot-tools
- apt-get install pv
- curl -sL https://github.com/BPI-SINOVOIP/bpi-tools/raw/master/bpi-tools | sudo -E bash
Clone code
- git clone: https://github.com/BPI-SINOVOIP/BPI-M2P-bsp.git
- ./build.sh
How to create an image
- Prepare a SD card which have installed system(Ubuntu/Raspbian/..)
- Boot your SD card with M2P, after M2P finish starting, copy your files and config your system, then poweroff M2P. [If you don't want to config your system, you can skip this step]
- Plug your SD card in PC(which is running Linux), "cd /media", then "ln -s <your account> pi"
- Execute "bpi-migrate -c bpi-m2p.conf -c ubuntu-mate-from-sd.conf -d /dev/sdx"
- Then you could get your own image now
GPIO Control
- To access a GPIO pin you first need to export it with
echo XX > /sys/class/gpio/export
- with XX being the number of the desired pin. To obtain the correct number you have to calculate it from the pin name (like PH18)
 (position of letter in alphabet - 1) * 32 + pin number
  for PH18 this would be ( 8 - 1) * 32 + 18 = 224 + 18 = 242 (since 'h' is the 8th letter)
- echo "out/in" > /sys/class/gpio/gpio*NUMBER*/direction
- echo "0/1" > /sys/class/gpio/gpio*NUMBER*/value
OTG
1. On M2P console:
- Execute "./adbd.sh", then execute "ps -ax | grep adbd" to see if adbd is set up
2. On PC terminal:
- If adbd was succeed to set up, insert OTG-USB interface to M2P and PC(with Ubuntu system)
- Execute "adb devices" to see if PC has recognised M2P OTG
- If yes, we could execute "adb shell" to connect M2P by adb now
GMAC
- Use iperf3 to test gmac

Bluetooth
- Use bluetoothctl tool to operate BT
- Execute "bluetoothctl"
- If you don't know how to use bluetoothctl, type "help", you will see more commands
- Execute these commands:


WiFi on M2P
Driver code:
WiFi Client
You have two ways to setup WiFi Client
1. Use commands to setup WiFi client
- ip link set wlan0 up
- iw dev wlan0 scan | grep SSID
- vim /etc/wpasupplicant/wpa_supplicant.conf
 network={
 ssid="ssid"
 psk="password"
 priority=1
 }
- wpa_supplicant -iwlan0 -c /etc/wpa_supplicant/wpa_supplicant.conf
- dhclient wlan0
2. Use UI interface to setup WiFi Client
Change Logo
1.Download M2P bsp code
- Execute command “git clone https://github.com/BPI-SINOVOIP/BPI-M2P-bsp”
- After you cloned project, execute command “cd BPI-M2P-bsp”
2.Change to your boot logo
- Prepare a ".bmp" picture, here I rotate 180°, as follows :

- Change your picture name as "bootlogo.bmp"
- put your picture to "sunxi-pack/chips/sun8iw7p1/configs/BPI-M2P-xxxP/"
Here I replaced “bootlogo.bmp” which is under “sunxi-pack/chips/sun8iw7p1/configs/BPI-M2P-720P/” as an example:

3.Build your code
- "./build.sh BPI-M2P-720P"
- choose 1

- After you built the project, you will see “SD” directory

4.Install a raspbian image on your SD card
5.Plug your SD card into your Ubuntu PC
(1) check your SD card was recognised as /dev/sdxx, as you can see, mine sd card was recognised as /dev/sde

6.Then “cd SD/bpi-m2p/100MB”
7.Execute command “bpi-bootsel BPI-M2P-720P.img.gz /dev/sde”

8.Insert your updated SD card to board, and power on, you will see:
Clear boot
- git clone https://github.com/BPI-SINOVOIP/BPI-files/tree/master/SD/100MB
- bpi-bootsel BPI-cleanboot-8k.img.gz /dev/sdX
Camara function
We use HDF5640 camara.

Guvcview
- Use your UI interface to operate camara
- Applications -> Sound & Video -> guvcview

Shell
- We also have built-in command in /usr/local/bin to test camara
- "./test_ov5640_image_mode.sh" to test picture taking function
- "./cameratest.sh" to test video recording function
IR function
- Execute "getevent"
- Use your IR device to send information to M2P

BPI-Tools
Install Bpi-tools
- Execute "curl -sL https://github.com/BPI-SINOVOIP/bpi-tools/raw/master/bpi-tools | sudo -E bash - "
Update Bpi-tools
- Execute "bpi-tools"

RPi.GPIO
Install RPi.GPIO
- Execute "git clone https://github.com/BPI-SINOVOIP/RPi.GPIO"
- after clone the repo, cd RPi.GPIO
- Execute "sudo apt-get update"
- Execute "sudo apt-get install python-dev python3-dev"
- Execute "sudo python setup.py install" or "sudo python3 setup.py install" to install the module
Using RPi.GPIO
- cd /usr/local/bin
- Execute "./bpi_test_g40.py" to test RPi.GPIO

WiringPi
- GitHub: https://github.com/BPI-SINOVOIP/BPI-WiringPi2.git
- We also have built-in test command in "/usr/local/bin"
How to Update WiringPi
- Execute "bpi-update -c pkglist.conf"

- Execute "bpi-update -c bpi-pkg-bpi-wiringpi.conf"

RGB 1602 LCD
- Execute "/usr/local/bin/bpi_test_lcd1602.sh"

0.96 Inch OLED Display
- Execute "/usr/local/bin/bpi_test_52pi.sh"

8x8 RGB LED Martix
- Firstly you need a GPIO Extend Board for 8x8 LED Martix

- Execute "/usr/local/bin/bpi_test_gpio40.sh"
