Difference between revisions of "Getting Started with BPI-QCar"
(Created page with "ch:快速上手_香蕉派_Q-Car =产品介绍= thumb|BPI Q-Car with micro:bit File:Q-Car_With_Web_Bit.png|thumb|BPI Q-Car with [[BPI-B...") |
(→Line patrol) |
||
| (48 intermediate revisions by 2 users not shown) | |||
| Line 1: | Line 1: | ||
| − | [[ | + | [[zh:快速上手_香蕉派_Q-Car]] |
| − | = | + | =About BPI-QCar= |
[[File:Q-Car_With_Micro_Bit.png|thumb|BPI Q-Car with micro:bit]] | [[File:Q-Car_With_Micro_Bit.png|thumb|BPI Q-Car with micro:bit]] | ||
[[File:Q-Car_With_Web_Bit.png|thumb|BPI Q-Car with [[BPI-Bit ]]]] | [[File:Q-Car_With_Web_Bit.png|thumb|BPI Q-Car with [[BPI-Bit ]]]] | ||
[[File:BPi-QCar_1.jpg|thumb|BPI-QCar with [[BPI-AI]] board]] | [[File:BPi-QCar_1.jpg|thumb|BPI-QCar with [[BPI-AI]] board]] | ||
| − | + | Banana PI BPI Q-Car,which is a robot focusing on maker education.Compatible with Web:Bit(BPI: Bit) and Micro:Bit development boards.Small car body, highly integrated functions, plug and play, can quickly children's attention, complete the quick start of graphics programming, cultivate independent thinking and logical thinking ability | |
| − | == | + | ==Key Features== |
| − | * | + | *support Micro:bit, PBI:bit(Web:bit) and BPI-AI(WEB:AI) boards |
| − | * | + | *support Makecode graphical programming(with micro:bit),support Webduino graphical programming(with BPI:bit),and it also support MicroPython arduino(Micro:bit/BPI:bit) |
| − | * | + | *Compact body, strong integrity |
| − | * | + | *N20 Miniature reducer |
| − | * | + | *Infrared emission, infrared reception, line patrol, speed measurement, atmosphere lamp, I2C interface (support 3.3V and 5V), ultrasonic interface, buzzer, steering gear interface, needle row expansion port, expansion screw hole, etc...Fully functional, strong expansibility |
| − | * | + | *Easy to use it. |
| − | = | + | =BPI-QCar with BPI:Bit for Arduino IDE = |
| − | + | Arduino is an open source electronic prototyping platform that is flexible and easy to use.With the help of the community, BPI: BIT can be programmed with the Arduino environment, which you can refer to in the tutorial | |
| + | [[BPI:bit_for_Arduino]] | ||
| − | == | + | ==Motor control== |
| − | + | Learning Objectives: Master the basic motor control method of Q-CAR | |
| − | + | Program effect display: car forward 1 second, stop 100ms, back 1 second, stop 100ms, left 1 second, stop 100ms, right turn 1 second, stop 100ms. | |
[[Image:Q-Car_Motor_Test.gif]] | [[Image:Q-Car_Motor_Test.gif]] | ||
| − | + | Arduino code link:https://github.com/BPI-STEAM/Q-Car/tree/master/SoftWare/Web_Bit_Arduino/Motor_Demo | |
| − | == | + | ==Ambient light control== |
| − | + | Learning Objectives: To understand the basic usage of Q-CAR RGB atmosphere light | |
| − | + | Program effect display: bottom RGB atmosphere light red, green, blue three color mixing gradient display a variety of colors, showing a color breathing effect. | |
[[Image:Q-Car_Pixel_Test.gif]] | [[Image:Q-Car_Pixel_Test.gif]] | ||
| − | + | Arduino code link:https://github.com/BPI-STEAM/Q-Car/tree/master/SoftWare/Web_Bit_Arduino/Pixel_Demo | |
| − | == | + | ==Ultrasonic sensor control== |
| − | + | Learning objective: master the use of Q-CAR ultrasonic sensor | |
| − | + | Program effect display: serial port display ultrasonic measured distance data. | |
[[Image:Q-Car_Ultrasonic_Test_1.gif]] | [[Image:Q-Car_Ultrasonic_Test_1.gif]] | ||
| Line 53: | Line 54: | ||
[[Image:Q-Car_Ultrasonic_Test_2.png]] | [[Image:Q-Car_Ultrasonic_Test_2.png]] | ||
| − | + | Arduino code link:https://github.com/BPI-STEAM/Q-Car/tree/master/SoftWare/Web_Bit_Arduino/Ultrasonic_Demo | |
| − | == | + | ==How to use buzzer== |
| − | + | Learning objective: master the use of BPI-QCAR buzzer | |
| − | + | Program effect display: the buzzer play "little star music" | |
| − | + | Arduino code link:https://github.com/BPI-STEAM/Q-Car/tree/master/SoftWare/Web_Bit_Arduino/Buzzer_Demo | |
| − | == | + | ==IR control== |
| − | + | Objective: To master the infrared remote control of Q-CAR | |
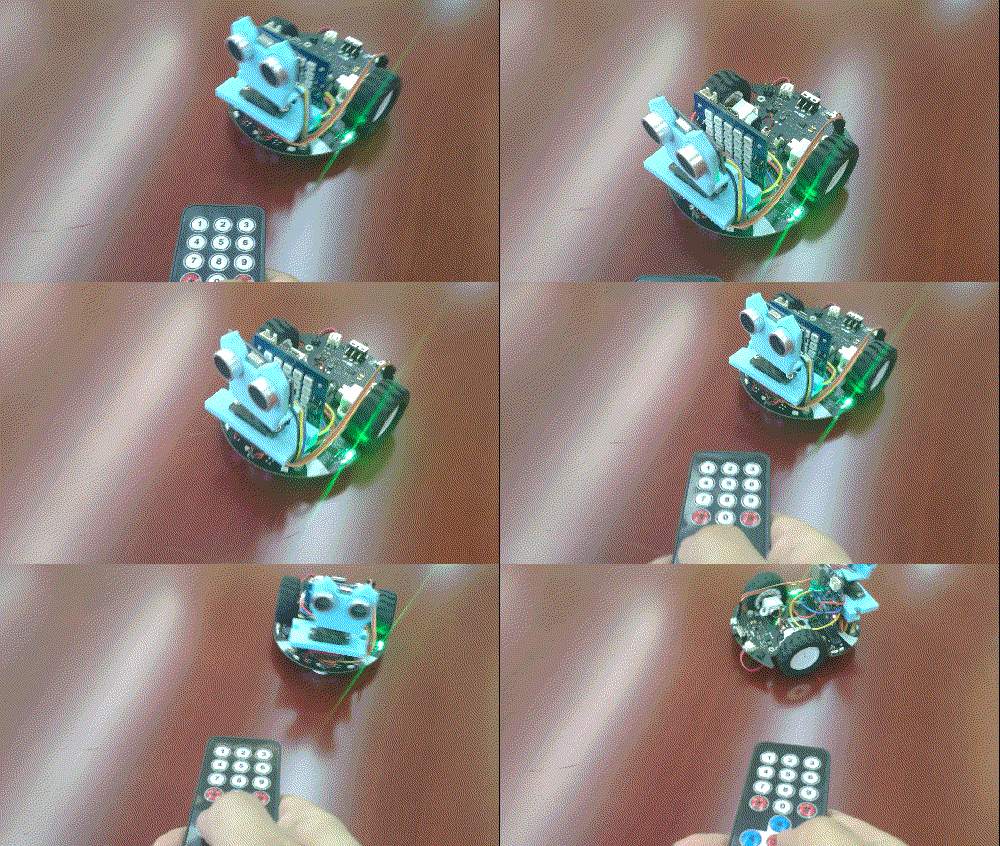
| − | + | Program effect display: infrared remote control Q-CAR forward and backward and turn | |
[[Image:Q-Car_IR_Control.gif]] | [[Image:Q-Car_IR_Control.gif]] | ||
| − | + | Arduino code link:https://github.com/BPI-STEAM/Q-Car/tree/master/SoftWare/Web_Bit_Arduino/IR_Control_Demo | |
| − | == | + | ==Ultrasonic obstacle avoidance== |
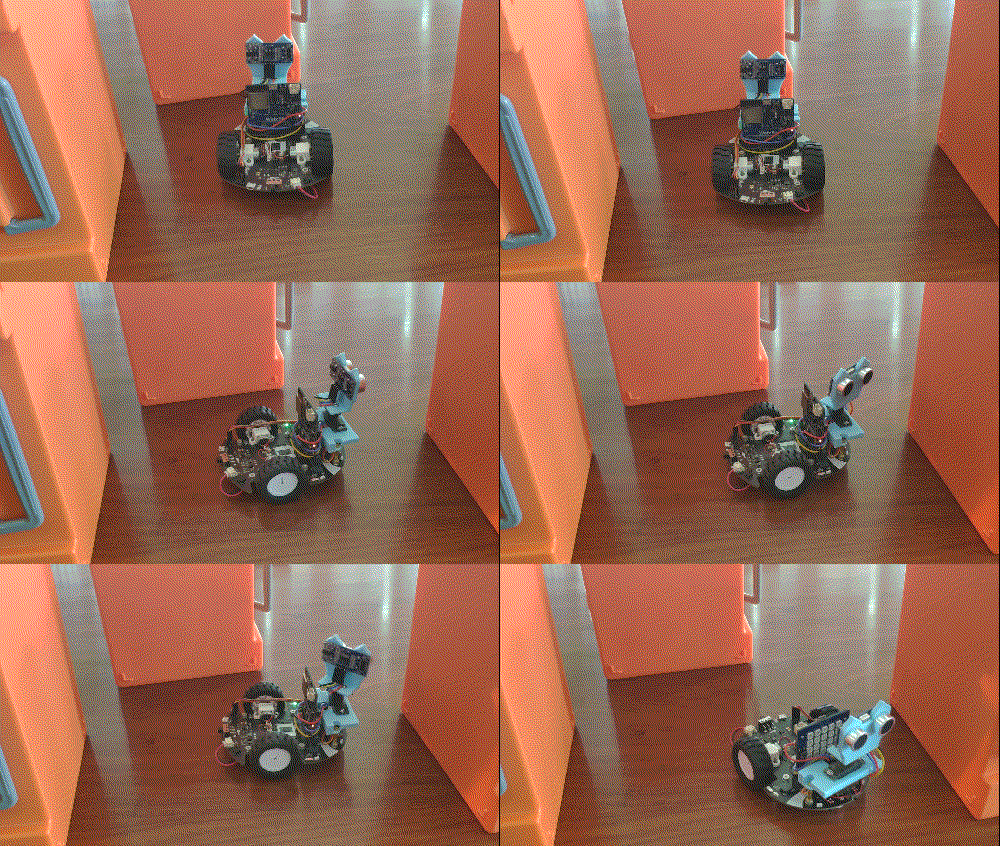
| − | + | Program effect display: boot the car forward, ultrasonic detection of the front distance, if the distance is less than 8cm, the car left and right to check the obstacles on both sides, choose the direction of the farther distance to turn, to avoid obstacles. | |
| − | + | Parts preparation: M2 copper column ×2, M2 screw ×2, SR04 ultrasonic module ×1, ultrasonic bracket ×1, steering gear bracket ×1([https://github.com/BPI-STEAM/Q-Car/tree/master/Hardware/Servo%26Ultrasonic Download address of bracket]),DuPont line number, insert SR04 interface in front。 | |
[[Image:Q-Car_Avoidance_Demo.gif]] | [[Image:Q-Car_Avoidance_Demo.gif]] | ||
| − | + | Arduino code link:https://github.com/BPI-STEAM/Q-Car/tree/master/SoftWare/Web_Bit_Arduino/Avoidance_Demo | |
| − | == | + | ==Line patrol== |
| − | = | + | =BPI-QCar with BPI:Bit use MicroPython= |
| − | = | + | =BPI-QCar with Micro:Bit use MakeCode = |
| − | == | + | ==MakeCode programming to light up the LED on Micro:Bit== |
| − | |||
| − | + | Learning Objectives: Familiarize yourself with basic Makecode applications and display some graphics or text on the Micro:Bit 5*5LED matrix. | |
| − | + | Open the Makecode programming environment web side of Micro:Bit:https://makecode.microbit.org/ | |
| + | |||
| + | Create a new project and connect the Makecode blocks with the following routine. For example, the first block "Show Leds" can be found in the "Basic" options column. This block can edit the desired graphics | ||
[[Image:Microbit-screenshot_(display_graphics).png]] | [[Image:Microbit-screenshot_(display_graphics).png]] | ||
| − | + | Right-click building blocks to carry out some operations on the building blocks, such as add notes, delete copy building blocks, as well as access to the corresponding documentation of the building blocks, this for the first time people can provide great help. | |
| − | + | The MakeCode programming environment has an emulator with its own simulation of the program to view the effect in real time, usually displayed at the top left | |
| − | + | The Makecode programming environment also supports importing project files from outside, such as.hex files that are compiled by Makecode | |
| − | + | Routine project file:https://github.com/Wind-stormger/Makecode/blob/master/microbit-display-graphics.hex | |
| − | ''' | + | '''Note''':The correct way to import *.hex file is to download the.hex file from the link above and then import it into the MakeCode, rather than directly importing the link. External project links import the MakeCode differently |
[[Image:Makecode(import_file).png]] | [[Image:Makecode(import_file).png]] | ||
| − | + | The project file can be imported into Makecode to view and edit after downloading to local, or it can be directly burned into Micro:Bit through USB and run directly | |
| − | == | + | ==Micro:bit's Button control - Base== |
| − | + | Learning Objectives: Use the two buttons A/B on Micro:Bit to control the graphics to be output by the LED matrix | |
| − | + | On the basis of the section "Using Makecode Programming to Light Micro:Bit", find the building block "On Button A Pressed" in the "Input" option column of Makecode to program | |
| − | + | The routine is shown in the figure below. Press the A button to display the English character "A", press the B button to display the English character "B", and press the AB button to display A pattern shaped like A banana | |
| − | [[Image:Using_the_button.png]] | + | [[Image:Using_the_button.png|500px]] |
| − | + | Routine project file:https://github.com/Wind-stormger/Makecode/blob/master/microbit-Using_the_button_1.hex | |
| − | + | The project file can be imported into Makecode to view and edit after downloading to local, or it can be directly burned into Micro:Bit through USB and run directly | |
| − | == | + | ==Micro:bit's Button control -advanced== |
| − | + | Learning objectives: Makecode programming to achieve a count and display button control procedures | |
| − | + | Building on the previous section, create a new variable called "A_was_pressed_times" in the "Variables" section of the Makecode. This will generate multiple building blocks for the variable in the "Variables" section | |
| − | + | Combine the addition blocks in the "Math" TAB and the Mosaic blocks in the "Variables" TAB. Refer to the following legend | |
[[Image:Using_the_button_2.png]] | [[Image:Using_the_button_2.png]] | ||
| − | + | At this point, we realized in the Makecode programming and made A use of the addition counting program, press A button A count to add 1 at the same time the counting value output to the LED matrix, press A button B count to return to 0 and clear the LED matrix display | |
| − | + | Routine project file:https://github.com/Wind-stormger/Makecode/blob/master/microbit-Using_the_button_2.hex | |
| − | + | The project file can be imported into Makecode to view and edit after downloading to local, or it can be directly burned into Micro:Bit through USB and run directly | |
| − | == | + | ==The wheel speed measurement== |
| − | + | Learning Objectives: Using Makecode programming to read the high and low level signals of the infrared pair tube used for wheel speed measurement on BPI-QCAR and calculate the wheel speed with counting method | |
| − | + | The routine is as shown in the figure below. The program is burned into Micro:bit, and the Micro:bit is connected to BPI-QCar. At this time, the left and right wheels of Q-CAR can be read from the USB serial port to the left and right wheel speed | |
[[Image:Q-Car_velocity_measurement_module.png]] | [[Image:Q-Car_velocity_measurement_module.png]] | ||
| Line 151: | Line 153: | ||
[[Image:Q-Car_velocity_measurement_module_Serial_port.png]] | [[Image:Q-Car_velocity_measurement_module_Serial_port.png]] | ||
| − | + | Routine project file:https://github.com/Wind-stormger/Makecode/blob/master/microbit-Q-Car_velocity_measurement_module.hex | |
| − | + | The project file can be imported into Makecode to view and edit after downloading to local, or it can be directly burned into Micro:Bit through USB and run directly | |
| − | == | + | ==Motor control== |
| − | + | Learning Objectives: Using Makecode programming to achieve QCar left and right motor forward and reverse control | |
| − | + | Routines as shown in the figure below, the program is burned into the Micro: BIT, the Micro: BIT and Q-CAR connection. Press the a button onceleft ,and right motor will be turned to 2s at the same time, reverse 2s at the same time, right motor is turned to 2s alone, left motor is turned to 2s alone,two motors stop. | |
[[Image:Q-Car_Motor_control_module.png]] | [[Image:Q-Car_Motor_control_module.png]] | ||
| − | + | Routine project file:https://github.com/Wind-stormger/Makecode/blob/master/microbit-Q-Car_Motor_control_module.hex | |
| − | + | The project file can be imported into Makecode to view and edit after downloading to local, or it can be directly burned into Micro:Bit through USB and run directly | |
| − | == | + | ==Ambient light control== |
| − | + | Learning Objectives: Use Makecode programming to control 10 WS2812B color atmosphere lamps on BPI-QCar | |
| − | + | The routine is as shown in the figure below. The program is burned into the Micro: BIT, and the Micro: BIT is connected to the Q-CAR. The 10 WS2812B lights on the Q-CAR will simultaneously cycle the rainbow light effect with 1800ms | |
[[Image:Q-Car_Pixel.png]] | [[Image:Q-Car_Pixel.png]] | ||
| − | + | Routine project file:https://github.com/Wind-stormger/Makecode/blob/master/microbit-Q-Car_Pixel.hex | |
| − | + | The project file can be imported into Makecode to view and edit after downloading to local, or it can be directly burned into Micro:Bit through USB and run directly | |
| − | == | + | ==Ultrasonic sensor control== |
| − | + | Learning Objectives: Using Makecode programming to control the HC-SR04 ultrasonic extension module on BPI-QCar | |
| − | + | Routine as shown below, burn the program into Micro:BIT, connect Micro:BIT with BPI-QCar, connect HC-SR04 ultrasonic extension module with BPI-QCar, connect 5V power supply with BPI-QCar | |
| − | [[Image:Q-car_Ultrasonic_ranging.png]] | + | [[Image:Q-car_Ultrasonic_ranging.png|600px]] |
| − | + | The distance detected by the ultrasonic sensor and the temperature sensor data on the Micro:Bit can be read from the USB serial port of the Micro:Bit. The temperature calibration of the ultrasonic sensor is realized by the routine | |
Distance=85.815|Temperature=21 | Distance=85.815|Temperature=21 | ||
| − | + | Routine project file:https://github.com/Wind-stormger/Makecode/blob/master/microbit-Q-car_Ultrasonic_ranging.hex | |
| + | |||
| + | The project file can be imported into Makecode to view and edit after downloading to local, or it can be directly burned into Micro:Bit through USB and run directly | ||
| + | |||
| + | ==Use the buzzer== | ||
| + | |||
| + | Learning Objectives: Write a piece of music with Makecode and play it on the BPI-QCar buzzer | ||
| + | |||
| + | The routine is shown in the figure below. Burn the program into Micro:Bit, connect Micro:Bit to BPI-QCar,press the a button once,and the buzzer on BPI-QCar will play the song twice in a cycle | ||
| + | |||
| + | [[Image:Q-car_Music_Arrangement.png|500px]] | ||
| + | |||
| + | Routine project file:https://github.com/Wind-stormger/Makecode/blob/master/microbit-Q-car_Music_Arrangement.hex | ||
| + | |||
| + | The project file can be imported into Makecode to view and edit after downloading to local, or it can be directly burned into Micro:Bit through USB and run directly | ||
| + | |||
| + | ==Line patrol== | ||
| + | |||
| + | Learning Objectives: using makecode programming to realize BPI-QCar line patrol driving, line patrol infrared tube analog value calibration, ultrasonic ranging and parking in case of obstacles | ||
| − | + | Routine as shown in the figure below, the program burned into the Micro:Bit , will Micro:Bit Connect with BPI-QCar and turn on the power switch, | |
| − | + | When the LED matrix displays the right arrow, place the two infrared tubes of Q-car above the white road around the line. | |
| − | + | Press button a and wait until the calibration procedure is completed. The LED matrix will display the left arrow. At this time, make the front of Q-car face the line travel direction. | |
| − | + | Press button B and Q-car will start line patrol driving. During driving, if the ultrasonic ranging module detects an object with a distance of less than or equal to 10cm in front, Q-car will stop. | |
| − | [[Image:Q- | + | [[Image:Q-car_Line_patrol.png|800px]] |
| − | + | Routine project file:https://github.com/Wind-stormger/Makecode/blob/master/microbit-Q-car_Line_tracking.hex | |
| − | + | The project file can be imported into Makecode to view and edit after downloading to local, or it can be directly burned into Micro:Bit through USB and run directly | |
Latest revision as of 23:12, 8 September 2021
Contents
About BPI-QCar
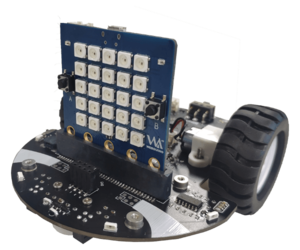
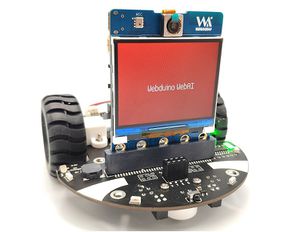
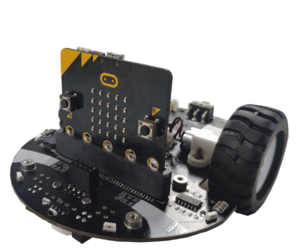
Banana PI BPI Q-Car,which is a robot focusing on maker education.Compatible with Web:Bit(BPI: Bit) and Micro:Bit development boards.Small car body, highly integrated functions, plug and play, can quickly children's attention, complete the quick start of graphics programming, cultivate independent thinking and logical thinking ability
Key Features
- support Micro:bit, PBI:bit(Web:bit) and BPI-AI(WEB:AI) boards
- support Makecode graphical programming(with micro:bit),support Webduino graphical programming(with BPI:bit),and it also support MicroPython arduino(Micro:bit/BPI:bit)
- Compact body, strong integrity
- N20 Miniature reducer
- Infrared emission, infrared reception, line patrol, speed measurement, atmosphere lamp, I2C interface (support 3.3V and 5V), ultrasonic interface, buzzer, steering gear interface, needle row expansion port, expansion screw hole, etc...Fully functional, strong expansibility
- Easy to use it.
BPI-QCar with BPI:Bit for Arduino IDE
Arduino is an open source electronic prototyping platform that is flexible and easy to use.With the help of the community, BPI: BIT can be programmed with the Arduino environment, which you can refer to in the tutorial BPI:bit_for_Arduino
Motor control
Learning Objectives: Master the basic motor control method of Q-CAR
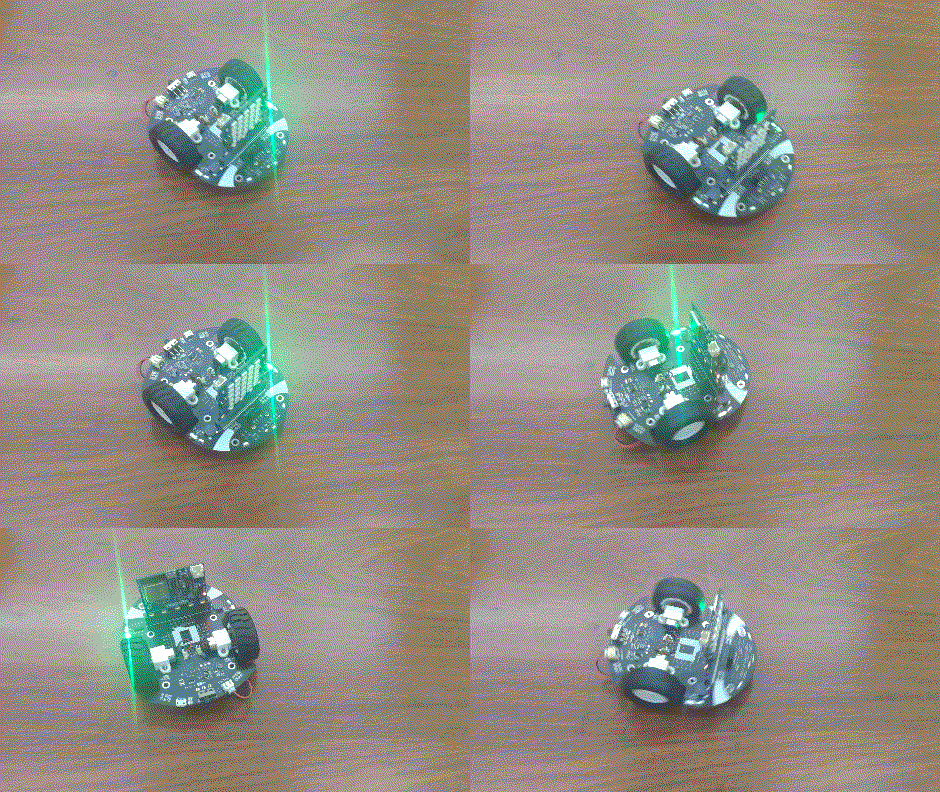
Program effect display: car forward 1 second, stop 100ms, back 1 second, stop 100ms, left 1 second, stop 100ms, right turn 1 second, stop 100ms.
Arduino code link:https://github.com/BPI-STEAM/Q-Car/tree/master/SoftWare/Web_Bit_Arduino/Motor_Demo
Ambient light control
Learning Objectives: To understand the basic usage of Q-CAR RGB atmosphere light
Program effect display: bottom RGB atmosphere light red, green, blue three color mixing gradient display a variety of colors, showing a color breathing effect.
Arduino code link:https://github.com/BPI-STEAM/Q-Car/tree/master/SoftWare/Web_Bit_Arduino/Pixel_Demo
Ultrasonic sensor control
Learning objective: master the use of Q-CAR ultrasonic sensor
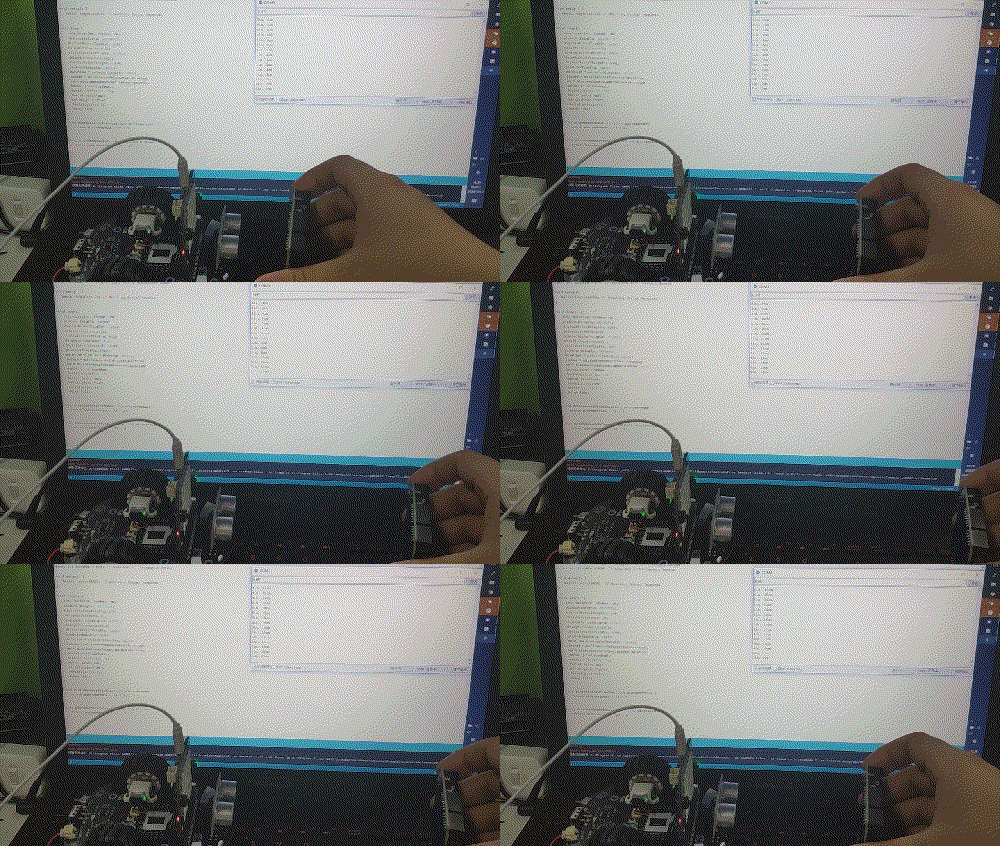
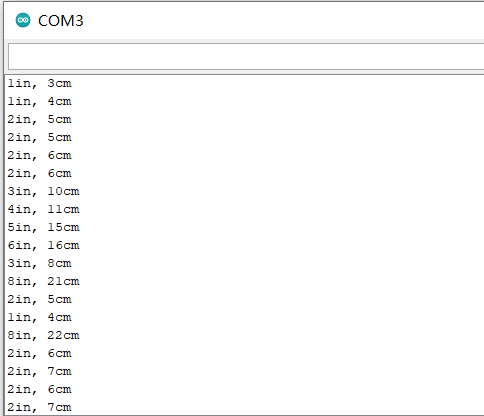
Program effect display: serial port display ultrasonic measured distance data.
Arduino code link:https://github.com/BPI-STEAM/Q-Car/tree/master/SoftWare/Web_Bit_Arduino/Ultrasonic_Demo
How to use buzzer
Learning objective: master the use of BPI-QCAR buzzer
Program effect display: the buzzer play "little star music"
Arduino code link:https://github.com/BPI-STEAM/Q-Car/tree/master/SoftWare/Web_Bit_Arduino/Buzzer_Demo
IR control
Objective: To master the infrared remote control of Q-CAR
Program effect display: infrared remote control Q-CAR forward and backward and turn
Arduino code link:https://github.com/BPI-STEAM/Q-Car/tree/master/SoftWare/Web_Bit_Arduino/IR_Control_Demo
Ultrasonic obstacle avoidance
Program effect display: boot the car forward, ultrasonic detection of the front distance, if the distance is less than 8cm, the car left and right to check the obstacles on both sides, choose the direction of the farther distance to turn, to avoid obstacles.
Parts preparation: M2 copper column ×2, M2 screw ×2, SR04 ultrasonic module ×1, ultrasonic bracket ×1, steering gear bracket ×1(Download address of bracket),DuPont line number, insert SR04 interface in front。
Arduino code link:https://github.com/BPI-STEAM/Q-Car/tree/master/SoftWare/Web_Bit_Arduino/Avoidance_Demo
Line patrol
BPI-QCar with BPI:Bit use MicroPython
BPI-QCar with Micro:Bit use MakeCode
MakeCode programming to light up the LED on Micro:Bit
Learning Objectives: Familiarize yourself with basic Makecode applications and display some graphics or text on the Micro:Bit 5*5LED matrix.
Open the Makecode programming environment web side of Micro:Bit:https://makecode.microbit.org/
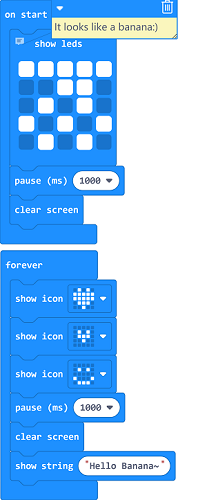
Create a new project and connect the Makecode blocks with the following routine. For example, the first block "Show Leds" can be found in the "Basic" options column. This block can edit the desired graphics
Right-click building blocks to carry out some operations on the building blocks, such as add notes, delete copy building blocks, as well as access to the corresponding documentation of the building blocks, this for the first time people can provide great help.
The MakeCode programming environment has an emulator with its own simulation of the program to view the effect in real time, usually displayed at the top left
The Makecode programming environment also supports importing project files from outside, such as.hex files that are compiled by Makecode
Routine project file:https://github.com/Wind-stormger/Makecode/blob/master/microbit-display-graphics.hex
Note:The correct way to import *.hex file is to download the.hex file from the link above and then import it into the MakeCode, rather than directly importing the link. External project links import the MakeCode differently
The project file can be imported into Makecode to view and edit after downloading to local, or it can be directly burned into Micro:Bit through USB and run directly
Micro:bit's Button control - Base
Learning Objectives: Use the two buttons A/B on Micro:Bit to control the graphics to be output by the LED matrix
On the basis of the section "Using Makecode Programming to Light Micro:Bit", find the building block "On Button A Pressed" in the "Input" option column of Makecode to program
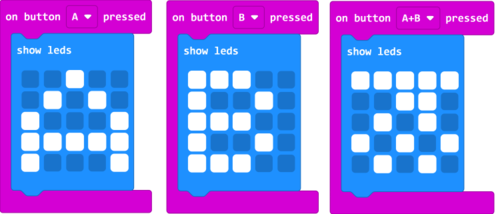
The routine is shown in the figure below. Press the A button to display the English character "A", press the B button to display the English character "B", and press the AB button to display A pattern shaped like A banana
Routine project file:https://github.com/Wind-stormger/Makecode/blob/master/microbit-Using_the_button_1.hex
The project file can be imported into Makecode to view and edit after downloading to local, or it can be directly burned into Micro:Bit through USB and run directly
Micro:bit's Button control -advanced
Learning objectives: Makecode programming to achieve a count and display button control procedures
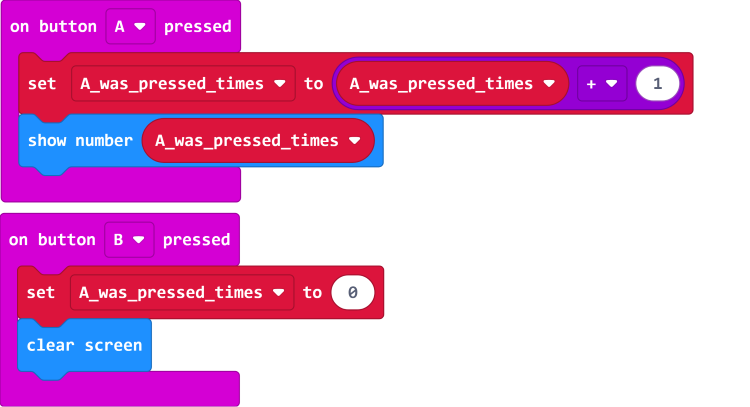
Building on the previous section, create a new variable called "A_was_pressed_times" in the "Variables" section of the Makecode. This will generate multiple building blocks for the variable in the "Variables" section
Combine the addition blocks in the "Math" TAB and the Mosaic blocks in the "Variables" TAB. Refer to the following legend
At this point, we realized in the Makecode programming and made A use of the addition counting program, press A button A count to add 1 at the same time the counting value output to the LED matrix, press A button B count to return to 0 and clear the LED matrix display
Routine project file:https://github.com/Wind-stormger/Makecode/blob/master/microbit-Using_the_button_2.hex
The project file can be imported into Makecode to view and edit after downloading to local, or it can be directly burned into Micro:Bit through USB and run directly
The wheel speed measurement
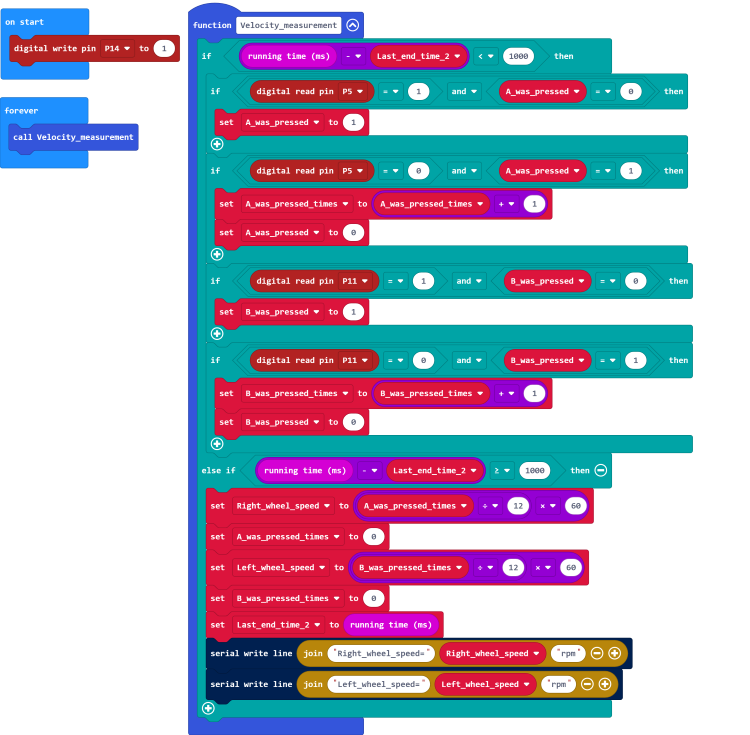
Learning Objectives: Using Makecode programming to read the high and low level signals of the infrared pair tube used for wheel speed measurement on BPI-QCAR and calculate the wheel speed with counting method
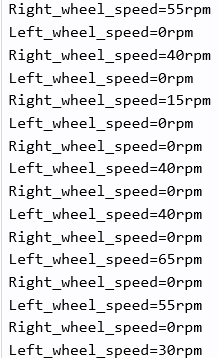
The routine is as shown in the figure below. The program is burned into Micro:bit, and the Micro:bit is connected to BPI-QCar. At this time, the left and right wheels of Q-CAR can be read from the USB serial port to the left and right wheel speed
Routine project file:https://github.com/Wind-stormger/Makecode/blob/master/microbit-Q-Car_velocity_measurement_module.hex
The project file can be imported into Makecode to view and edit after downloading to local, or it can be directly burned into Micro:Bit through USB and run directly
Motor control
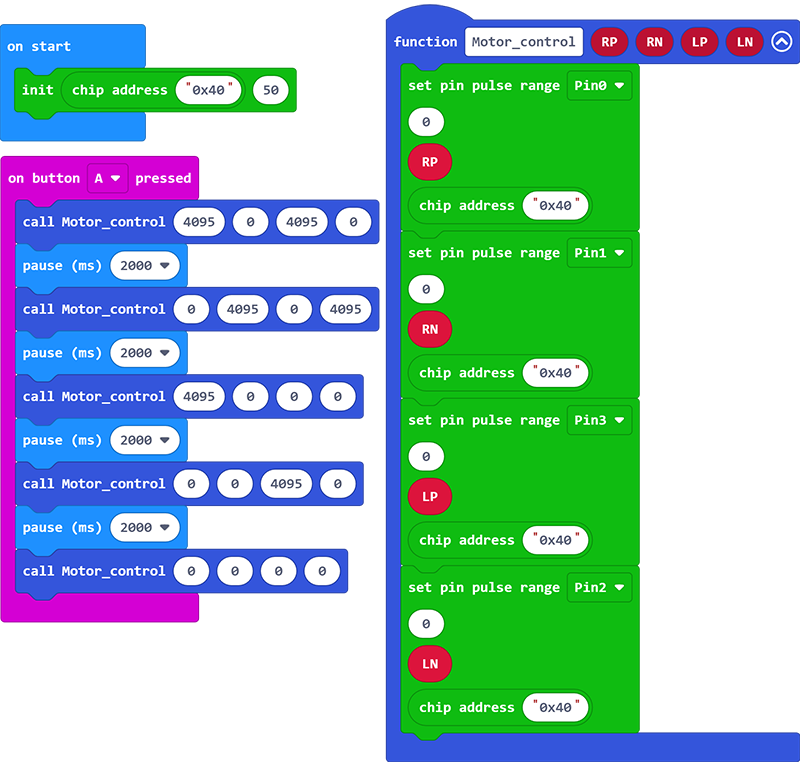
Learning Objectives: Using Makecode programming to achieve QCar left and right motor forward and reverse control
Routines as shown in the figure below, the program is burned into the Micro: BIT, the Micro: BIT and Q-CAR connection. Press the a button onceleft ,and right motor will be turned to 2s at the same time, reverse 2s at the same time, right motor is turned to 2s alone, left motor is turned to 2s alone,two motors stop.
Routine project file:https://github.com/Wind-stormger/Makecode/blob/master/microbit-Q-Car_Motor_control_module.hex
The project file can be imported into Makecode to view and edit after downloading to local, or it can be directly burned into Micro:Bit through USB and run directly
Ambient light control
Learning Objectives: Use Makecode programming to control 10 WS2812B color atmosphere lamps on BPI-QCar
The routine is as shown in the figure below. The program is burned into the Micro: BIT, and the Micro: BIT is connected to the Q-CAR. The 10 WS2812B lights on the Q-CAR will simultaneously cycle the rainbow light effect with 1800ms
Routine project file:https://github.com/Wind-stormger/Makecode/blob/master/microbit-Q-Car_Pixel.hex
The project file can be imported into Makecode to view and edit after downloading to local, or it can be directly burned into Micro:Bit through USB and run directly
Ultrasonic sensor control
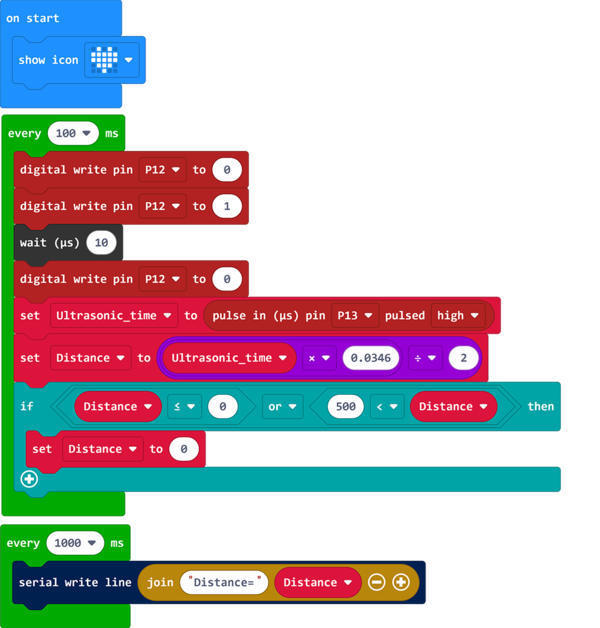
Learning Objectives: Using Makecode programming to control the HC-SR04 ultrasonic extension module on BPI-QCar
Routine as shown below, burn the program into Micro:BIT, connect Micro:BIT with BPI-QCar, connect HC-SR04 ultrasonic extension module with BPI-QCar, connect 5V power supply with BPI-QCar
The distance detected by the ultrasonic sensor and the temperature sensor data on the Micro:Bit can be read from the USB serial port of the Micro:Bit. The temperature calibration of the ultrasonic sensor is realized by the routine
Distance=85.815|Temperature=21
Routine project file:https://github.com/Wind-stormger/Makecode/blob/master/microbit-Q-car_Ultrasonic_ranging.hex
The project file can be imported into Makecode to view and edit after downloading to local, or it can be directly burned into Micro:Bit through USB and run directly
Use the buzzer
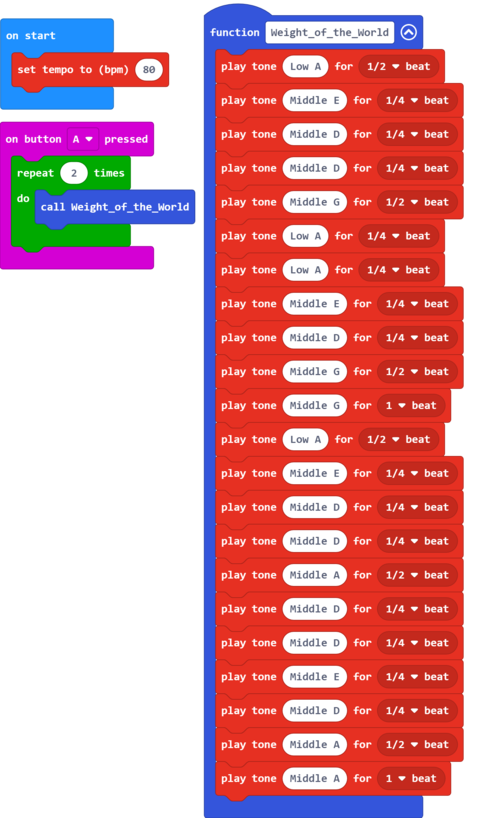
Learning Objectives: Write a piece of music with Makecode and play it on the BPI-QCar buzzer
The routine is shown in the figure below. Burn the program into Micro:Bit, connect Micro:Bit to BPI-QCar,press the a button once,and the buzzer on BPI-QCar will play the song twice in a cycle
Routine project file:https://github.com/Wind-stormger/Makecode/blob/master/microbit-Q-car_Music_Arrangement.hex
The project file can be imported into Makecode to view and edit after downloading to local, or it can be directly burned into Micro:Bit through USB and run directly
Line patrol
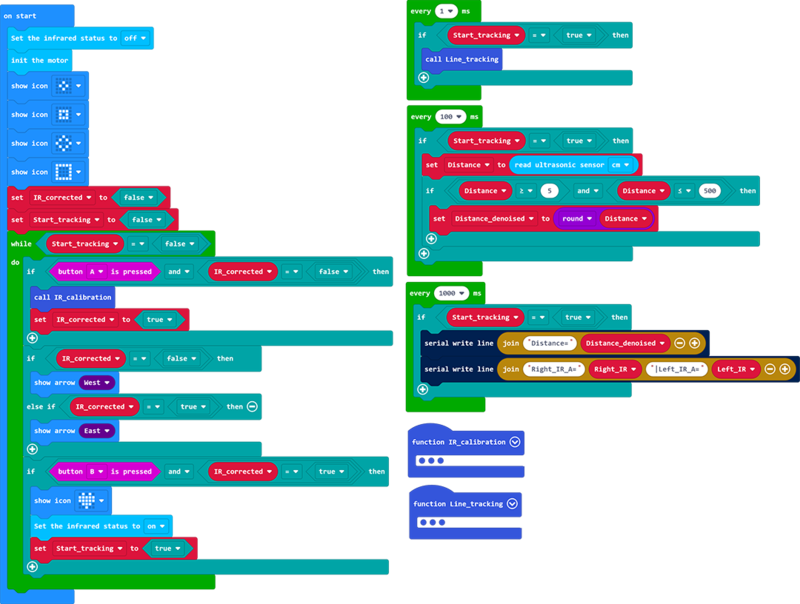
Learning Objectives: using makecode programming to realize BPI-QCar line patrol driving, line patrol infrared tube analog value calibration, ultrasonic ranging and parking in case of obstacles
Routine as shown in the figure below, the program burned into the Micro:Bit , will Micro:Bit Connect with BPI-QCar and turn on the power switch,
When the LED matrix displays the right arrow, place the two infrared tubes of Q-car above the white road around the line.
Press button a and wait until the calibration procedure is completed. The LED matrix will display the left arrow. At this time, make the front of Q-car face the line travel direction.
Press button B and Q-car will start line patrol driving. During driving, if the ultrasonic ranging module detects an object with a distance of less than or equal to 10cm in front, Q-car will stop.
Routine project file:https://github.com/Wind-stormger/Makecode/blob/master/microbit-Q-car_Line_tracking.hex
The project file can be imported into Makecode to view and edit after downloading to local, or it can be directly burned into Micro:Bit through USB and run directly
