Difference between pages "How to use Arduino" and "BPI:bit for Arduino"
(→Platform IO) |
(→How to use with Platform IO) |
||
| Line 1: | Line 1: | ||
| − | ==Arduino == | + | [[File:Webduino_gif.gif|thumb|Overview: [[BPI-Bit]]]] |
| + | [[File:ESP32_6.JPG|thumb|[[BPI-UNO32]] with ESP32 design]] | ||
| + | [[File:BPi_bit_webduino_3.jpg|thumb|Overview: BPI:bit for Webduino]] | ||
| + | [[File:BPI_bit_acrylic_shell_1_.JPG|thumb|[[BPI-bit acrylic shell compatible LEGO bricks]]]] | ||
| + | [[File:Bpi_bit_gpio_expansion_board_2.JPG|thumb|[[BPI:bit gpio expansion board]]]] | ||
| + | [[File:BPIbit_breadboard_GPIO_expansion_board_3.jpg|thumb|[[BPI:bit gpio expansion board]]]] | ||
| + | [[File:BPI-bit_robort_board_3.JPG|thumb|[[BPI:bit robot expansion board]]]] | ||
| + | |||
| + | =About BPI:bit= | ||
| + | This product adopts esp-wroom-32 module as the core for design, and supports wi-fi, bluetooth, BLE and other wireless communication modes. | ||
| + | |||
| + | The '''BPI bit''' (also referred to as '''BPI-bit''', stylised as '''bpi:bit''') is an ESP32 with 32-bit Xtensa LX6 dual-core processor based embedded system. It supports Webduino, Arduino, MicroPython as well as Scratch X programming environments. | ||
| + | |||
| + | [[File:A_BPI-Bit.jpg]] | ||
| + | |||
| + | More about Banana Pi BPI:bit,please see :[[BPI-Bit]] | ||
| + | |||
| + | =BPI:bit for Arduino-IDE= | ||
| + | |||
| + | ==BPI:bit for Arduino IDE source code== | ||
| + | *BPI:bit for Arduino IDE source code : https://github.com/BPI-STEAM/BPI-BIT-Arduino-IDE | ||
| + | |||
| + | ==Wired connection board== | ||
| + | |||
| + | Connect the boards to your computer via the MicroUSB wire, it is same as BPI:bit with microPython. | ||
| + | |||
| + | please see this documents:[[2 Wired connection board]] | ||
| + | |||
| + | ==Development extension package== | ||
| + | |||
| + | [https://github.com/espressif/arduino-esp32/archive/master.zip Arduino-esp32 developer kit], click the previous link to get the developer kit | ||
| + | |||
| + | From arduino-esp32, an open source project of [https://github.com/espressif/arduino-esp32 github (espressif)], it is recommended to use [https://desktop.github.com/ github DeskTop tool] to update the suite at any time. | ||
| + | |||
| + | =How to install Arduino IDE= | ||
| + | ==Windows installation instructions== | ||
| + | *Download and install the latest version of the Arduino IDE, '''Windows Installer''' from [https://www.arduino.cc/en/Main/Software arduino.cc] | ||
| + | |||
| + | *Download the arduino development extension package from the [https://github.com/espressif/arduino-esp32 espressif/arduino-esp32] open source project | ||
| + | ::[[File:Win-1.png]] | ||
| + | |||
| + | *Unzip the Arduino expansion package: [ARDUINO_SKETCHBOOK_DIR]/hardware/espressif/esp32 | ||
| + | ::ARDUINO_SKETCHBOOK_DIR:generally is C:/Users/[YOUR_USER_NAME]/Documents/Arduino listed below the "Sketchbook location" in the Arduino preference | ||
| + | ::[[File:Win-2.png]] | ||
| + | |||
| + | *In turn open directory [ARDUINO_SKETCHBOOK_DIR]/hardware/espressif/esp32 /tools, and double-click the get operation. Exe | ||
| + | ::[[File:Win-3.png]] | ||
| + | |||
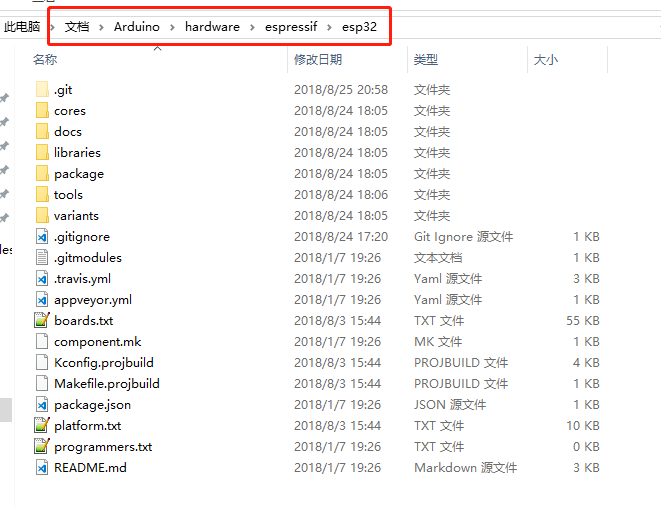
| + | *When get.exe runs out, you should see the following files in the directory | ||
| + | ::[[File:Win-4.png]] | ||
| + | |||
| + | *Insert the BPI:bit board and wait for the driver to install (or manually install) [http://www.wch.cn/downloads/file/5.html Serial CH341] | ||
| + | |||
| + | *Run the Arduino IDE | ||
| + | |||
| + | *Select your version (bpi-bit) Tools>Board menu | ||
| + | ::[[File:Win-5.png]] | ||
| + | |||
| + | *Select the COM port to which the BIT board is connected, such as COMx | ||
| + | |||
| + | *Compile and upload your engineering code (BIT board design has automatic recording circuit, just click to upload) | ||
| + | ::[[File:Win-6.png]] | ||
| + | |||
| + | ==Debian/Ubuntu Linux OS installation instructions== | ||
| + | |||
| + | *Get and install the latest version of the arduino IDE from the [https://www.arduino.cc/en/Main/Software arduino.cc] website | ||
| + | |||
| + | *Open the terminal and execute the following command (copy-> paste and click enter): | ||
| + | |||
| + | sudo usermod -a -G dialout $USER && \ | ||
| + | sudo apt-get install git && \ | ||
| + | wget https://bootstrap.pypa.io/get-pip.py && \ | ||
| + | sudo python get-pip.py && \ | ||
| + | sudo pip install pyserial && \ | ||
| + | mkdir -p ~/Arduino/hardware/espressif && \ | ||
| + | cd ~/Arduino/hardware/espressif && \ | ||
| + | git clone https://github.com/espressif/arduino-esp32.git esp32 && \ | ||
| + | cd esp32 && \ | ||
| + | git submodule update --init --recursive && \ | ||
| + | cd tools && \ | ||
| + | python2 get.py | ||
| + | |||
| + | *Restart the Arduino IDE | ||
| + | |||
| + | *If you have installed arduino to ~/directory, please execute the following code. If not, please start from mkdir-p ~/ arduino /hardware: | ||
| + | |||
| + | cd ~/Arduino/hardware | ||
| + | mkdir -p espressif && \ | ||
| + | cd espressif && \ | ||
| + | git clone https://github.com/espressif/arduino-esp32.git esp32 && \ | ||
| + | cd esp32 && \ | ||
| + | git submodule update --init --recursive && \ | ||
| + | cd tools && \ | ||
| + | python2 get.py | ||
| + | |||
| + | ==Mac OS install arduino IDE== | ||
| + | *Get and install the latest version of the arduino IDE from the [https://www.arduino.cc/en/Main/Software arduino.cc] website | ||
| + | *Open the terminal and execute the following command (copy-> paste and click enter): | ||
| + | |||
| + | sudo usermod -a -G dialout $USER && \ | ||
| + | sudo apt-get install git && \ | ||
| + | wget https://bootstrap.pypa.io/get-pip.py && \ | ||
| + | sudo python get-pip.py && \ | ||
| + | sudo pip install pyserial && \ | ||
| + | mkdir -p ~/Arduino/hardware/espressif && \ | ||
| + | cd ~/Arduino/hardware/espressif && \ | ||
| + | git clone https://github.com/espressif/arduino-esp32.git esp32 && \ | ||
| + | cd esp32 && \ | ||
| + | git submodule update --init --recursive && \ | ||
| + | cd tools && \ | ||
| + | python2 get.py | ||
| + | |||
| + | ::The ~/Documents/Arduino directory should be consistent with the "Arduino" > "preference" > "Sketchbook location" (after the software starts). You may need to change the above command if you need to! | ||
| + | |||
| + | ::If you receive the following error. Use xcode-select --install to install the command-line development tool and try the above command again: | ||
| + | |||
| + | xcrun: error: invalid active developer path (/Library/Developer/CommandLineTools), missing xcrun at: /Library/Developer/CommandLineTools/usr/bin/xcrun | ||
| + | xcode-select --install | ||
| + | |||
| + | If you receive an error message: IOError: [Errno socket error] [SSL: TLSV1_ALERT_PROTOCOL_VERSION] tlsv1 alert protocol version (_ssl.c:590) while running python get.py, you can try using python3 instead of python | ||
| + | |||
| + | *Restart the Arduino IDE | ||
| + | |||
| + | =How to development with BPI:bit= | ||
{| class = "wikitable" | {| class = "wikitable" | ||
| Line 43: | Line 166: | ||
|SDA ||IO21 | |SDA ||IO21 | ||
|} | |} | ||
| + | ==How to use with Arduino IDE== | ||
| + | |||
| + | |||
| + | |||
| + | ===Source code on github=== | ||
| + | |||
| + | *Source code on github: https://github.com/BPI-STEAM/BPI-BIT-Arduino-IDE | ||
| + | |||
| + | * 1. [[How to use with Arduino IDE]] | ||
| + | |||
| + | ==Lighting the RGB LED== | ||
| + | * 2. [[Lighting the RGB LED]] | ||
| + | |||
| + | =How to use with Platform IO= | ||
| − | == | + | ==Install Platform IO== |
| + | [[How to install Platform IO]] | ||
| + | ==Source code at github== | ||
| + | * Source code on github : https://github.com/BPI-STEAM/BPI-BIT-PlatformIO | ||
| + | ==Text Editor== | ||
| − | + | We need to prepare a text editor in advance (VSCode or Atom) | |
| + | *[https://code.visualstudio.com/ Visual Studio Code(VSCode)] | ||
| + | *[https://atom.io/ Atom] | ||
| + | ==Add Espressif 32 Development Kit== | ||
| − | + | [https://github.com/BPI-STEAM/BPI-BIT-PlatformIO/blob/master/docs/ESP32-PIO-Development-Kit.md Espressif 32 for Atom/VSCode] | |
| − | * | + | =Documents= |
| + | *BPI-Bit PlatformIO 4.0.0a3 documentation :https://docs.platformio.org/en/latest/boards/espressif32/bpi-bit.html# | ||
| + | *[[How to use with Platform IO]] | ||
| + | *BPI:bit arduino basic development tutorials(chinese version) : http://forum.banana-pi.org/t/bpi-bit-arduino-basic-development-tutorials-chinese-version/7299 | ||
| + | *Bpi:bit + Arduino IDE, shared by JavierPiay :http://forum.banana-pi.org/t/bpi-bit-arduino-ide/7244 | ||
Revision as of 02:23, 10 July 2019


Contents
About BPI:bit
This product adopts esp-wroom-32 module as the core for design, and supports wi-fi, bluetooth, BLE and other wireless communication modes.
The BPI bit (also referred to as BPI-bit, stylised as bpi:bit) is an ESP32 with 32-bit Xtensa LX6 dual-core processor based embedded system. It supports Webduino, Arduino, MicroPython as well as Scratch X programming environments.

More about Banana Pi BPI:bit,please see :BPI-Bit
BPI:bit for Arduino-IDE
BPI:bit for Arduino IDE source code
- BPI:bit for Arduino IDE source code : https://github.com/BPI-STEAM/BPI-BIT-Arduino-IDE
Wired connection board
Connect the boards to your computer via the MicroUSB wire, it is same as BPI:bit with microPython.
please see this documents:2 Wired connection board
Development extension package
Arduino-esp32 developer kit, click the previous link to get the developer kit
From arduino-esp32, an open source project of github (espressif), it is recommended to use github DeskTop tool to update the suite at any time.
How to install Arduino IDE
Windows installation instructions
- Download and install the latest version of the Arduino IDE, Windows Installer from arduino.cc
- Download the arduino development extension package from the espressif/arduino-esp32 open source project

- Unzip the Arduino expansion package: [ARDUINO_SKETCHBOOK_DIR]/hardware/espressif/esp32
- ARDUINO_SKETCHBOOK_DIR:generally is C:/Users/[YOUR_USER_NAME]/Documents/Arduino listed below the "Sketchbook location" in the Arduino preference

- In turn open directory [ARDUINO_SKETCHBOOK_DIR]/hardware/espressif/esp32 /tools, and double-click the get operation. Exe

- When get.exe runs out, you should see the following files in the directory

- Insert the BPI:bit board and wait for the driver to install (or manually install) Serial CH341
- Run the Arduino IDE
- Select your version (bpi-bit) Tools>Board menu

- Select the COM port to which the BIT board is connected, such as COMx
- Compile and upload your engineering code (BIT board design has automatic recording circuit, just click to upload)

Debian/Ubuntu Linux OS installation instructions
- Get and install the latest version of the arduino IDE from the arduino.cc website
- Open the terminal and execute the following command (copy-> paste and click enter):
sudo usermod -a -G dialout $USER && \
sudo apt-get install git && \
wget https://bootstrap.pypa.io/get-pip.py && \
sudo python get-pip.py && \
sudo pip install pyserial && \
mkdir -p ~/Arduino/hardware/espressif && \
cd ~/Arduino/hardware/espressif && \
git clone https://github.com/espressif/arduino-esp32.git esp32 && \
cd esp32 && \
git submodule update --init --recursive && \
cd tools && \
python2 get.py
- Restart the Arduino IDE
- If you have installed arduino to ~/directory, please execute the following code. If not, please start from mkdir-p ~/ arduino /hardware:
cd ~/Arduino/hardware
mkdir -p espressif && \
cd espressif && \
git clone https://github.com/espressif/arduino-esp32.git esp32 && \
cd esp32 && \
git submodule update --init --recursive && \
cd tools && \
python2 get.py
Mac OS install arduino IDE
- Get and install the latest version of the arduino IDE from the arduino.cc website
- Open the terminal and execute the following command (copy-> paste and click enter):
sudo usermod -a -G dialout $USER && \
sudo apt-get install git && \
wget https://bootstrap.pypa.io/get-pip.py && \
sudo python get-pip.py && \
sudo pip install pyserial && \
mkdir -p ~/Arduino/hardware/espressif && \
cd ~/Arduino/hardware/espressif && \
git clone https://github.com/espressif/arduino-esp32.git esp32 && \
cd esp32 && \
git submodule update --init --recursive && \
cd tools && \
python2 get.py
- The ~/Documents/Arduino directory should be consistent with the "Arduino" > "preference" > "Sketchbook location" (after the software starts). You may need to change the above command if you need to!
- If you receive the following error. Use xcode-select --install to install the command-line development tool and try the above command again:
xcrun: error: invalid active developer path (/Library/Developer/CommandLineTools), missing xcrun at: /Library/Developer/CommandLineTools/usr/bin/xcrun
xcode-select --install
If you receive an error message: IOError: [Errno socket error] [SSL: TLSV1_ALERT_PROTOCOL_VERSION] tlsv1 alert protocol version (_ssl.c:590) while running python get.py, you can try using python3 instead of python
- Restart the Arduino IDE
How to development with BPI:bit
| Arduino IDE Programing Function Define | |||
| Function | IO | ||
|---|---|---|---|
| RGB_LED | IO4 | ||
| RGB_LED_POWER | IO2 | ||
| BUZZER | IO25 | ||
| BOTTON_A | IO35 | ||
| BOTTON_B | IO27 | ||
| LIGHT_SENSOR1(upper left) | IO36 | ||
| LIGHT_SENSOR2(upper right) | IO39 | ||
| TEMPERTURE_SENSOR | IO34 | ||
| MPU9250_AD0 | IO0 | ||
| Communication Protocol | |||
| SPI | |||
| MISO | IO19 | ||
| MOSI | IO23 | ||
| SCK | IO23 | ||
| SS | IO5 | ||
| I2C | |||
| SCL | IO22 | ||
| SDA | IO21 | ||
How to use with Arduino IDE
Source code on github
- Source code on github: https://github.com/BPI-STEAM/BPI-BIT-Arduino-IDE
Lighting the RGB LED
How to use with Platform IO
Install Platform IO
Source code at github
- Source code on github : https://github.com/BPI-STEAM/BPI-BIT-PlatformIO
Text Editor
We need to prepare a text editor in advance (VSCode or Atom)
Add Espressif 32 Development Kit
Documents
- BPI-Bit PlatformIO 4.0.0a3 documentation :https://docs.platformio.org/en/latest/boards/espressif32/bpi-bit.html#
- How to use with Platform IO
- BPI:bit arduino basic development tutorials(chinese version) : http://forum.banana-pi.org/t/bpi-bit-arduino-basic-development-tutorials-chinese-version/7299
- Bpi:bit + Arduino IDE, shared by JavierPiay :http://forum.banana-pi.org/t/bpi-bit-arduino-ide/7244