Lighting the RGB LED: Difference between revisions
Jump to navigation
Jump to search
legacy>Hulkwang |
legacy>Jh |
||
| (4 intermediate revisions by 2 users not shown) | |||
| Line 4: | Line 4: | ||
# Install library from github: | # Install library from github: | ||
* Librarys:[[https://github.com/ | * Librarys:[[https://github.com/Makuna/NeoPixelBus NeoPixel_Bus]] from Makuna | ||
* Download libraries and put it in the libraries folder in the installation directory of the Arduino IDE | * Download libraries and put it in the libraries folder in the installation directory of the Arduino IDE | ||
| Line 12: | Line 12: | ||
# Install Library by Manage Libraries: | # Install Library by Manage Libraries: | ||
[[File:LightingLED-4.png]] | [[File:LightingLED-4.png]] | ||
[[File:LightingLED- | [[File:LightingLED-6.png]] | ||
=== Programe Code=== | === Programe Code=== | ||
* Open Arduino IDE | * Open Arduino IDE | ||
click 'file'->'Example'->' | click 'file'->'Example'->'NeoPixel Bus'->'simple' to open the example | ||
[[File:LightingLED-7.png]] | |||
* We need to change some code,Find the code below in the code | |||
const uint16_t PixelCount = 4; // this example assumes 4 pixels, making it smaller will cause a failure | |||
const uint8_t PixelPin = 2; // make sure to set this to the correct pin, ignored for Esp8266 | |||
* change to | |||
const uint16_t PixelCount = 25; // this example assumes 4 pixels, making it smaller will cause a failure | |||
const uint8_t PixelPin = 4; // make sure to set this to the correct pin, ignored for Esp8266 | |||
Then add the following code to void setup() | * Then add the following code to void setup() | ||
#define LED_POWER 2 | |||
pinMode(LED_POWER, OUTPUT); | |||
digitalWrite(LED_POWER, HIGH); | |||
Compile this program | * Compile this program | ||
[[File:LightingLED-3.png]] | [[File:LightingLED-3.png]] | ||
And download it(Set the serial port and board) | And download it(Set the serial port and board) | ||
Latest revision as of 14:49, 1 October 2018
How to lighting the RGB LED
Install Library
- Install library from github:
- Librarys:[NeoPixel_Bus] from Makuna
- Download libraries and put it in the libraries folder in the installation directory of the Arduino IDE
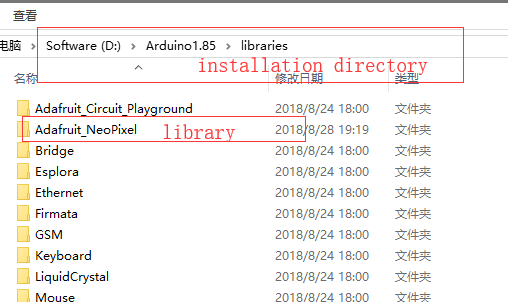

- Install Library by Manage Libraries:


Programe Code
- Open Arduino IDE
click 'file'->'Example'->'NeoPixel Bus'->'simple' to open the example

- We need to change some code,Find the code below in the code
 const uint16_t PixelCount = 4; // this example assumes 4 pixels, making it smaller will cause a failure
 const uint8_t PixelPin = 2;  // make sure to set this to the correct pin, ignored for Esp8266
- change to
 const uint16_t PixelCount = 25; // this example assumes 4 pixels, making it smaller will cause a failure
 const uint8_t PixelPin = 4;  // make sure to set this to the correct pin, ignored for Esp8266
- Then add the following code to void setup()
 #define LED_POWER      2
 pinMode(LED_POWER, OUTPUT);
 digitalWrite(LED_POWER, HIGH);
- Compile this program

And download it(Set the serial port and board)