Difference between revisions of "Getting Started with M2P"
JackZengWiki (talk | contribs) (→GPIO) |
JackZengWiki (talk | contribs) (→GPIO) |
||
| Line 38: | Line 38: | ||
==Advanced Development== | ==Advanced Development== | ||
| − | |||
| − | |||
| − | |||
| − | |||
| − | |||
| − | |||
| − | |||
| − | |||
| − | |||
| − | |||
| − | |||
| − | |||
| − | |||
| − | |||
| − | |||
===Bluetooth=== | ===Bluetooth=== | ||
* Use bluetoothctl tool to operate BT | * Use bluetoothctl tool to operate BT | ||
Revision as of 17:11, 16 May 2018
Contents
Introduction
Banana Pi M2+ is mini size development board that offers great computing performance in an ultra portable form factor.It is a 65mm*65mm fantastic mini size board with Allwinner H series chips. It comes with different versions but share the same interfaces.
Read more: Banana Pi BPI-M2+
BPI-M2+ H3
Key Features
- Quad-core 1.2GHz Cortex-A7 H3
- 1GB DDR3
- 8GB eMMC onboard
- WiFi and BlueTooth onboard
- 10/100/1000Mbps Ethernet Port
Development
Let's get start to develop on BPI-M2P, see amazing things happen.
Basic Development
Prepare to develop
1.Prepare 8G/above TF card, USB-Serial interface, PC with Ubuntu System
2.Using your USB-Serial Connect debug console on M2P
Load your first image on M2P
 1.You could download latest image from our forum
 * Here is the example image link: https://pan.baidu.com/s/1Jf-AZF6a4jZugqqx2QXH3Q
 2.Install bpi-tools on your Ubuntu
 * apt-get install pv
 * curl -sL https://github.com/BPI-SINOVOIP/bpi-tools/raw/master/bpi-tools | sudo -E bash
 3.After you download the image, insert your TF card into your Ubuntu
 * Execute "bpi-copy xxx.img /dev/sdx" to install image on your TF card.
4.After step 3, then you can insert your TF card into M2P, and press power button setup M2P.
Build your own image on M2P
Advanced Development
Bluetooth
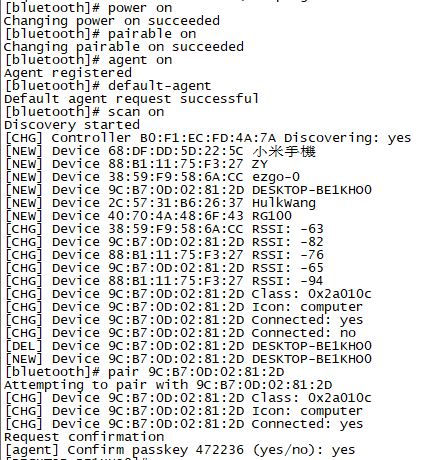
- Use bluetoothctl tool to operate BT
- Execute "bluetoothctl"
- If you don't know how to use bluetoothctl, type help, you will see more commands
- Execute these commands:
Error creating thumbnail: Unable to save thumbnail to destination
WiFi and Ap mode on M2P
WiFi Client
AP mode
Clear boot
- git clone https://github.com/BPI-SINOVOIP/BPI-files/tree/master/SD/100MB
- bpi-bootsel BPI-cleanboot-8k.img.gz /dev/sdX
Camara function
We use HDF5640 camara.
Error creating thumbnail: Unable to save thumbnail to destination
Guvcview
- Use your UI interface to operate camara
- Applications -> Sound & Video -> guvcview
Error creating thumbnail: Unable to save thumbnail to destination
- We also have built-in command in /usr/local/bin to test camara
- test_ov5640_image_mode.sh
- cameratest.sh
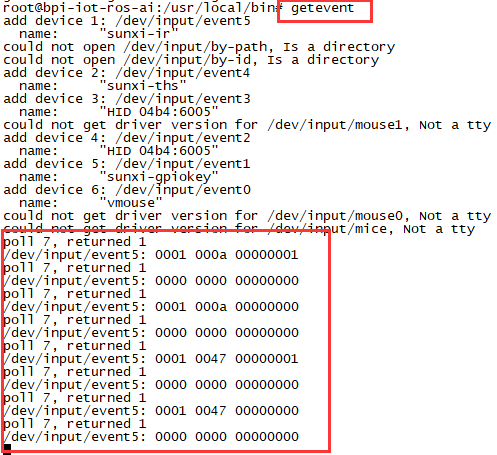
IR function
- Execute getevent
- Use your IR device to send information to M2P
WringPi
- GitHub: https://github.com/BPI-SINOVOIP/BPI-WiringPi2.git
- We also have built-in test command in /usr/local/bin
RGB 1602 LCD
- Execute bpi_test_lcd1602
Error creating thumbnail: Unable to save thumbnail to destination
0.96 Inch OLED Display
- Execute bpi_test_52pi
Error creating thumbnail: Unable to save thumbnail to destination
8x8 RGB LED Martix
- Firstly you need a GPIO Extend Board for 8x8 LED Martix
Error creating thumbnail: Unable to save thumbnail to destination
- Execute bpi_test_gpio40
Error creating thumbnail: Unable to save thumbnail to destination

